
A damp garage floor is frustrating whether you use the space for storage or want to turn it into a room. Moisture makes the floor cold, slippery and totally unsuitable for living areas.
In this guide we explain step by step how to damp proof a garage floor, helping you create a dry, usable space for storage or a full conversion into a comfortable living area.
Why Do Garage Floors Get Damp?
Unlike internal rooms, garage floors are rarely built to the same standard as those in living spaces. Most were laid without a full damp proofing system, as garages were never intended to be habitable areas.
This means that when converting a garage into a living space or using it for dry storage, you may need to tackle damp problems caused by the original construction. The main issues usually include:
- Damp concrete floors – Many older garages lack a damp proof membrane (a plastic sheet under the slab that stops moisture rising). Newer homes may include one, but it’s worth checking with a damp test meter, available in most DIY stores.
- Damp proof course set too high – In many garages, the damp proof course (DPC) sits above floor level, leaving exposed brickwork or blockwork that will almost always stay damp. A common fix is to inject a new silicone injection cream DPC, then apply a tanking slurry to seal the lower walls.
- Adjoining walls without cavity trays – If the wall between your house and garage has no cavity tray or weep holes, it can remain slightly damp. The best long-term solution is to fit an air gap membrane, which allows the wall to breathe and provides a dry surface for plastering or boarding.
How to Investigate Damp in Your Garage Floor
Before you can fix a damp garage floor, it’s important to understand where the problem is coming from. Damp can creep up through the concrete itself, enter through the walls or even form as condensation on a cold surface. A careful investigation will help you choose the right damp proofing method and avoid wasting money on the wrong fix.
Start with a simple visual check. Look for dark patches, salt deposits (white, powdery marks known as efflorescence) or peeling paint. These are common signs that moisture is moving through the floor slab. If the problem only appears after heavy rain, the issue may be water ingress from outside rather than rising damp.
For a clearer picture, use a damp meter, available from most DIY stores. Press the probes against the concrete in different areas of the floor. High readings across the whole surface usually point to a missing or damaged damp proof membrane. If readings are only high near walls, the problem may be linked to a faulty damp proof course or poor drainage outside the garage.
It’s also worth checking the surrounding ground level. If soil or paving is higher than the floor inside the garage, rainwater can sit against the walls and gradually soak through. In this case, improving drainage or lowering the external ground level may be part of the solution.
A Simple Test for Garage Floor Damp
Choose a clean area of your garage floor and brush away all dust and debris so the surface is clear.
Cut a small square of plastic sheeting, about 100mm x 100mm, and seal it tightly to the floor with plastic tape on all four edges. Leave it in place overnight.
If you see condensation or damp patches under the plastic the next day, it confirms that moisture is rising through the floor and the slab is damp.
Different Methods of Sealing a Damp Concrete Floor
If your garage floor is damp, sealing it properly is essential before converting it into a living space or even using it for dry storage. The right method depends on the severity of the problem and how you intend to use the space. Below are the most common and effective approaches.
Liquid DPM (Damp Proof Membrane) – A liquid DPM is painted or rolled directly onto the surface of the concrete. Once cured, it forms a waterproof barrier that stops moisture rising up through the floor. It’s a quick and cost-effective solution for light to moderate damp.
Epoxy Coatings – Epoxy floor sealers provide a tough, long-lasting surface that not only blocks damp but also gives a smooth, easy-to-clean finish. These are ideal if you want a hard-wearing floor in a garage conversion or workshop.
Tanking Slurry – For more severe damp, a tanking slurry can be applied to the floor and lower walls. This forms a dense, waterproof layer that prevents water ingress even under pressure, making it a good choice for garages that sit below ground level or in exposed areas.
Sheet Membranes – A physical plastic sheet can be laid over the entire concrete floor before adding insulation or a screed. This method is often used in full garage conversions where new flooring is planned, as it provides a reliable long-term barrier against damp.
Whichever method you choose, it’s absolutely essential that you prepare the surface properly by cleaning and repairing cracks before applying any product. Taking time to seal the floor correctly will help create a dry, durable base for your garage conversion.
How to Identify the Cause of a Damp Garage Floor
Before you can fix a damp garage floor, it’s important to understand where the moisture is coming from. Damp can appear for several reasons, and identifying the source will help you choose the right solution.
Rising damp – If your garage floor was built without a damp proof membrane or if the existing one has failed, moisture can travel up from the ground into the concrete. This is very common in older garages.
Surface water – Check outside the garage after heavy rain. Poor drainage, leaking gutters or a sloping driveway can all direct water towards the floor, leading to patches of damp inside.
Condensation – Cold concrete floors can attract condensation, especially if the garage is poorly ventilated. This type of damp often shows up as a thin layer of water on the surface rather than patches soaking through.
Structural cracks – Look for small cracks or joints in the floor. These can act as entry points for moisture, especially if the garage is on a sloping site or exposed to groundwater pressure.
Once you have checked for these potential causes, you should then be able to confirm the likely source of your water/moisture ingress and once you know this you can then select the most suitable method to cure the issue once and for all.
Preparing a Damp Floor for Sealing
Before sealing a damp garage floor, preparation is essential. A well-prepared surface ensures that sealants, membranes or coatings bond properly and keep moisture out for the long term.
Clear the area – Remove all items from the garage and sweep away any loose dust, dirt or debris.
Even the slightest bit of grit left behind can stop the sealant from adhering to the concrete.
Check for cracks and holes – Inspect the floor carefully. Fill absolutely any gaps, no matter how slight with a strong repair mortar and allow it to cure fully.
If cracks are left untreated, water can continue to find its way in beneath the seal.
Clean thoroughly – Use a stiff brush and a concrete cleaner or mild detergent to scrub the floor. Rinse with clean water and leave to dry.
For stubborn oil or grease stains, a degreasing product may be needed, as these can prevent the sealant from sticking.
Test for moisture – Carry out a simple plastic sheet test overnight (we mention this technique above and describe how it’s done).
If condensation appears, the floor is still damp and needs to be treated with a damp proofing solution before sealing.
Ensure proper ventilation – Keep windows or doors open while preparing and during sealing.
This helps the floor dry faster and reduces the risk of condensation forming as the new surface cures.
An Important Note on the Wall to Floor Joint
The joint where your garage floor meets the wall is one of the most common entry points for moisture. If left untreated, this gap can let damp seep inside and cause long-term problems.
To stop this, the joint should be opened up, cleaned, and sealed with a waterproof filler. This creates a solid barrier between the wall and floor, blocking future moisture.
To do this, you can cut the joint using an angle grinder with a stone blade, but always wear safety goggles and a dust mask, and keep the garage door open for ventilation. Aim to cut about 25mm deep, then use a cold chisel and lump hammer to remove the concrete and smooth the base of the channel. The smoother the trench, the better the seal will hold.
If you don’t have a grinder, you can also use a hammer and bolster chisel, however this takes way more effort but achieves the same result in the long run, once all sealed up correctly.
How to Seal a Damp Concrete Floor
If your garage floor shows signs of damp after testing, it must be sealed before converting the space. This applies whether you plan to use the garage as a living area, workshop, or simply for dry storage.
In an unheated garage, moisture usually evaporates harmlessly thanks to natural ventilation. But once the room is insulated and this natural airflow reduced, trapped damp can quickly cause problems. These include condensation, mould growth and even timber rot.
Unsealed concrete can also ruin new flooring. For example, wooden floors will absorb moisture, swell, and eventually rot. Even tiles or carpet can lift and become damaged over time.
To prevent these issues, the concrete floor must be sealed and damp proofed. This involves treating the main surface and sealing all wall-to-floor joints. There are two main methods to achieve a lasting solution:
Installing a Vapour Barrier or Damp Proof Membrane on a Garage Floor
- Clear the floor: Remove all items, sweep, and vacuum the garage floor to eliminate dust, dirt and any remaining debris. Ensure the surface is completely clean for the membrane to adhere properly.
- Inspect and repair: Check for cracks, holes or uneven areas in the concrete. Fill any imperfections with a suitable concrete repair compound and allow it to cure fully before proceeding. As stated above, also ensure the floor to wall joint is fully sealed.
- Measure and cut: Roll out the vapour barrier membrane and measure it to fit the garage floor. Cut sheets to size, allowing an extra 100mm overlap on all sides for sealing.
- Lay the membrane: Place the first sheet onto the floor, overlapping the edges of previous sheets by at least 100mm. Work methodically to cover the entire floor without wrinkles or gaps.
- Seal overlaps and edges: Use waterproof adhesive tape to seal all overlaps between sheets and also any and all corners. Run tape along the perimeter where the floor meets walls to create a continuous moisture barrier.
- Pay attention to joints: Focus on corners and areas where the floor meets walls, columns or other protrusions. Ensure the membrane forms a tight seal to prevent moisture from seeping through.
- Add insulation or floor finish: Once the membrane is fully in place and sealed, you can lay insulation boards or your chosen flooring. The membrane not only protects against damp but also improves thermal efficiency.
- Check and maintain: Inspect the membrane before final floor installation to ensure no gaps or tears remain. Any damage should be repaired immediately to maintain its effectiveness.
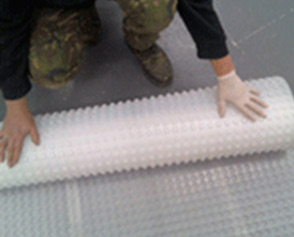
Rolling out damp proof membrane across a floor to prevent damp
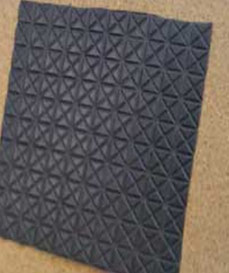
Slimline floor membrane used when laying carpet
Step-by-Step Guide: Applying a Liquid Membrane to Damp Proof a Garage Floor
Using a liquid membrane is one of the most effective ways to damp-proof a garage floor before conversion. Follow these steps for a reliable, long-lasting result.
- Clear the floor: Remove all furniture, tools and debris. Sweep and vacuum the surface to remove dust, dirt and loose particles.
- Repair cracks and holes: Fill any cracks or surface defects with a suitable concrete filler or repair mortar. Smooth the surface to ensure the membrane bonds evenly. Also, ensure the floor to wall joint is sealed in accordance to the instructions above.
- Prime the surface (if required): Some liquid membranes require a primer coat for better adhesion. Follow the manufacturer’s instructions for mixing and applying the primer.
- Apply the first coat: Use a brush, roller or spray to apply a thin, even layer of the liquid membrane. Pay extra attention to corners, edges and joints where the floor meets walls.
- Allow to cure: Let the first coat dry fully according to the product instructions, usually a few hours. Ensure the garage is well-ventilated during curing.
- Apply a second coat: Apply a second layer perpendicular to the first coat to ensure full coverage and a continuous moisture barrier.
- Check coverage: Inspect the floor carefully for any missed spots or thin areas. Touch up as necessary to create a complete, uniform barrier.
- Cure fully: Allow the liquid membrane to cure completely before installing insulation, flooring or underfloor heating. This ensures maximum damp protection and durability.
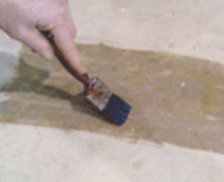
Applying a liquid membrane to a damp garage floor
Best Floor Coverings for a Sealed Garage Floor
Once your garage floor is properly sealed, you can choose from several types of floor coverings depending on your needs and insulation requirements. The type of floor will also influence the sealing method used.
- Suspended timber floor: Installed on ventilated joists to prevent rot. Ensure airflow with vents at both ends to avoid condensation. Treat all timber, especially cut ends and contact points with walls. This floor should always sit above a damp-proof membrane.
- Floating floor: Typically chipboard on battens, requiring similar ventilation and timber treatment as suspended floors. Can be installed over a membrane, but ensure the subfloor is sealed.
- Screeded floor: Requires at least 50mm of screed (see our screeding guide). Can be laid over a membrane or a sand-blinded epoxy seal. Raising the floor to match the house level allows insulation installation, reducing heat loss and improving energy efficiency.
- Directly bonded floor (tiles or timber): Can be applied over chipboard, a membrane, or a blinded epoxy seal. The subfloor must be perfectly flat to prevent movement that could crack tiles or joints. Always use a flexible adhesive for direct-bond applications.
If you are considering converting your garage into more of a living space, it is absolutely essential that to properly damp proof the floor to avoid any damp and rot issues in the future, this is an absolute must.
For further information about planning your garage conversion please have a look at our project on converting a garage.

 DIY Doctor Ltd,
  0845 6342 179


