• Skip to primary navigation
  • Skip to main content
  • Skip to primary sidebar
  • Skip to footer
DIY Doctor

Main navigation

      • Project Type A - E
      • All Projects
      • Brick, Block, Masonry and Concrete
      • Damp, Condensation, Rot and Woodworm
      • Doors, Windows and Conservatories
      • Electrical
      • Project Type F - G
      • Fencing, Decking, Paving and Patios
      • Floors, Walls, Ceilings and Lofts
      • Garages, Sheds and Outbuildings
      • Gardening and Landscaping
      • General Building, Self Build and Renovation
      • Project Type G - J
      • General Repairs and Cleaning
      • Green Living and Eco DIY
      • Ground, Foundations and Drainage
      • Heating, Central Heating and Boilers
      • Joinery and Carpentry
      • Project Type M - P
      • Materials, Fixings and Fixing
      • Painting, Decorating and Finishing
      • Planning Regs, Project Management and Safety
      • Plastering, Plasterboard and Rendering
      • Plumbing
      • Project Type R - T
      • Roofing and Gutters
      • Tiling and Tiles
      • Tools, Appliances and Access
      • Useful Tips
      • DIY Tips
      • Find a Tradesman
      • Contract Download
      • Working With Tradesmen - Ultimate Guide
      • Home Improver Protection
      • Price Doctor
      • About DIY Doctor
      • What we do
      • Trade Shows and Exhibitions
      • Master Classes
      • Book Store
      • Contact Us
      • Feedback
      • DIY Competitions

Home > DIY How To Projects and Tutorial Guides > Lead Water Main Replacement – How to Replace Lead or Iron Water Mains

Lead Water Main Replacement – How to Replace Lead or Iron Water Mains

In this how to guide we take you through the process of lead water main replacement and changing lead water supply pipes and what's involved including who you need to contact, depth of any new pipework, how to insulate it and how and where to dig and fill any trenches. The principles of this job are exactly the same for changing iron water mains so the same steps apply.

TwitterFacebookPin ItBuffer

Don't want to do this job yourself? Let us help you find a tradesman local to you

Project Page Menu
  • How to Tutorial
  • Video
  • Find Tradesmen
  • Help

Why would I want to change Lead or Iron Water Pipes?

Until the 1960’s lead was used for almost all water supply pipes and although the water is treated by your local authority, small amounts of lead can find their way into the water you use. This also applies to rust from iron pipes. All local authority water boards will, if asked, take samples of your water and test it for you free of charge.

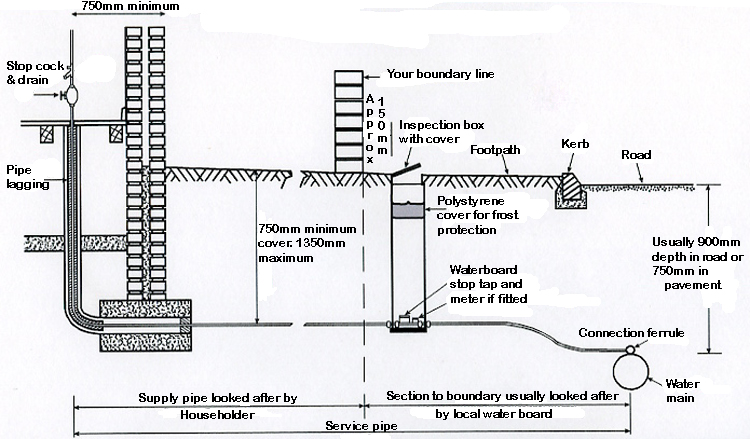
You are responsible for all of the pipework in your property and for the pipe work between your property and the boundary of the street the main is in. This main will normally be fairly close to the property boundary. The diagram below outlines the situation found with most properties but there are exceptions to this rule. In the case of an exception, such as you property being beyond the end of a main, contact your local water board to see who is responsible for the incoming pipe.

Lead water main cross section

Lead water main cross section

If you share a water pipe with a neighbour you are jointly responsible for that pipe. If you then want your own connection to the main you may have to pay for this.

What do I Change Lead Watermain Pipework to?

The new pipe should be a blue plastic pipe which is made from Medium Density Polyethylene (MDPE). It will have a minimum of 25mm external diameter until it gets to your internal stop tap when copper is usually installed. If however there is any possibility that your ground, or the ground surrounding your property may be contaminated with petrol or oil or other hydrocarbons, MDPE must not be used. In these situations a special foil wrapped pipe must be used.

What do I do if I Want to Change Lead Mains Water Pipes?

Contact your local water authority. They will come out and check if you share a supply with anyone. They will advise you if there would be any charge and advise you on where to lay your new pipe.

Where to Lay New Pipework

You will, in most cases, be expected to lay your new pipe slightly beyond the property boundary for connection to the main by the local water company. You will also need to get prices from local plumbers for changing the internal pipes from lead to copper.

Depth of New Watermain Pipework

Your pipe must be laid in a trench between 750mm and 1350mm deep and it must enter the property and remain at that depth for a minimum of 750mm from the external face of the wall of the property. It will then rise up to the internal stop tap usually located under the kitchen sink.

Lagging and Insulation of New Pipework

From the bend upwards and for all pipes higher than 750mm deep the pipe must be insulated to BS 6700.

Lagging must also be used for all lengths of pipe passing through unheated parts of the property such as basements and underfloor voids. The lagging insulation should be as follows:

  • For a 25mm pipe, 28mm of insulation must be used
  • for a 32mm pipe, 35mm of insulation must be used
  • The insulation must also be designed for frost protection

Do I Have to Change Anything Else?

When your new pipe is installed to your stop cock, if the first internal length of pipe, i.e. the length of pipe from your stop cock to the first (drinking water) tap is lead or iron, this must be replaced also.

Passing Through Foundations and Under Buildings

If the new pipe needs to pass through any foundations or is buried under the building, it must be placed in a duct of at least 100mm diameter. The duct must allow for the pipe to be insulated and a wire must be laid next to the pipe, and clamped to it when it gets inside the property, to trace or pull through a new pipe should any faults develop.

Get it Checked

Before you fill the trench in a member of the local water authority must inspect it to make sure it has been laid correctly.

Earthing

Please check that your old water pipe, where it entered the building, was not used as an earthing point as many were pre 1966. You need to contact and electrician if you are in any doubt.

Filling the Trench for Your New Watermain

When you backfill the trench care should be taken. No stones or bricks should be near the pipe, nor should any other sharp objects. For safety’s sake it is recommended that the first 100mm of backfill be sand and the pipe itself is laid on 100mm of sand also. It is as well to keep the rest of the backfill free of aggressive materials.

A range of MDPE fittings can be seen below:

MDPE Reducing Coupler

MDPE Reducing Coupler

MDPE Coupler

MDPE Coupler

Stop Tap

Stop Tap

MDPE Pipe Insert

MDPE Pipe Insert

MDPE Blue pipe

MDPE Blue pipe

MDPE Female Adaptor

MDPE Female Adaptor

MDPE Male Adaptor

MDPE Male Adaptor

MDPE Equal Tee

MDPE Equal Tee

MDPE Elbow

MDPE Elbow

All project content written and produced by Mike Edwards, founder of DIY Doctor and industry expert in building technology.

TwitterFacebookPin ItBuffer

Video

Back to the Top

Apologies, but we don't seem to have a video for this project yet, but we will do our best to get one up soon

Find a Reliable Local Tradesman

Back to the Top
Don't fancy doing this project yourself? We work with the industries best to ensure that we recommend only reliable and trustworthy tradesmen.
Let DIY Doctor help you find a tradesman

Find a tradesman now!


More Help

Back to the Top
Related Projects That May Help You:
  • Joining Cast Iron to Plastic Soil and Vent Pipe
  • Building Regulations Approved Document C
  • Installing a Land Drain
  • Depths of Utility Service Pipes and Cables
Give us Some Feedback!

We love feedback on our DIY tutorials it helps us to make them the best they possibly can be so if you have any comments you would like to share with us, click the button below and let us know.

Primary Sidebar

Master Basic DIY - By DIY Doctor

Our Book - Master Basic DIY

Grab your copy now for all the DIY help you need right at your finger tips!

Buy it Here!

Signup for our Newsletter

Keep up to date with our DIY projects, tips and latest deals

Sign Me Up!

Our Sponsors

Find out about advertising on DIY Doctor

Advertisments

Other Similar Projects
  • Building Site Preparation And Resistance To Moisture Information Relating To Building Regulations
  • How To Change From Cast Iron To Plastic Waste Pipes
  • How To Lay A Land Drain To Get Rid Of Excess Surface Water

Footer

DIY Doctor company logo

Here at DIY Doctor, we offer completely free DIY and construction help and advice to any and all, from professional tradesmen, exactly as they would do it.

We have hundreds of DIY project tutorials covering all aspects of building and DIY that provide step by step instructions on how to complete your given task.

If you need a little help then we also have an active question and answer forum and a find a trademan service and much more.

Site Menu

  • DIY Doctor Ltd,
    The Workshop,
    Newbury Works, Somerset,
    BA3 5RX

  • 0845 6342 179

  • Contact Us

  • Company Number: 05863375
  • VAT Number: 811134774

Other Stuff

  • About DIY Doctor
  • Contact DIY Doctor
  • Media and Press
  • DIY Projects
  • UK DIY Forum
  • DIY Doctor Suppliers
  • DIY Webinars

DIY Doctor Social Channels

  • Advertise
  • Competitions
  • Terms and Conditions
  • Privacy Policy
  • Cookie Information
  • NHIC
  • Sitemap

DIY Doctor are members of:

© DIY Doctor Ltd 2025 All Rights Reserved