Black mould is a common issue in many UK bathrooms, particularly on ceilings where moisture and warmth allow it to grow and thrive. It not only looks unpleasant but can also pose significant health risks if left untreated.
This simple how-to guide explains what causes black mould, why it often appears in damp areas like bathrooms and kitchens and the most effective ways to remove and prevent it for good.
What Exactly is Black Mould?
Black mould is a type of fungus made up of tiny thread-like filaments that spread across damp surfaces. These filaments release microscopic spores that travel through the air, especially so in warm, humid environments like bathrooms.
When the warm, moist air rises and the spores settle on the ceiling or walls, they begin to grow and form visible mould patches. Black mould thrives in conditions above 21°C with humidity levels over 70%, making bathrooms, kitchens and poorly ventilated rooms ideal places for it to develop.
What’s the Problem with Black Mould?
Black mould isn’t just unpleasant to look at, it also produces a musty, damp smell and can cause serious health concerns. Its spores can irritate the skin, eyes and lungs, especially for those with asthma, allergies or weakened immune systems.
Bathrooms and kitchens are common trouble spots. In kitchens, mould spores can easily contaminate food and cooking surfaces, posing a hygiene risk. It also grows in hidden, damp areas like under sinks, behind toilets or inside cupboards. Because these spots often go unchecked, mould can spread unnoticed, releasing spores into the air and worsening indoor air quality.
Black Mould and Its Effect on Health
Black mould isn’t just unpleasant to look at, it can seriously affect your health. The biggest danger comes from the tiny spores it releases as it grows. These spores carry toxins that spread easily through the air and can be breathed in without you realising it.
Once inhaled, mould spores may trigger a range of health problems such as coughing, sore throats, wheezing, rashes and flu-like symptoms. In severe cases, exposure can cause headaches, dizziness or nausea. Long-term contact may also weaken your immune system, making you more vulnerable to other illnesses.
Never try to scrape or wipe away black mould yourself. Disturbing it can release even more spores into the air, increasing the health risks for everyone nearby.
If mould appears in living spaces like bedrooms or lounges, treat it as urgent. Because people spend more time in these rooms, exposure levels are higher. The mould should be removed safely and professionally as soon as possible to protect your health and home.
What Are the Signs of Mould Toxicity?
Mould toxicity occurs when your body reacts to prolonged exposure to black mould spores. Recognising the signs early is key to protecting your health and reducing any harmful effects, especially in UK homes where damp or poorly ventilated areas are common.
Respiratory Problems: One of the most common signs of mould toxicity is breathing difficulties. This can include persistent coughing, wheezing, shortness of breath or a tight chest, even in people without a history of asthma or allergies.
Skin and Eye Reactions: Exposure to mould spores can trigger skin irritation such as rashes, redness or itching. Eyes may also become watery, red or irritated.
General Health Symptoms: Long-term exposure can cause headaches, fatigue, dizziness or nausea. Some people report flu-like symptoms that persist despite no other illness being present. In severe cases, prolonged exposure may weaken the immune system, making the body more vulnerable to other infections.
Spotting these signs early can help you take action before mould exposure leads to more serious health problems. Regularly checking damp areas in bathrooms, kitchens and lofts, combined with proper ventilation, can significantly reduce your risk.
Why Do Bathroom Ceilings Get Mouldy?
The main reason bathroom and kitchen ceilings often develop black mould is because of condensation. Activities like showering, bathing or cooking release warm, moist air that rises and meets cooler surfaces, such as ceilings or tiles. The air cools and the moisture turns into water droplets. This is condensation.
When condensation accumulates on warm surfaces like bathroom walls or ceilings, it creates the perfect conditions for black mould to grow. Cooler surfaces, like windows, also attract condensation, which is why mould often appears there too.
Preventing mould starts with controlling condensation. For detailed tips and solutions, see this guide on condensation causes and prevention. Black mould on ceiling and walls – Image courtesy of blackmold.awardspace.com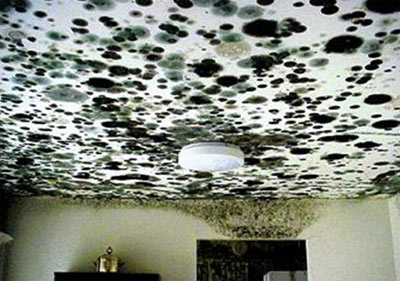
How to Prevent Mould on Bathroom and Kitchen Ceilings
Prevention is the easiest way to deal with black mould. It’s much simpler to stop mould from growing than to remove it later. While it’s impossible to eliminate all moisture from activities like showering, bathing or cooking, there are practical steps you can take to reduce mould risks:
- Ventilation: The most effective way to prevent mould is by removing moist air. Use an extractor fan near showers, baths or cooking areas to vent humidity outside.
- Open Windows: Opening a window during showers or cooking helps moisture escape. Combined with an extractor fan, it greatly reduces condensation, though it may be less practical in winter.
- Reduce Moisture: Shorter showers and covering pots while cooking can limit steam and reduce humidity in the room.
- Insulation and Heating: Condensation forms on cold surfaces. Insulate walls and ceilings where possible and keep indoor temperatures at least 16°C to discourage mould growth.
- Wipe Away Condensation: Remove water droplets from surfaces as soon as they appear. This prevents mould from taking hold.
- Remove Mould Promptly: If mould appears, clean and kill it immediately to stop it spreading.
- Anti-Mould Paints: Special anti-mould or anti-condensation paints can reduce mould growth. Use them as part of a broader prevention plan, not as the only solution.

Extractor fan above shower in bathroom ideal for removing large amounts of moist air
Once mould starts growing, it can be very difficult to remove. It can penetrate plasterboard and plaster, making full removal of such coverings the only effective solution, which is costly and time-consuming.
That’s why prevention is always better than cure.
If you can’t reduce condensation through ventilation or heating, a reliable way to prevent mould is using specialist paints or additives designed to kill mould and stop it returning.
Here’s a simple way to protect your walls:
- Apply a mould-killing or sterilising paint to remove any existing mould. Follow the product instructions carefully.
- Paint a protective barrier solution over the treated surface.
- Once dry, apply your topcoat mixed with a fungicidal additive to prevent mould from coming back.
How to Get Rid of Mould on the Bathroom Ceiling
Even with proper ventilation, insulation and wiping away condensation, black mould can still appear. The good news is that it’s relatively easy and inexpensive to manage with the right approach. Here are the most effective methods:
- Bleach solution: Mix 4 parts water with 1 part bleach and apply to the affected area. Bleach kills mould but can damage paint, so always test a small hidden spot first.
- Mould and mildew removers: Ready-made products are highly effective at removing mould stains and killing mould. They are simple to use and available at most stores.
- Antibacterial sprays: These sprays kill mould without bleach, so they are gentler on painted surfaces. While less effective on stains, they are ideal for regular preventative use.
For most people, specialist mould and mildew removers are the easiest solution, just apply and follow the instructions. Since many of these cleaners contain bleach, always wear old clothes, gloves, goggles and a mask for protection.
- Step 1 – Choose Your Tools: Pick a mould remover, we recommend Dettol Mould and Mildew Remover. Use a scouring sponge for best results or an old cloth if you don’t have one.

Mould and mildew cleaner with sponge
- Step 2 – Apply Cleaner to Sponge: Spray the remover onto the sponge or cloth, not directly on the ceiling. This avoids spreading spores and keeps the product under control. Apply 2–3 squirts to the centre of the sponge.

Squirt mould cleaner onto sponge or cloth
- Step 3 – Apply to Mould: Gently wipe the mouldy area with the sponge or cloth, leaving enough remover on the surface. Reapply if needed and let it sit for about 5 minutes to work effectively.

Apply mould cleaner to the affected area
- Step 4 – Scrub Gently: Use the scouring side of the sponge to scrub the mould away. Avoid scrubbing too hard to prevent paint damage, though slight paint removal may happen.

Scrub mould off the ceiling
- Step 5 – Rinse and Dry: Rinse the sponge with clean water and wipe the ceiling to remove any residue. Finally, dry the area thoroughly with an old cloth.

Wipe the area with clean water and dry
Natural Solutions for Black Mould Removal
If you prefer chemical-free options, there are several effective natural solutions for removing black mould. These methods are safe, easy to use and widely available in UK homes.
Vinegar: White distilled vinegar is acidic and can kill most types of mould. Simply pour it into a spray bottle and apply directly to the affected area. Let it sit for at least an hour, then wipe the surface clean with a damp cloth or soft scourer. Repeat if necessary for stubborn mould patches.
Baking Soda: Baking soda not only kills mould but also absorbs moisture, helping prevent future growth. Mix a tablespoon of baking soda with water to create a paste or dissolve it in water for a spray solution. Apply to the mould, scrub gently with a sponge, then rinse and dry thoroughly.
Tea Tree Oil: This natural antifungal oil is highly effective against black mould. Mix about one teaspoon of tea tree oil with a cup of water in a spray bottle, spray onto the affected area and leave it to dry. There’s no need to rinse, as the oil continues working to prevent regrowth.
Using natural solutions can be a gentle yet effective way to manage black mould, especially for small areas. Remember, consistent ventilation and drying are still essential to stop mould from returning.
In short, controlling ventilation and reducing condensation is the most effective way to prevent black mould. When this isn’t enough, treating the mould directly is essential to keep your bathroom ceiling clean and safe.
Removing mould not only improves the look of your bathroom but also reduces harmful spores, protecting your health in the process.