Condensation in the home can be an absolute nightmare. Not only can it make everything feel cold and damp but it can also cause black mould growth which can be extremely dangerous to you and your families health.
In this project guide we run through all the steps involved in spotting condensation issues, identifying the cause of the condensation problem and then how to cure it for good. Read on to find out more.
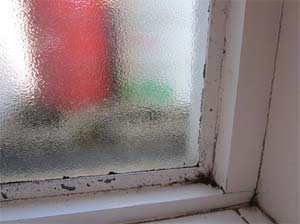
Condensation problems on windows and recesses create damp conditions causing flaking paint and black mould on window frames and walls
What is Condensation and How Does It Form?
Condensation is warm moisture that exists in the air that turns into water droplets when it touches a cooler surface. It often appears on windows, walls, or pipes, making them damp and leading to peeling paint or black mould.
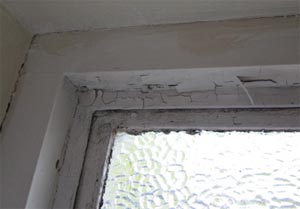
Condensation causes paint to flake and can lead to black mould if not dealt with quickly
Mould thrives in damp areas caused by condensation, especially on window frames, bathroom walls and ceilings, and even curtains. It’s not just an eyesore, it can also trigger very serious health issues.
All air naturally holds some water vapour, but warm air holds more than cold.
When warm, moist air that’s very common to bathrooms due to baths and showers and also kitchens due to cooking meets a colder surface, such as a window, the vapour condenses and turns into liquid and this is condensation.
The temperature at which this happens is known as the dew point.
As mentioned, common household activities like showering, cooking, drying clothes, and even breathing release moisture into the air. That’s why car windows steam up or why bathroom pipes often appear to be leaking when they’re not; it’s just condensation.
For example, a cold glass bottle from the fridge quickly steams up when left in a warm room. The same effect happens at home on cold surfaces when warm, humid air can’t escape.
Outside, this process causes dew, frost, or fog. Indoors, it’s condensation and it needs to be properly controlled through ventilation and heating to prevent damage and potential health risks.
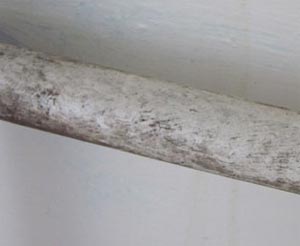
Condensation forms on cold pipe work in kitchens and bathrooms leading to flaking and discoloured paint
How to Diagnose Condensation
Now that we have looked at exactly what condensation is and how it forms, it’s time to look at exactly how to identify and diagnose any condensation issues you are experiencing at home.
The first thing to do is to review the list of most common condensation issues that are experienced. most likely where and also the order in which they are generally seen and try to match one or possibly even more to your own:
Main Signs of Condensation
- Water droplets on windows
- Pools of water on windowsills
- Moisture on external walls
- Damp patches on ceilings or cold walls
- Wet spots in room corners
- Condensation on internal walls
- Black mould on window frames and sills
- Mould in corners or rooms with poor airflow
- Mould growth inside cupboards
- Black spots on curtains or clothing
- Wet or musty-smelling internal walls
- Mould on carpets (often caused by penetrating damp)
If you’re seeing any of these symptoms, you’re likely dealing with condensation. It’s important to take action quickly to stop moisture damage and prevent mould from spreading further.
Confusion Over Rising Damp – Busting the Rising Damp Myth
Many homeowners assume that damp near floor level must be rising damp, but in actuality that’s rarely the case.
True rising damp is very uncommon, especially in modern UK homes. More often, damp patches are caused by condensation or penetrating damp from damaged roofs, cracked brickwork, or faulty windows.
Understanding the difference is key to solving the problem properly. But first, let’s bust some common myths:
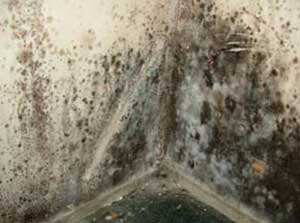
Condensation can lead to black mould on cold wall corners – a common symptom mistaken for rising damp.
Common Questions About Rising Damp
“My lower walls are damp but dry above – is it rising damp?”
Answer: Probably not. Warm air rises, so cooler lower walls attract condensation. Water also runs down to the lowest point, concentrating moisture at floor level.
“There’s mould on the inside of my external walls – is it coming from outside?”
Answer: Likely not. External-facing walls are colder, making them a prime spot for condensation to form inside your home.
“I’ve got mould at the bottom of my wall – surely that’s rising damp?”
Answer: Not necessarily. Unless your property lacks a damp-proof course or it’s failed, this is more likely condensation. Learn more about rising damp here.
“My walls are soaking wet – it can’t be just condensation, right?”
Answer: It can be. Condensation can create surprisingly large amounts of water, leading to wet surfaces, peeling paint, and even structural damage. See examples of condensation damage here.
Most modern homes suffering from damp are dealing with condensation, not rising damp. If you see mould, especially black spots in corners or on cold surfaces, it’s a strong sign. Large amounts of moisture may still just be condensation, not a leak.
Want tailored advice? Visit our DIY damp forum and ask your question directly.
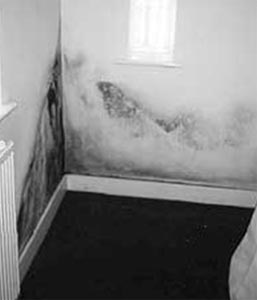
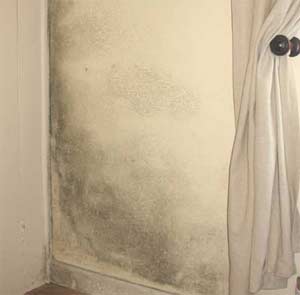
Condensation will often settle on external walls causing mould on walls in this classic pattern, which shows where the walls are coldest
What Causes Condensation in the Home?
As we have discussed, condensation is one of the most common causes of damp in UK homes and forms when warm, moist air hits a cold surface and turns into water droplets. This can happen on windows, walls, ceilings, and even furniture and if left untreated, it can lead to mould, mildew, and structural issues.
When it comes to what causes it there are several possible causes that include everyday activities like cooking, bathing, drying clothes indoors, and even breathing as all release moisture into the air. In fact, an average family can produce several litres of water vapour per day. If this moisture has nowhere to escape, it can easily build up in the air and settle on cold surfaces when the two collide.
Another very common case is poor ventilation and is generally considered to be one of the biggest contributors to condensation. Homes that are sealed tightly to improve energy efficiency often lack sufficient airflow, as older properties do.
Due to the lack of natural ventilation that older properties benefit from, moist air gets trapped and creates the perfect conditions for condensation to form.
Another major factor is temperature difference. Warm air holds more moisture than cold air. When that warm, humid air meets a cold wall, window, or pipe, it cools quickly, releasing the moisture as condensation. That’s why condensation often appears overnight when room temperatures drop.
In respect to this, heating can be used to massively reduce the problem. When heated fully, a room is obviously much warmer and this also goes for the objects in it, including windows, pipes and the likes. If problem objects such as these are warmer then warm, moisture-laden air cannot condense!
One other less commonly known cause of damp walls that can get pulled into the mix is where a wall tie in a cavity wall has become compromised and is allowing water to travel along the tie from the external wall and on to the internal wall.
We explain damp being caused by wall ties more thoroughly in our Damp in Cavity Walls DIY and information project.
Additionally, older properties and those with solid external walls are more prone to condensation, especially during colder months. Properties with blocked air bricks or faulty extractor fans can also struggle to manage moisture effectively.
On the whole, to reduce condensation, it’s crucial to balance out correct levels of heating inside with proper ventilation. Opening trickle vents, using extractor fans, and avoiding indoor clothes drying where possible are all simple but effective steps.
How to Test for Condensation
If you’re unsure whether damp on your walls is caused by condensation or a leak, here’s a simple way to test it.
First, clean and dry a small patch of wall. Tape a 30cm square of aluminium foil over the area using strong tape like Gaffer tape, not Sellotape as this won’t hold.
Leave it in place for 48 hours. When you remove the foil:
- Wet behind the foil: likely a leak or penetrating damp.
- Wet on the front: likely condensation.
For a more accurate method, you can use condensation indicator cards or damp test strips. These change colour—usually turning blue—when high humidity is present and show how long it’s been at that level.
Most of these tools give a non-reversible reading, meaning they keep showing the highest humidity reached, even if conditions improve later. This helps identify recurring condensation issues over time.
Preventing Condensation From Happening
Now we have defined condensation and also looked at what actually causes this issue, and what the symptoms are, the next thing you we to know is how to prevent condensation from actually happening.
In simply terms, ventilation is pretty much always the cure for condensation as is balancing it along side your heating.
Ventilation: The Key to Preventing Condensation
Whenever warm, moist air touches a cold surface, condensation forms. You’ll spot it on windows and mirrors, but at the same time it’s also quietly building up on walls and ceilings.
Modern homes are generally very well insulated, which is great for energy efficiency, however it also traps humid air inside as they lack the natural ventilation provided by poorly fitting windows and doors and lack of roof insulation etc. found in older homes.
Everyday activities like cooking, showering, and even breathing release water vapour and without proper ventilation, this moisture has nowhere to go and turns into condensation.
The fix? As we have stated numerous times, ventilate regularly. Fresh air helps carry moisture out before it settles on cold surfaces
Ideally, air each room once a day, or better, every few hours, to keep humidity under control.
Good ventilation reduces the risk of damp patches, wet walls, and black mould. For severe or recurring problems, using ventilation products like extractor fans or positive input ventilation (PIV) systems can provide a long-term solution.
Check Humidity Levels to Control Condensation
Condensation happens when the air holds too much moisture, this is known as Relative Humidity (RH).
To stop condensation forming, aim to keep indoor humidity between 55% and 65%. Even in a warm, well-insulated home, moisture in the air will still settle on cold surfaces if RH gets too high.
The easiest way to monitor this is with a hygrometer (also called a home humidity monitor). These affordable devices are available online or from most DIY shops.
Many models track humidity over time, so you can see patterns, like whether cooking or drying clothes indoors is causing spikes. Regular checks help you stay on top of moisture levels and take action before condensation becomes a problem.

Hygrometer or Home Humidity Monitor
Use a Dehumidifier to Reduce Condensation
Dehumidifiers help control condensation by removing excess moisture from the air, especially useful when heating and ventilation alone aren’t enough.
To know when to use one, check the room’s Relative Humidity with a hygrometer. As we have suggested above, aim to keep levels between 55% and 65%. Without a reading, it’s hard to strike the right balance between warmth and airflow.
Dehumidifiers work by drawing in moist air, passing it over a cold coil, and collecting the condensed water in a tank. Most units shut off automatically when full, so they’re safe to leave running unattended.
For best results, keep windows and vents closed while using a dehumidifier—otherwise, you’ll just be pulling in more moist air from outside.
Although effective, dehumidifiers can be costly to run and may slightly lower room temperature. They’re best used as a short-term fix in very damp rooms, especially where condensation has already caused damage.
Today it’s possible to get more energy efficient dehumidifiers, that use a lot less electricity than their older counterparts, however despite how good some are they do still use a fair bit.
You don’t have to buy one, dehumidifiers can be hired from most tool hire centres. Once your room is dry, maintain it with regular ventilation to stop condensation coming back.
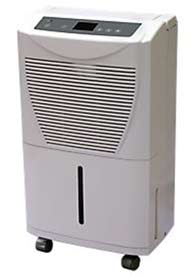
A dehumidifier will quickly dry out a damp room and can be wheeled into each area of the house (although care should be taken using electrical equipment in kitchens and bathrooms)
Dealing with Condensation When You Can’t Open Windows
If you can’t leave windows open—whether it’s too cold or you’re worried about security, trickle vents are a simple, effective solution.
These small vents fit neatly into your window frame and let stale, moist air escape while fresh air flows in, all without opening the window.
They’re easy to install as a DIY project, and our guide to fitting trickle vents walks you through the process step by step.
Each vent has an inside and outside half. You drill small holes through the top of the window frame to connect them. Most models come with built-in flaps to close during colder months, and insect screens to keep bugs out.
We added them to a timber single-glazed home in Frome, Somerset and they made a big difference to the condensation problem.
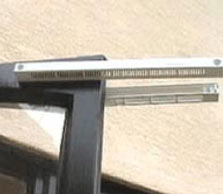
Trickle vents come in two halves and fit either side of the window allowing ventilation without opening a window to solve window condensation
Fixing the Causes of Condensation Problems
How that we have looked at what causes condensation, how to stop it when you have it, it’s now time to look at how to sort out the results of condensation issues, such as black mould and then redecorate afterwards.
Condensation can cause significant damage to paintwork, wallpaper and especially plasterwork and plaster board.
So once you have humidity levels under control you will need to repair the damage, once you have sorted out your underlying condensation issues however.
How to Treat Black Mould from Condensation
Black mould is the most common sign of condensation. It often appears as black spots or large, soot-like patches. In some cases, it may be white and fluffy, resembling a fungal coating.
Aside from looking unpleasant and damaging paintwork, black mould can seriously affect your health, especially for asthma sufferers and those with allergies and breathing difficulties. That’s why removing it properly is absolutely essential.
Start by cleaning the affected area with a specialist anti-mould cleaner. This kills the mould spores and stops them coming back. Don’t just wash with detergent, it won’t remove the spores and the mould can return, even under anti-condensation paint.
Once the area is fully cleaned and dry, you can repaint using anti-condensation paint to help prevent future growth. But remember: for long-term results, you must also fix the root cause and that’s excess moisture in the air.
See our full guide on how to treat black mould for detailed steps and product tips.
As a summary, here is a quick run down on how to effectively clean and treat black mould:
- Spray the affected area with a specialist anti-mould cleaner. Let it sit as per the product instructions to kill mould and spores.
- Wearing rubber gloves and a mask, scrub the area with sugar soap or mild detergent mixed with water. This removes dirt and grease.
- Rinse the surface thoroughly to ensure it’s grease-free.
- If paint is flaking or the surface feels rough, gently sand it smooth using fine sandpaper.
- Wipe down the sanded area with a damp lint-free cloth to clear all dust.
- Apply a second coat of anti-mould treatment, brushing into corners and cracks. Let it dry naturally without rinsing.
- For decorating, mix anti-mould additive into your topcoat paint, following the product’s instructions for correct dosage and mixing.
- If stains remain, apply a damp and stain-blocking paint before your final topcoat.
- Use anti-condensation paint for the top layer. It’s breathable and ideal for bathrooms and kitchens. Alternatively, add anti-mould additive to your regular paint.
- If replacing wallpaper, strip off all old paper and treat the wall as above. Avoid reapplying wallpaper where possible. If needed, use anti-fungal wallpaper paste and anti-condensation lining paper.
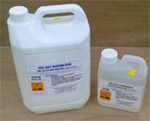
Black mould or mildew will thrive in the moist conditions created by condensation and as well as damaging your paint and wallpaper it can be harmful to your health (pictures courtesy of Property Repair systems)
Treating Efflorescence (Wall Salting)
Efflorescence, or ‘salting’, appears as white, fluffy or crystal-like deposits on walls. It’s caused when moisture reacts with natural salts in plaster, brick, or stone, often due to condensation.
To treat it, first sand off the visible salts. Then apply a salt neutraliser to stop the problem returning before decorating. These are widely available at DIY stores.
If the efflorescence keeps coming back, it might be due to penetrating damp. In this case, it’s essential to identify the source of damp before treating the surface.
Persistent issues may need damp-proofing. DIY Doctor offers expert guides on injecting a damp-proof course, replacing a DPC, and treating rising damp.
Salt neutraliser to treat efflorescence on internal walls
Decorating After Fixing Condensation
Once you’ve tackled condensation, dried out your walls, and removed any black mould or efflorescence, you’re ready to redecorate. This is the ideal time to choose new paint colours and refresh your space with confidence that the problem won’t return.
Anti-Mould Emulsion Paint
Anti-mould emulsion is a low-odour paint designed to stop black mould, even in areas with constant condensation. It’s widely available at most UK DIY stores.
This breathable paint contains advanced biocides throughout the formula, creating a long-lasting barrier against mould. It’s tough, flexible, water-resistant, and ideal for kitchens, bathrooms, and other damp-prone areas.
Anti-Condensation Coating
Anti-condensation paint is ideal for areas like ceilings, pipes, ductwork, steel frames, and cupboard interiors—places not often cleaned or touched.
It works by absorbing moisture and adding insulation to reduce condensation build-up. Many formulas also include biocides to help prevent mould inside the tin.
Anti-Condensation Wallpaper
Anti-condensation wallpaper helps prevent mould and lets walls breathe. It’s durable, easy to apply, and works well on both walls and ceilings.
It’s a simple DIY option for tackling condensation without major renovations.
Foil-backed wallpapers can also be used under standard paper, but they’re better for dealing with damp in areas like basements, not general condensation.
Condensation has caused the wallpaper to peel off this wall, and mildew is growing on the paper causing discolouration
Quick DIY Tips to Reduce and Prevent Condensation
If you’ve read through this guide, you’ll know there are many ways to tackle condensation. To make it easier, here’s a simple 10-step checklist you can follow:
How to Stop Condensation: 10 Simple Steps
- Ventilate daily – Open windows or use trickle vents to let fresh air in and stale, moist air out.
- Use extractor fans – Always run bathroom and kitchen fans when showering or cooking to remove steam at the source.
- Avoid drying clothes indoors – Use a vented tumble dryer or a condenser dryer instead.
- Run a dehumidifier – Ideal for quickly drying out damp rooms or problem areas.
- Monitor humidity – A digital hygrometer helps you keep indoor humidity between 55–65%, the ideal comfort zone.
- Check for cold spots – Use an infrared thermometer to detect poor insulation or hidden damp patches.
- Test for leaks – A damp meter helps identify water ingress in walls or floors that may be mistaken for condensation.
- Use condensation test strips – These change colour if condensation is the cause, helping rule out other damp issues.
- Clean mould-prone areas – Wipe down affected surfaces with an anti-mould cleaner before repainting.
- Add anti-mould additives to paint – Or use ready-mixed anti-mould paints to stop regrowth after decorating.
Extra Tips to Prevent Condensation at Home
Alongside the 10 key steps above, here are more expert tips to reduce condensation and stop it from damaging your home:
- Leave space behind furniture – Keep sofas and wardrobes a few inches away from cold walls to let air circulate and reduce moisture build-up.
- Don’t overfill cupboards – Crammed storage traps moisture. Leave room for air to flow.
- Check loft ventilation – Ensure loft insulation doesn’t block airflow from eaves vents or grilles. Clear any obstructions to keep moisture out.
- Install cavity wall insulation – It helps stop cold patches that lead to condensation. Always check it complies with building regulations first.
- Upgrade your heating – Central or underfloor heating keeps temperatures stable, reducing moisture in the air.
- Use thermostatic controls – Consistent indoor temperatures prevent cold surfaces where condensation forms.
- Vent your tumble dryer – Either vent it outdoors or use a self-condensing model to avoid excess indoor moisture.
- Fit extractor fans with humidistats – These switch on automatically when humidity rises, perfect for kitchens and bathrooms.
- Add trickle vents to windows – They allow fresh air in and stale, damp air out—especially useful when windows are kept shut.
- Keep trickle vents open – Having them installed is not enough; they need to stay open for constant airflow throughout the day.
Condensation can quickly damage your home, peeling wallpaper, ruining paint, and cracking plaster. Worse still, it can harm your health. The good news? With the right balance of heating and ventilation, it’s easy to control and prevent.