The first step in tackling rot is identifying whether it’s dry rot or wet rot. The images below can help you spot the key differences so you can choose the right treatment.
This guide offers a quick overview, but we also have detailed advice on how to diagnose and treat dry rot, including the best methods and products to use.
Dry rot can cause serious structural damage, so if you’re unsure, it’s a good idea to get expert help as soon as possible.
Pictures of Dry Rot and Wet Rot
Use the images below to quickly spot whether you’re dealing with dry rot or wet rot. These show the most common signs to help you identify and treat the problem correctly.
Dry Rot
Dry rot often appears as root-like strands in white, off-white, or silver-grey. Once dry, these strands become brittle, unlike wet rot, which stays soft and flexible. Dry Rot Strands or Hyphae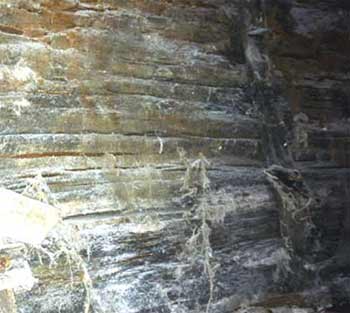
Wet Rot
Coniophora Puteana (cellar fungus) produces dark strands, grey, brown or black, in fern-like shapes. Even when dry, they stay flexible. Fruiting bodies are rare and appear olive-brown. Wet Rot Strands or Coniophora Puteana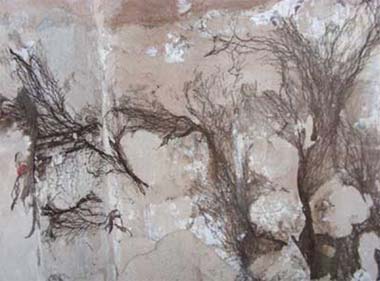
Fibroporia vaillantii looks similar but has bright white strands and can produce white fruiting bodies and spores.
Asterostroma features very fine, brilliant white strands. Its fruiting body contains star-shaped structures only visible under magnification. Wet Rot strands Asterostroma
Sheets or Mycelium
The name referes to what is commonly found to be teh root system of many fungo species and as the name would suggest, it appears as a sheet-like growth. Dry rots and wet rots from these species are as follows:
Dry Rot
Dry rot appears as a dull, off-white sheet or skin on timber. It may have yellow or lilac tones, but it’s never bright white. A brilliant white surface usually points to wet rot, not dry rot. Dry Rot Sheets or Mycelium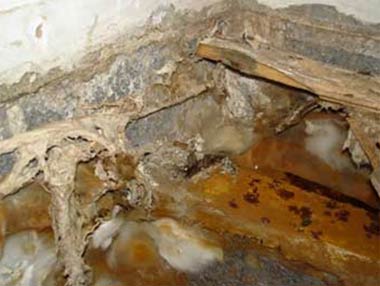
Wet Rot
Wet rot forms a bright, pure white skin or coating on the surface of affected timber. It looks cleaner and glossier than dry rot. Wet Rot Sheets or Mycelium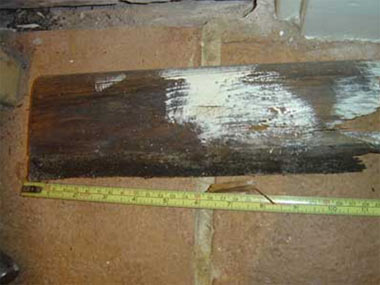
Fruiting Body (Sporophore)
The fruiting body is the final growth stage of dry or wet rot. It releases spores, similar to seeds, that land on timber and spread the fungus when the damp conditions are present and right.
Dry Rot
The dry rot fruiting body is typically flat and resembles a woodland mushroom. It’s rusty red or ochre yellow in the centre, with a pale outer edge, often off-white, lilac or grey. Red spores are usually visible in the middle. Dry Rot Mushroom, Fruiting Body or Sorophore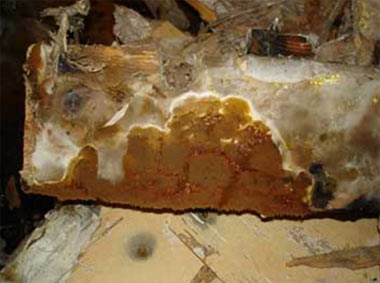
Wet Rot
Wet rot produces small, off-white fruiting bodies that look like tiny mushrooms. Wet Rot Fruiting body or Mushrooms
Dusting or Spores
The spores or “dusting” as they are also known are the reproductive elements of fingi and help it to spread far and wide. They are also very resilient
Dry Rot
Dry rot spores are a rusty red and are released by the mature fungus, spreading across nearby surfaces. This helps the fungus find new damp timber to grow on. However, reaching this stage is rare, as dry rot is usually found and treated earlier. Dry Rot Spores are Rusty Red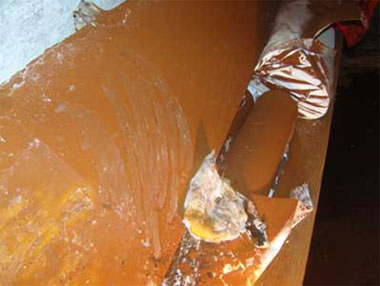
Wet Rot
The dust you see isn’t from spores — it’s caused by wood-boring weevils feeding on already rotting timber. It looks like fine sawdust because that’s exactly what it is. Wet Rot Dusting Caused by Wood–Boring Weevils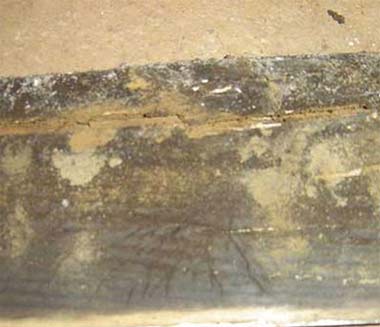
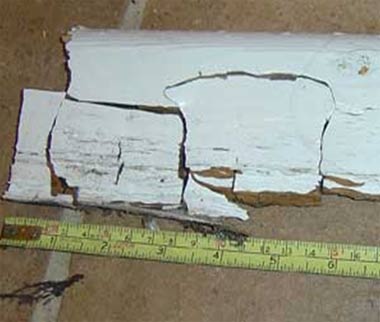
Wood Cracking or Cubing
This is the visual confirmation that timber has been infected with wet or dry rot.
Dry Rot
Dry rot causes deep cracks along the wood grain, followed by smaller cracks across it, creating a distinctive cube-like pattern. The timber may also shrink and warp inward as it deteriorates.
Timber Cracking Caused by Dry Rot
Wet Rot
Wet rot also cracks timber but forms smaller, more even cubes. In contrast, dry rot usually causes larger, uneven cracking. Timber Cracking Caused by Wet Rot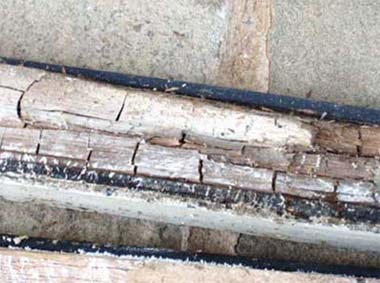
Dry Rot and Wet Rot Treatments
Once you’ve identified dry or wet rot in your home, it’s crucial to treat it quickly. Early action prevents further damage and avoids costly timber replacements later on.
Boron Powders and Solutions
Note: Since Brexit, boron-based treatments for dry and wet rot are no longer available to the public. Only licensed professionals can now use them.
Boron (also called Borate) is a highly effective treatment for rot, mould, and wood-boring insects. It also protects timber from future decay.
This water-based solution, known as a ‘biostat’, is safe for people, pets, and non-wood-boring insects. It’s also harmless to bats and their food sources.
Applied in two coats by brush or spray, boron soaks deep into wood and masonry. It’s long-lasting, odour-free, and produces no harmful vapours.
While powerful and reliable, boron treatments now require professional application, which often comes with a high cost.
DIY Dry Rot Treatment
If hiring a professional isn’t possible, you can treat dry rot yourself, but it must be done thoroughly and safely.
Dry rot is serious. It spreads quickly and can weaken structural timber, posing safety risks and leading to costly repairs if ignored.
Start by fixing the source of moisture. Dry rot needs damp wood (above 20% moisture) to grow, so repair any leaks first.
Next, expose the full extent of the damage. Lift floorboards, remove plaster, and inspect nearby timber and masonry, dry rot spreads beyond what’s visible.
Use a scraper and stiff brush to remove all fungal growth, fruiting bodies, and spores. Wear a mask for safety and bag the waste securely.
Cut away all affected timber, at least 500mm beyond visible damage, to ensure no spores remain. Replace with pre-treated wood.
Then, wash all exposed areas with a dry rot treatment or fungicidal wash. Once dry, apply a high-quality wood preservative to all timber.
Don’t forget the walls, treat surrounding masonry with a specialist dry rot masonry solution to prevent regrowth.
With care and the right products, dry rot can be tackled successfully as a DIY job, but speed and thoroughness are critical. Everbuild Lumberjack wood preservative to prevent dry rot infestation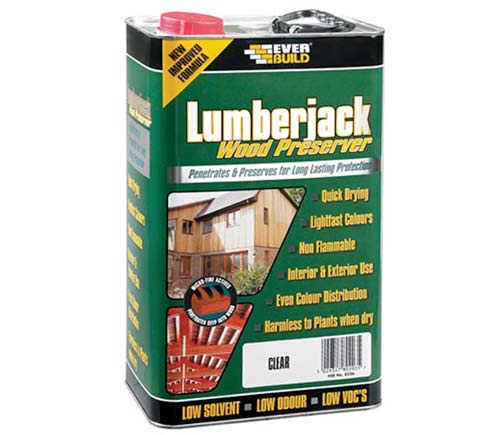
Treating Wet Rot
Wet rot is less aggressive than dry rot, but it can still cause major damage if left untreated, so act fast.
Step 1: Fix the moisture problem. Wet rot only forms in damp conditions. Repair any leaks or water ingress before doing anything else.
Step 2: Expose the affected area. Remove floorboards, plasterboard or wall panels so you can see how far the rot has spread.
Step 3: Check the timber. Use a screwdriver to probe the wood. If the surface is soft but the core is solid, it may be saved. If the screwdriver sinks into the core, the timber is beyond repair and must be replaced.
Step 4: Cut out damaged wood. Remove all rot-infected timber, at least 500mm past any visible damage, and replace it with new, pre-treated wood.
Step 5: Apply treatment. While the area is still drying, treat all exposed wood and surrounding surfaces with a quality fungicide to kill spores and stop further spread.
Optional: Use wet rot hardener. For minor surface damage (like window frames or doors), apply a wet rot wood hardener after treatment. It reinforces soft wood but is not suitable for structural repairs.
With the source of moisture removed and the area fully treated, your timber should stay dry and protected long-term. Everbuild 404 fungicidal wash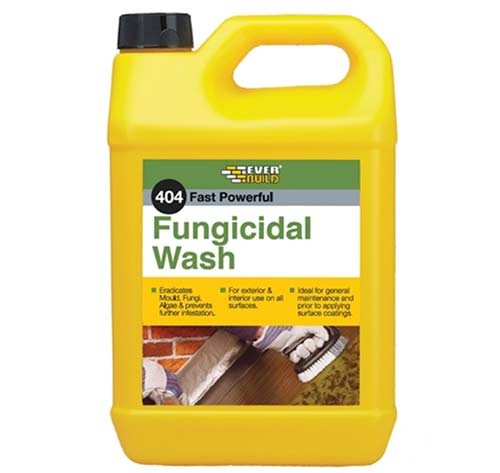
Additional Precautions Against Dry Rot
Aside form the above steps and methods you can employ to rid yourself of both wet and dry rot, here is an additional product you should also be aware of.
Dry Rot Paint
Dry rot paint from Property Repair Systems helps block the spread of rot
For extra protection against dry rot, apply a specialist dry rot paint to both damaged and nearby unaffected areas. This creates a protective barrier that stops the fungus from spreading.
Several dry rot paints are available, including the one shown above, which we’ve tested and found to be effective.
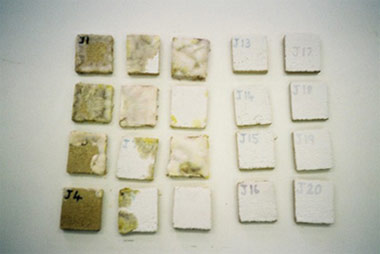
PRS Dry Rot Paint blocks fungal spread, untreated panels show visible rot, treated ones don’t
The image clearly shows the difference: treated panels on the right remained rot-free, while untreated ones on the left show fungal growth.
PRS ‘No Go Zone’ Barrier Paint is a special emulsion designed to stop dry rot from spreading through treated surfaces. Ideal for use behind skirting boards, around window frames, and in joist sockets, it’s been tested by the Building Research Establishment (BRE) and offers unique, proven protection.
Currently, there’s no other dry rot treatment that forms this kind of long-lasting, physical barrier. It’s a powerful addition to any DIY or professional dry rot treatment plan.
Identifying and fixing any form of dry rot or wet rot might seem daunting at first, but with the right steps, even beginners can tackle the job successfully and achieve great DIY results.