Sash windows are a common features on older and period properties and help to bolster and enhance their classic appearance.
As with all things with moving parts, they can eventually break and then require repair or replacement so in this guide we look at how to repair a sash window by replacing the cord.
What is a Sash Window?
Sash windows are a classic feature of many period homes in the UK. They are known for their timeless design and practical functionality.
They are characterised by their moving window panels, or “sashes” as they are known that slide vertically or horizontally to open and close.
They are most commonly found on Georgian, Victorian, and Edwardian properties, as they were both traditionally featured on these types of property and contribute to their overall elegant look.
A major reason for their popularity is their ability to enhance natural light and increase ventilation, both .
When it comes to their construction, the sliding windows or sashes of a sash window are held in place by parting beads, with a stop bead at the front.
Inside the vertical uprights at either side of the sash behind access panels their lies the weights and cords that help to raise and lower the sash smoothly. It is these cords that can break and then require replacing.
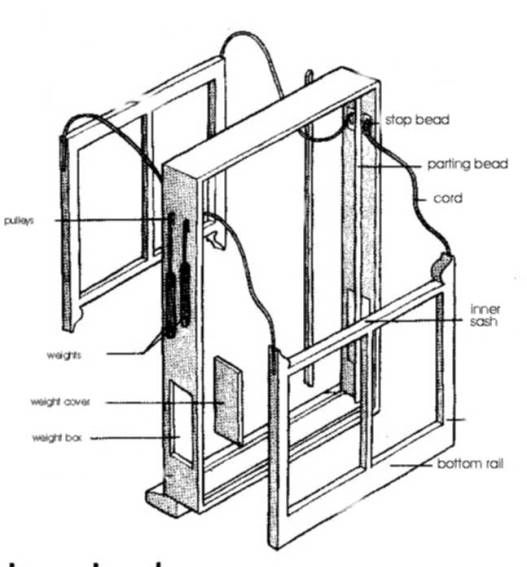
Cross section of a sash window showing all parts
What are the Key Features of a Sash Window?
The defining feature of a sash window is undoubtedly its sliding mechanism.
Unlike todays casement windows that open on hinges, sash windows use a system of cords, pulleys, or springs to move the sashes smoothly and prevent them from crashing down.
The design is traditionally made from wood, but modern options include uPVC and aluminium for enhanced durability and low maintenance.
The key features can be summarised as follows:
- Vertical Sliding Sashes: The most common style, where one or both sashes can slide up or down.
- Horizontal Sliding Sashes: Often referred to as Yorkshire sash windows, these move side-to-side and are typically found on period homes.
- Single vs. Double-Hung: Single-hung sash windows allow only one sash to move, while double-hung versions enable both sashes to slide, offering better ventilation options.
Why Are Sash Windows Popular in the UK?
Sash windows are deeply rooted in British architectural history, as they add character and charm to many period properties.
Not only does their iconic design help them blend seamlessly with period architecture, this design also serves a purpose in that they are designed to suit the UK’s temperate climate, providing effective ventilation while maintaining energy efficiency.
Additionally, the sliding mechanism also makes them ideal for the many narrow streets or small gardens featured in many Georgian, Edwardian and Victorian properties they feature on, as they don’t protrude outward taking up space when opened.
How to Measure Sash Cord Length for Replacement
To ensure that the window continues to work correctly once the cord has been replaced it’s necessary to ensure that the new cord is the correct length.
You can obviously measure the old cord, however getting it out in one piece is often tricky and it’s easier to simply cut it.
So, in order to measure your replacement cord correctly, using a tape measure, measure the whole of the window opening from the top all the way down to the sill at the base and then add around 6 inches or so.
This will give you enough cord to allow for both knotting off at the sash and also tying off at the weight. You will need 2 lengths or cord, one for each side.
Tools Needed for Sash Cord Replacement
In order to successfully replace the cord in your sash window you will need the following tools and products:
- Tape measure
- Pen/pencil
- Sharp knife – utility knife etc.
- Pliers
- Hammer
- Small chisel, screwdriver or similar
- Small panel pins
- Sash cord – enough replace all cords that need doing. Get the waxed type if you can
- 120 grit sandpaper
How to Replace a Sash Window Cord
Replacing a sash cord may seem like a very tricky job if you have never done it before, however if you take your time and work through the below steps, it should be more than possible for even a DIY novice to do.
For the purposes of this guide we are going to be working on one of the most common sash windows, the single-hung window that features a bottom opening sash.
Step 1 – Lay out Dust Sheets and Prepare Area
The very first job to do is to prepare the working area by moving any obstructions out of the way such as furniture, ornaments, rugs etc. and then lay out dust sheets all around the area.
Any objects that cannot be moved should also be protected using dust sheets and the likes.
Also, ensure that you have all the necessary tools and products ready to hand.
Step 2 – Remove Staff/Stop Bead Holding Sash in
The first job is to remove the stop or staff bead as it’s known from the front of the window so the sash can be removed from the frame.
First, run a utility knife down the joint between the bead and frame to break any caulk or paint seals. This will prevent any major paint chips (hopefully).
Using a chisel, screwdriver or small pry bar, knock it gently into the joint and prise the bead away. Work slowly and in stages to prevent damage or breakages until it comes off. Repeat for the other side and then clean the edges of the bead off using your chisel or sandpaper.
The bead itself is designed to be removed so should be held in place using a removable fixing or small nails.
Step 3 – Remove Sash Window(s) and Parting Bead
With both beads out of the way, the sash window itself should now lift out of the frame or sash box as it’s known.
These tend to be heavy so be aware of this and get help if needed. If the sash cords are broken then the sash itself should lift out fine, but if not you will need to cut both sash cords to enable the section to come out.
If you were working on double hung window, you would now remove the top sash also.
With the sash removed, next, pry off and remove each pairing bead in the same manner as the staff beads. These beads run between each window section, keeping them apart and allowing them to slide past each other.
These will either be small beads fixed to the frame or small thin beads that sit in a recess channel.
Once you have pried them off/out, clean them up using sandpaper or a chisel. Also, ensure you thoroughly clean the channel if there is one.
Step 4 – Remove Sash Weights
Next, you will now need to remove the sash weights. The weights themselves are hidden behind the weight cover or weight box as it’s known. This is simply just a timber cover in the side of the frame that is pried out to reveal the weights.
Using a similar method to the above, pry the cover away to reveal the weight and then remove it completely. Repeat for the other side also. Depending on the type and design of window, each cover may just simply pop off, so work slowly and carefully to avoid any damage.
If you are working on the top sash too, you can now also remove it and its weights in the same way.
Step 5 – Replace Sash Cord
With the cord, weights and sash out of the way, you can now replace the cord.
Firstly, on the sash section, pry out the nails (if there are any) and then pull out the old section of sash cord. Repeat for the other side also. They may just be knotted and if so, pry them out and away using a screwdriver.
Now, take a new length of sash cord and carefully feed it over the pulley where the old section of cord was. For easier handling as this can be very fiddly, tie a piece of string to the cord, guide the string over the pulley, and pull it through until the cord is reachable.
Once the cord is secure, remove the string to prevent it from slipping back.
Note: Feed the cord from the window side into the boxing and down into the weight compartment.
Once threaded, securely tie the counterweight to the new cord to keep it there in place.
Step 6 – Reassemble Sash Window
Before reassembly, lubricate the sash cords (if they aren’t already) using a silicone lubricant or the more traditional candle wax, this works a treat.
With our bottom opening sash, take the sash and position it roughly in the frame. Thread each cord down into the recess in each side of the sash section.
To reassemble, now pull the new cord until the counterweight disappears into the side of the frame and lightly tap against the top. While holding the weight in this position, secure the cord by nailing it into the groove on the side of the sash at the same height as the other cords (if there are any existing cords that you removed).
Finally, tie the cord off by using a basic self-tightening knot.
Once secured, replace the sash. As you slide the window upward, the counterweight will drop into place, supporting the sash securely and preventing it dropping.
If replacing a top sash also, now put the side of the sash that has the existing cord (if only one was broken), back onto its side of the frame, and make sure that the bottom of the sash is about 4 inches above the cill.
Once back in the frame, refit the centre pairing bead correctly then ensure the sash is fully back in the frame and then refit the staff bead to hold the section in place and you’re now pretty much done.
Once all back together it’s a good idea to now repaint any areas that you have damaged the paint on, making sure the coating isn’t too thick and prevents the sash opening and closing.
Replacing a sash cord can seem like a very daunting task if you haven’t attempted such a job before, but as long and you follow the steps above you are sure to succeed.