Sash windows were traditionally the window of choice back in the day, but today they really only feature on historic and period properties.
Despite their visual appeal, painting a sash window can lead to all sorts of trouble. If it is not painted in the correct order the sashes will stick together or each sash may stick in the frame rebate.
To find out exactly how you should prepare and paint sash windows, read on below.
What are Sash Windows?
The go-to choice today in terms of windows is the casement window. This type of window first made an appearance in the 18th century and was the direct replacement for stone mullion windows and also the sash window.
Unlike the casement window where the casements open outwards from the frame, with a sash window the parts of the window that actually open, open and close vertically, sliding up and down in the frame.
Sash windows are generally featured on older more period properties and where stipulated by a conservation area order that states a property much have features of its time period.
One of the main reasons why sash windows have been replaced by the more modern casement window is because they are such high maintenance, needing a lot of attention and constant restoration to keep them in top condition. Additionally they don’t seal anywhere near as well as a casement window so do produce a lot of draughts.
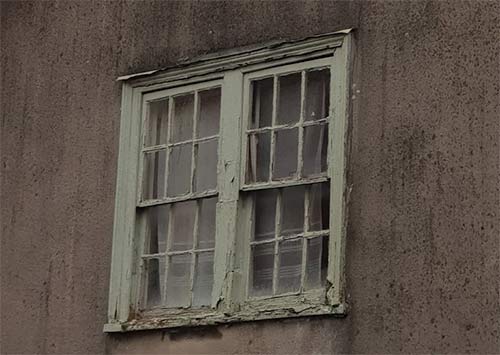
Traditional wooden sash window in poor condition
What are Single Hung and Double Hung Sash Windows?
If you have ever dealt with sash windows before or are just getting to know them then you may have heard the terms single hung and double hung.
In terms of what this means, it actually means which parts of the sash window will move. With a single hung sash window, only one part of the window will actually move and the other part will be a fixed pain of glass.
With a double hung sash window, as you may guess, both top and bottom parts of the window will open and close.
On the whole, single hung sash windows tend to be the most popular type of sash window featured in most homes.

Single hung sash window
How Often Should you Paint Sash Windows?
In terms of how often you should paint a sash window, this really depends on several factors, the first being the condition of the window itself.
In pretty much all cases, sash windows are painted to ensure they are protected from the elements to prevent them getting damp and rotting. If the paint, particularly on the outside is cracked and flaking then it will let in damp and moisture which will rot and destroy the window.
So, if the protective layer of paint isn’t doing its job then it’s time to paint your sash windows.
When it comes to a maintenance schedule, to keep a sash window in top condition it’s best to prep and repaint them roughly every 5 years.
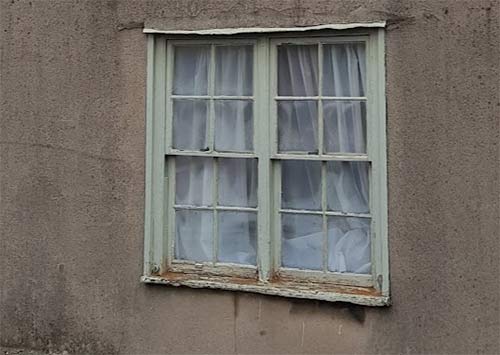
Sash window in need of repair and painting
What Order do you Paint Sash Windows?
Due to all the different surfaces and moving parts, painting a sash window can be very tricky. If you paint one certain area in the wrong order you will either have to wait for it to dry before you can move on or you risk either getting covered in paint or parts drying and getting stuck together.
In order to avoid any such issues there is a particular order in which you should paint a sash window. Note: start on the outside of the window first.
- Remove any and all window furniture
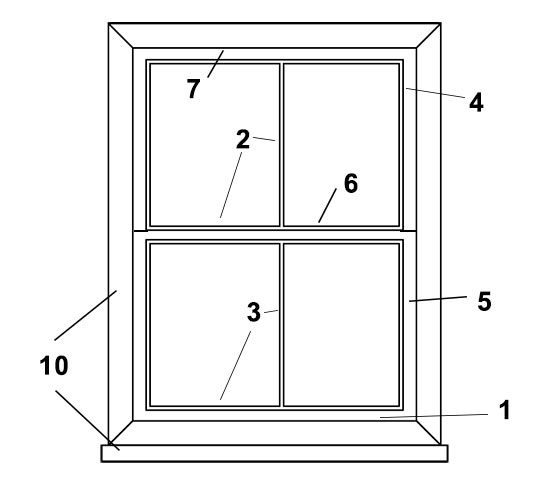
- Paint mullions in top sash – both horizontal and vertical (bottom sash pushed up)
- Paint face of frame – lower sash pushed up
- Paint top of top sash – As it’s pulled down and you can access the top area
- Paint underside of top rebate
- Paint the lower sash – Repeat the steps above for the lower sash
- Paint remaining mullions and frame
- Paint frame casing and cill – outside first and then inside
- Once all else dried, push bottom sash up and paint side rebates, leave to dry and then vice versa for the top side rebates
- Clean off any dried on paint from glass
Different stages of painting a sash window
How to Prepare Sash Windows for Painting
Just as with every decorating job, before painting a sash window it will need proper preparation.
Sash windows fit very tightly together and the more paint you put on them the tighter they get as the layers build up.
At some point in the decorating life of a sash window, you will need to strip all the old layers of paint off and get back to bare wood as if the layers of paint get to a certain thickness any moving parts will simply jam up.
If this is the case for your window you will need to follow the instructions in our replacing a sash cord project for instructions on how to strip the window down and take it to pieces.
By taking it to pieces you can then easily strip all the paint off and repaint from scratch.
As this process is quite involved it’s also time consuming and will take, in all reality, a few days to correctly strip and repaint. This obviously leaves you without a window so you will need to board the gap over until you’re finished and can refit everything.
Another point to note is that you can really only paint sash windows when they are dry, as if water has penetrated through damaged paint, simply painting over it will lock the moisture in and they will rot from the inside.
With this in mind, summer time is normally the best time of year to undertake this task.
To prepare your sash windows for painting:
- Remove all of the window furniture e.g. locks, catches etc.
- Use a decorators knife or scraper to scrape off any and all lose and flaking paint. Ensure you get down into any nooks and crannies removing as much as you can
- Sand the whole window over using a medium grade sandpaper such as 120 grit, again getting down into all tight spaces
- Repair any damage or rot. Dig any such areas out, clean adn sand them and then fill any holes using a good quality filler
- Once filler has cured, fully sand down flat and level with the surrounding areas
- Vacuum over all areas and remove any and all dust and then wipe over with a damp rag to remove any residue and allow to dry
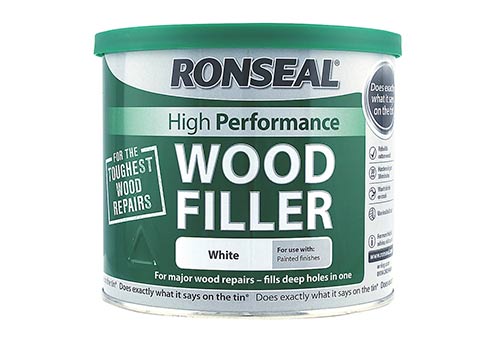
Ronseal high performance wood filler
What Paint Should I Use to Paint Sash Windows?
If you are stripping all of the paint off of your sash windows and painting them from scratch as there are too many existing layers of paint on them you will need to prime them using a primer or undercoat before adding your finishing topcoat.
When painting bare timber the belt and braces approach is to prime the surface, add an undercoat and then add your topcoat, but there are now many good quality all-in-one primer undercoats that can do the same in one application. Ideally you would add 2 coats of this or 2 coats of each if adding them individually.
If you are simply “touching up” and the existing paintwork is in pretty good condition you can simply give everything a light rub down and then 2 coats of topcoat but you can also add an undercoat as well as tis will help smooth over any imperfections.
When it comes to what top coat paint to use, again, the options available are vast but on the whole any good quality water-based exterior eggshell, matt or gloss paint will give you a great finish.
As with the above, 2 decent top coats should be added for a quality finish.
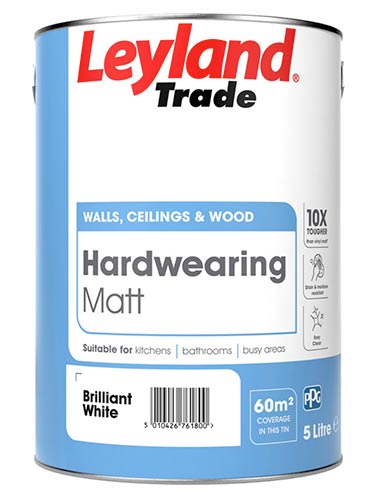
Harwearing exterior matt paint
How to Paint Sash Windows
Now that you know exactly how to prepare your sash window for painting it’s time to get the job done. The painting order that we have stated above is really just a guide as there are many different ways to paint a sash window but this is the one we have found to be best after much practice.
One of the reasons for painting windows and doors in the order we do is simply to do it in a way which keeps your fingers and elbows out of the wet areas you have just painted. Its not a scientific as it seems and most of it is just common sense!
Whether you are painting on primer or undercoat or even a topcoat, the process is exactly the same as detailed below.
Note: Each stage should be done both inside and outside if surfaces exist to be painted.
1. Remove Window Furniture
If you haven’t already done so in the preparation phase, remove all locks and handles from the window frame. It’s hard enough to paint as it is without painting round all the ironmongery so take it all off and put it to one side.
2. Paint Mullions in Top Sash
To get at all the parts of the sash window its necessary to reverse the sashes. Lift the bottom sash as high as it will go and pull the top sash down. We are going to start with the bottom sash that is now currently pulled to the top
Painting the mullions comes first. Mullions are the division strips within the frame that hold the individual panes of glass. Paint carefully but don’t worry about a little paint on the glass.
Many people try to put masking tape on the glass but this causes more problems than it solves. Don’t worry about a bit of paint on the glass, we will deal with how to get that off later.
If you are right handed start at the top left corner and work across to the right just as you do when writing. Many people prefer to paint one side of all mullions first, then go back to paint the other side and finally the front.
This is a good way to do it as the job is time consuming and painting all of one mullion in one go can lead to the paint getting a little "sticky" as you finish. This makes it harder to get a really smooth finish.
We tend to paint the left hand side of each mullion first, then go back to painting the right side. We also paint the underside of each horizontal mullion separately before going back to do the top.
Paint the mullions in the lower sash. You wont be able to get to them all but paint the ones you can get to easily. Use the same method as above.
3. Paint Face of Sash Frames
Paint the face of the frame on the lower sash which you have pushed to the top. This the structure that holds the mullions and glass in place.
Ensure your coats are level and even with no runs.
4. Paint Top of Top Sash
As the top sash window section has been pulled down the very top should now be easily accessible so go ahead and give this a coat of paint, again keeping it flat and level and ensuring no runs.
5. Paint Top Rebate
Next, paint the underside of the rebate into which the top sash will push when the job is finished and the window is closed up. Ensure there are no runs and again your coat is nice and flat and even.
6. Paint the Lower Sash
With the top sash now painted you can then repeat all of the above for the below sash window starting with the mullions fir and then the frame.
Once done push the top sash back up but do not push it all the way into the rebate. Stop short of any painted surfaces meeting and do the same for the top and pull this one down .
7. Paint Remaining Mullions and Frame Sections
Now that you have swapped the sashes back around again so that they’re sitting where they should be paint the remaining mullions and frame faces that you should now be able to access. Anything you could not reach before should now accessible.
8. Paint Main Frame and Cill
Finally the main window frame casing and the cill can be painted. As these both make up the bulk of the window it’s important to do them at the very end as quite often, painting the other areas are easier when you can rest on the cill or frame.
As with all other areas, ensure your layers of paint are nice and flat and even.
9. Paint Inside Sides of Rebate
With all else now painted the final areas to paint are the inside sides of each rebate. To do this push the bottom sash all the way up and apply an even coat of paint to each side and then allow to dry.
Once dried swap the sashes around e.g. push them both down and then apply paint to the inside top rebates and allow to dry.
10. Clean off Dried Paint From Glass
Once all has finally dried the last job is to remove any dried on paint that has found its way on to the any glass.
The best too for this job is what’s known as a window scraper. This special weapon features a sharp thin blade at the front that can be used to gently scrape off any dried paint without causing damage to any surrounding areas.
Simply push the blade of the scraper onto the glass and run gently in towards the mullions. Now hold the blade vertically and run it carefully along the edge of each mullion where it meets the glass. This will cut through the paint so when you scrape the surplus paint will lift and leave a clean edge.
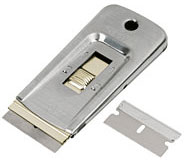
Window scraper
With your sash window now beautifully painted and looking fresh, if you have any draughts caused by gaps in the frames, now is the time to seal these up also. For full information on how to do this see our project on sash window draught proofing for full details on how to do so.
Painting sash windows correctly and getting a great finish can be a fairly lengthily process but if you take your time and follow the steps above then you can be sure to get a great and lasting finish.