When starting on a self build project, aside form the land you are going to build on you will need to find a decent and competent builder to actually build it (this may of course be yourself) and finally some materials for him to build it with.
If you are somewhere around this stage you will also have to decide whether you are going to find someone to project manage your build for you or whether you are going to do it youself.
If you are going down the builder and project manager route they will manage the sourcing, purchase and delivery of materials for you so you won’t actually have to do this yourself (unless you stipulate this) but it is a good idea to understand the process of what’s involved.

Once you have the plans and the land sorted, it’s time to get your materials and start building
If, however, you are going to be doing this yourself then it is essential that you know about the various methods of sourcing and purchasing self build materials to make sure that you get the right items at the right price.
When it comes to self build projects, budget is a massive consideration. Often there will be a fixed amount of capital to cover the cost of the build (labour if any and materials), with possible a little in reserve for any emergencies or unforseen circumstances e.g. hidden problems with groundworks, sudden increase in prices etc….
Before you Start Purchasing Materials
As you can see already there is a huge amount of things to think about and consider so it is essential that you do your homework and research before you even start. For example, if you purchase a piece of land with the hope of getting planning permission on it, but it is refused, you could end up waisting a huge amount of money, so, as you can see, it is essential that you know everything you need to know.
As we have established, running a self build project yourself and find and selecting the right materials requires a huge amount of knowledge and research, so use any and all sources available to you:
The Internet
As we all know, there is a huge wealth of information available online. Here on the DIY Doctor website we have a section dedicated to self build and you will find lots of help on not only how to do certain jobs, but what materials and tools are required for each.
Aside from our own site there are also many others full of great information such as the Build It site found here and also the National Custom and Self Build Association site here, both containing lots of hel and advice on sourcing and selecting materials.
In certain locations, materials such as bricks and blocks, windows, roof tiles/slates etc…. may be stipulated by your local authority or by Building Regulations (more about this later). In these instances the Planning Portal website can be a very valuable tool for understanding why certain things need to be done a certain way or how you can contact your local building control departement.
Local Authority Building Control
As mentioned above, your local authority may in some cases state what materials you have to use.
In locations deemed as conservation areas, there will be a certain amount of architectural herritage that needs to be maintained and if you are building or renovating in one of these areas, your local authority will want to make sure that your new development fits in with the existing properties.
This may mean you have to use a certain type of stone (e.g. Bath stone in Bath) or roof tiles, you may have to use or incorporate renewable and eco friendly materials or you may even have to offset the carbon footprint of the entire build through the overal energy efficiency of the structure once complete. What ever the requirements may be, your local authority will be able to advise you.
Local authority building control
Architects and Structural Engineers
Out of all the resources available to you, your architect or structural engineer will in most cases be one of the most valuable.
Houses come in many shapes and sizes and during their career, an architect or engineer will probably have designed a fair few using a range of different materials and construction techniques.
With this in mind they will normally have a great deal of knowledge on what materials are available, what options you have for each e.g. insulation, bricks and blocks, types of timber, types and sizes of steels etc…. and also and in some cases more importantly a more cost effective option would be better, for example timbers that could be used in place of more costly steel that would do the job just as well.
More often than not you will be using an anchitect or engineer local to your area. Through this they will be used to working with your particulat local authority and will be very familiar in the ways that they work, what materials and techniques they prefer and where they may be a little lienient when it comes to what materials can be used.
This is definetly something you should bear in mind when deciding if you should use their services as it could potential save you plenty of time and money!
Builders Merchants
It shouldn’t be forgotten that these guys work with a massive range of, not only materials, but also builders on a daily basis.
Due to this they very often have a wealth of knowledge on, again, the types of materials available, the range of prices and quality of different materials, where a cheaper alternative can be used in place of a more expensive one that fullfills the exact same job to the exact same level and much more.
Along with this they may also have a decent idea of the latest materials and techniques emerging and also what materials are popular through the range that they sell and also through general chat from the builders themselves.
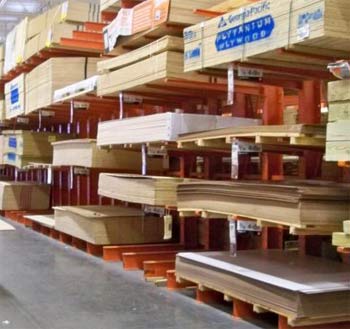
Help can be found at your local builders merchants
Books
Although we live in an online age, books are still more than relevant.
There are many books available covering all aspects of the self build process, including sourcing materials, what materials to use, different types, levels of quality etc….
One book in particular that we like is called Build Your Own Home by Andy Patmore:

Build Your Own Home by Andy Patmore
What Will I Need?
This is a bit of a “how long is a piece of string” question really. The materials you need to complete your self build home will vary quite a bit depending on it’s design, the area in which you are building, the size of the property, the type of property etc….
Despite this there are quite a number of materials that are pretty much common to all builds:
Foundations and Groundwork
The first job when building the house is to dig and set your foundations and lay any drainage.
The foundations need to be dug in accordance to the guidelines set by Building Control and also the Building Regulations Approved Documents to the specified depth. Once dug they will be filled with the appropriate grade concrete, suited to support the above structure.
Just before the concrete is poured you will need to set in your drainage and soil pipes in the desired places within the footprint ready for your toilets and other amenities. It’s worth noting that if drainage has to run through a section of foundation then you will need to insert a lintel.
Once the foundations are set you will then need to build up to DPC (damp proof course) level. This usually involves laying insulation and setting a concrete pad to form your concrete base floor (this can also be block and beam or timber).
Along with the drainage you will also have to get any services run in. Services include such things as gas, electricity, phone lines etc….
With the above in mind, the materials should roughly include:
- Concrete to form your footings (normally ready mix for speed and ease)
- Drainage and soil pipes, soakaway crates or pipework, access chambers etc….
- Bricks, blocks or stone to build up to DPC level
- Sand and cement for brick/block/stonework
- DPC membrane
- Concrete, timber or block and beam sectiosn to form pad stone base
- Vents, air bricks etc…. if needed
- Cabling or engineers to run service pipework, cables etc….
- Lintels to support any drainage that has to run through foundations
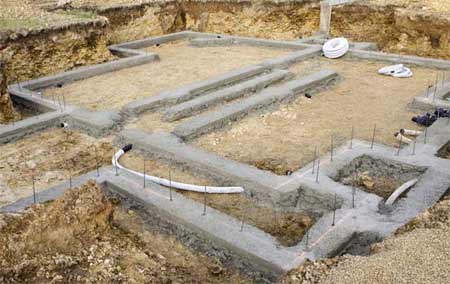
Foundations laid and ready for DPC and pad
Wall Structure, Windows and Roof
With the foundations in place, drainage laid and your floor or pad and DPC set, it’s now time to start on the walls and then the roof.
Again, your wall construction materials will depend on your design. In most cases it will be brick or block (concrete block inner skin, with either brick or rendered block outer skin).
With the above in mind there are plenty of new techniques coming in to their own such as steel or timber frame and brick/block or eco materials such as straw bales, insulated concrete formwork, rigid foam, structural insulated panels and many others that you may want to look in to.
With all the walls up to wall plate level, next comes the roof. Again, the exact materials and construction techniques needed to get your roof on will depend on your design and requirements and possibly building control and local authority requirements e.g. certain timbers or tiles to be used.
Once the roof structure is up and tiled, the final items needed to make the structure water tight are the windows and doors. Again, in most cases this will be your choice, but normally they will be uPVC, composite or hardwood.
As above, it may also be stipulated by your local authority that you have to use a specific product e.g. hardwood windows, doors etc…
As a summary, the materials you will need at this stage should include:
- Bricks, blocks or stonework for your inner and outer walls
- Timber or steel to form the frame work for the structure (if you are going down this route)
- If using a frame, you will need infill e.g. bricks/blocks, straw bales, foam, structural panels etc….
- Cavity insulation if needed – normally Celotex/Kingspan, eco friendly panels, wool etc….
- Sand and cement for brick/stone/blockwork and edges of tiles
- Wall ties for brickwork
- Timber for roofing/ceiling joists
- Tiles or chosen roof covering materials e.g. EPDM rubber, membranes for green roof etc….
- Steel work if needed for roof or other areas
- Ridge tiles or ridge system (dry ridge)
- Chimney pots/stacks/flues etc….
- Lintels or other supports for window, door or other spans
- Windows, doors, patio doors, bi-folds, window sills etc….
- Ply/chipboard for any flooring
- Facias, soffits, guttering
- Fixings – this can encompus a huge range of things including clips, nails, screws, bolts, nuts, threaded bar etc….
- Green technologies – This could include items such as solar panels, solar collectors, air source/ground source heat pumps and the like. If any of these require pipework, cabling, storage units etc…. it may be a good time to start getting them in place while you have the room
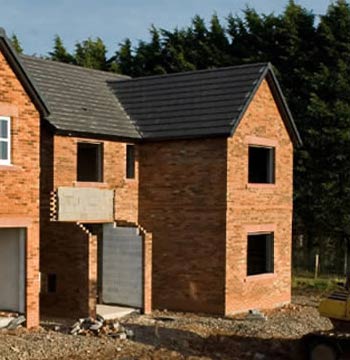
Shell built and finished ready for windows to be fitted
First Fix, Plastering, Second Fix and Internals
Now that the structure is water tight, it’s time to move inside.
At this stage you will be putting up the studwork to form partition walls, insulating it, installing door frames and then plasterboarding. Before actually boarding it fully you will want to run any electrical cables and plumbing pipes that will be inset into the walls or ceilings (first fix).
Whilst erecting walls you will also want to be putting the floors down such as ply/chipboard where timber floors or upstairs floors are required, laying screed on concrete floors etc….
Before screeding you may also want to include also laying underfloor heating pipework and any associated insulation and membranes.
Moving back to plumbing and electrics, you will want to get all your supplies in place.
For plumbing this will include running pipework to the exact locations for sinks and basins, baths, showers, boilers, radiators etc…. and for electrics this will be running cabling to all sockets, switches, ethernet ports etc….
Once all the first fix items are ready and initial tests should be carried out such as basic cable continuity tests and pressure tests of pipework to ensure there are no leaks or broken wires that could cause issues later down the line. Once this is done, then the remaining open walls can be plasterboarded.
Once all boarded it’s time to get some plaster on the walls. This will involve taping all the joints and adding angle beads and stop beads where needed. Once laid on, the plaster could take a fair while to cure and dry out correctly depending on humidity and temperatures so be prepared for this.
Once cured, you may decide to do all the decorating (painting, wallpapering, tiling etc…) while the rooms are effectively empty as it’s much easier that without the likes of toilets, sinks, or kitchen units in the way.
Next, you will want to start getting all your amenities in place. This will include baths, showers, kitchens, toilets etc….
At this stage you will also want to be doing the second fix on all plumbing and electrical items. This will include installing and/or connecting up all light switches and sockets, pendants and lights, water supplies to baths, basins, showers, radiators etc…. and also installing any boilers and associated gas/oil supplies, gas supply to cooker and any other appliances that require this.
It is also likley that you will looking at fitting skirting boards, architrave and also any decorative fittings around about this time
Your building site, at this stage, will be looking much more like an actual home and you won’t be too far off completing. To summarise, to get to this point you will need most, if not all and more of the following items:
- Timber and/or blockwork for stud walls and partitions
- Insulation for stud wall cavities – normally Kingspan/Celotex or similar
- Plumbing pipework – can be copper or plastic pushfit type, probably 22mm and 15mm
- Plumbing fittings – elbows, inline joiners, isolation valves, stop ends, pipe inserts (plastic pipe), equal T’s, clips, waste pipe and fittings (soil pipe, shower/sink waste) etc….
- Amenities such as toilets, basins, sinks, shower fittings and trays, baths, taps, shower unit, shower screen/enclosure, cookers, boilers, radiators, TRV’s etc….
- Kitchen – including floor units, wall units, worktops, doors etc….
- Electrical fittings such as cable, clips, sockets, switches, light fittings, phone sockets and cabling (including ethernet cable if needed)
- Flooring – ply or T∧G chipboard
- Sand and cement – This will be used to create a screed if you are screeding a floor and also for making mortar for blockwork if needed
- Plasterboard, Aquaboard (if needed), coving (if needed) etc….
- Underfloor heating pipework if needed
- Gas pipework and fittings
- Base coat plaster, top coat plaster, plasterboard adhesive, skrim tape, stop/angle beads
- Paint – for mist coats, top coats, skirting, door frames
- Timber for skirting boards, architrave, beading etc….
- Fixings – Again as above, you will need quite a few such as Wood/timber screws, plasterboard screws
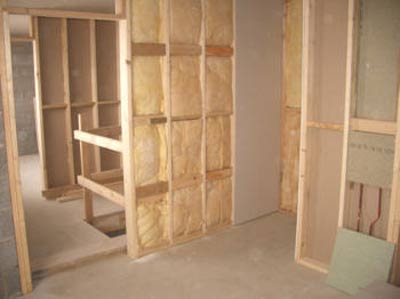
First fix plumbing in and stud work walls constructed – Image courtesy of selfbuildselfhelp.com
Finishing up and Snagging List
By this point you will be pretty much there or thereabouts. The final items to cover before actually moving in will be mostly the final decorative items such as carpets, shelving, picture hooks, caulking and silicone, possible tiling in the kitchen and/or bathroom if you haven’t done this already.
The final floor coverings will also need to be fitted about now. These include things such as carpets, laminate or hardwood flooring and also possible tiles.
There may also be items on your snagging list such as the replacement of any damage to items caused during the build, repair/replacement or anything that was rushed and not quite finished to the standard you would like.
Materials needed for this final stage may include:
- Floor coverings – carpets, tiles, laminate/hardwood flooring, lino/vinyl etc….
- Finishing – this could cover quite a range of things depending on your design and finishing requirements but should feature caulk, silicone, possibly filler for any damage repair
- Timber for shelving – to keep with the self build theme you may want to make your own shelving for storage. If so, you will need sheet timber or timber planks, 1×2 inch or 2×2 inch timber for brackets, fixings, screws, paint, varnish or stain for finishing etc….
- Tiles – you may want to also tile above the worktops in the kitchen or tile the bathroom if you haven’t already, if so, you will also need adhesive, grout, spacers etc….
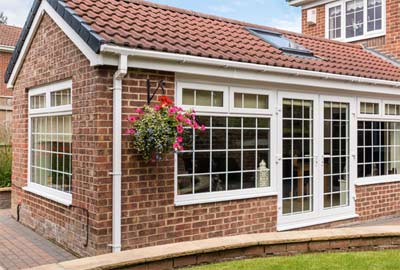
Your dream home built and finished
After all of the above, you should now have a good idea of the shear scale and volume of items needed in order to construct a house form scratch. You should also bear in kind that the above is only a rough guide to the materials needed for a standard property.
If you start delving in to non-standard design ideas and materials, further requirements and costs can quickly escalate.
One of the golden rules when it comes to self build is be realistic when it comes to what you want to achieve and what materials you want to use.
The temptation of a “blank canvas” can quickly jump to ideas of solid oak kitchens, granite bath tubs and many other luxury items. If you have the budget for items such as these then go for it, but if your budget is tight don’t be tempted to think “let’s go for it and worry about the cost laster” as you may end up cutting corners where you shouldn’t be to cover the costs.
Location Considerations and Local Authorities
As we have already mentioned above, your local authority can in some situations dictate to you some of the materials that you have to use e.g. a certain type of stone or windows to ensure that your new build will still fit with any existing properties and the surrounding area.
One other consideration to take in to account is where your building pllot actually is.
If your plot is considered to be “easy access” then materials can be dropped to site easily as any delivery lorries will be able to drive right to site and make the drop.
If however your site isn’t so easy to get to e.g. it’s down a very tight, single track lane, miles out in to the country side, across several fields etc…. then access may be quite difficult as lorries won’t be able to get there due to their size, or may have difficulty travelling across muddy fields and the like.
If this is the case then they may need to drop at the nearest road and you will have to transfer your materials to your site.
Depending on the distance and considering the nature of the items, for example 10+ tonnes of sand, ready mixed concrete, hundreds of concrete blocks or bicks, this is no mean feat and will usually involve hiring smaller vans, dumpers, powered barrows or front loaders, all at considerable cost in terms of both time and money.
With the above in mind, you will certainly need to consider this in your budget if your site is going to be hard to get to.
Another point to remember is where your materials are going to be stored. If you have lots of expensive items lying around and the site isn’t going to be occupied all the time, this offers a huge temptation to thieves.
Additionally, items such as plasterboard, bags of cement, bags of plaster, untreated timber, kitchen units etc…. do not fair well if left out in the elements and can easily be damaged by rain. With this in mind, they will need to be stored in a dry environment to ensure they remain in top condition.
When it comes to actually getting the materials themselves, you’re not going to want everyting for the whole build delivered at the same time, for example, you’re not going to have all of your timber for the internal stud work before you’ve even got the gound work completed.
To ensure you have everything you need when you actually need it you will want to work to a staged delivery schedule.
This way you won’t have loads of materials on site that you don’t need.

Think about the access to your site and getting materials delivered
Finding Builders Merchants and Other Suppliers
Once you know what materials you are going to need, it’s then time to start sourcing them.
Unless you are located in the middle of no where, the chances are you will have at least one local builders merchant, whether they are part of a national chain such as Travis Perkins, Wickes, B&Q etc….. or an indepandant, it will soon become your second home!
Before settling on just one (if you have the choice), it’s a good idea to pop in to all of them and have a chat with the staff. Take a copy of your plans and materials list and run them through what you are looking for and ask if they would be willing to get a price list up together for you.
Just before you do this though, it’s a good idea to break your materials list down in to stages e.g. items you will need for ground work and drainage and then a seperate list for getting the structure up to water tight and next list for first and second fix items etc….
This way it won’t seem such a daunting task.
It is advisable to have at least three suppliers available to you, even if you have to go further afield as in most cases all of their prices will vary slightly so in almost all instances you will be puchasing different materials fom each.
Aside form the traditional brick and mortar stores, also think about thematerials you could source online. Large sites like eBay, Amazon etc…. sell a huge range of materials at very competative prices.
Although you may be hard pushed to get the likes of bricks, blocks and timber from these such sitescheaper than form local sources, items such as bathroom suites and kitchens etc…. are often a fair bit cheaper.
When working to a budget, ultimately it’s always going to come down to price; where can you get the best quality items at the best price and this is really going to come down to the amount of research you do, unless you have a project manager to do this for you.
Negotiation, Prices, and Trade Accounts
As we have established above, the prices you pay for materials are critical to ensuring that your self build project is actually financially viable and you can realistically complete!
When it comes to getting the best prices that you can, research is key.
Whilst visiting or calling all of your local merchants always ask about the possibility of obtaining a trade card or opening a trade account.
By doing this, a trade account or trade card will bring many benefits. In some cases, some companies will match online prices to in-store prices, give special offer deals, give discounts on bulk purchases, hold prices if you order in advance, price match other local merchants and a whole host of other great benefits.
Trade accounts and cards are not just reserved for those actually in the trades, if you are involved in renovation, extensions, alterations and or self-build then most merchants will consider you to be eligible.
A summary of some of the benefits are:
- All your building materials and supplies with one card
- Valid for use with almost all general building materials and specialist supplies
- Save considerable sums and cut the cost of your build and, in some cases, earn reward points
- Provides an additional source for advice and support right through your project
- Can be used by the self builder, renovator or an appointed contractor

Builders merchant trade accounts available from most merchants
Most major building supply companies will provide an account manager and, if they do not mention this when you open an account, ask if there will be an account manager available – for a very good reason.
Although you should enjoy materials at a discount if you visit or phone a building supply company branch, an account manager will often get you an even better discount.
The staff serving in a branch will usually not give you the maximum discount they can. An account manager, will know the maximum discount that can be given and is more interested in helping you.
He / she will also know that the account managers from other companies will be on the prowl and will want to keep your custom and it is no bad thing to get an account at more than one supply company.
By doing so you will then be able to ring round and get the best deal – although this is time consuming it could be time well spent in terms of the savings you could make.
If you find an account manager that you get on with, then you will be able to tell him / her what other deals you can get and they may then improve their offer.
Your account manager will also be able to supply catalogues, technical literature and put you in contact with the technical departments of suppliers – they are keen to put themselves out to keep your custom as, don’t forget, you are going to be spending a good 20 – 30 thound pounds or more and they will want their slice.
As we have mentioned throughout this project, the above is only a guide to the self buil materials that you will for your project but does give you a good idea of what’s involved.

