If you are lucky enough to have a garden with a decent sized tree then building a tree house for the kids is a great idea as it can keep them entertained for hours outdoors during the warmer months of the year.
In this DIY guide we look at everything that’s involved in building a solid, sturdy and safe tree house.
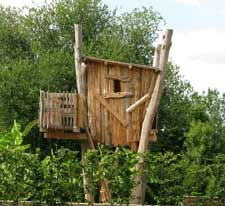
Typical treehouse
What Different Types of Tree House are There?
Aside from the traditional tree house e.g. a house in a tree, there are in fact several other different designs and layouts that you could go for. So before you actually start to build anything then the first job is to decide what you’re actually going to build.
Traditional Children’s Tree Houses
This is the classic type of tree house most people think of, a small, elevated wooden structure built in the branches of a sturdy tree, often with a ladder or rope access.
These are usually designed for kids and focus on fun, imagination, and play. They’re often DIY-friendly and don’t usually require planning permission unless built above a certain height or in protected areas.
Platform Tree Houses
Platform tree houses are built around or among trees but sit on a raised platform supported by stilts or posts, rather than being fully suspended.
These are ideal when the trees themselves aren’t strong enough to support weight. They offer greater design flexibility and are commonly used for outdoor decks, studios, or garden offices.
Suspended or Hanging Tree Houses
Suspended tree houses are an eye-catching and innovative option, where the structure hangs from strong branches using heavy-duty cables.
These are rarer and require expert engineering but create a magical “floating” effect. They’re often used for glamping experiences or eco-retreats and are especially popular in forested areas of the UK.
Luxury Tree House Retreats
These are fully insulated, professionally built structures with plumbing, electricity, and even underfloor heating. Think of them as miniature woodland lodges nestled in the canopy.
Luxury tree houses are popular for holiday lets, Airbnb rentals, or private escapes, and can command high nightly rates.
In the UK, many require planning permission and must comply with building regulations, especially when used for commercial purposes.
Multi-Tree or Bridge-Linked Tree Houses
Some of the most impressive tree houses connect multiple trees with walkways, rope bridges, or zip lines. These larger-scale designs are often found in adventure parks or bespoke private builds.
They may include multiple levels, lookout towers, or even tree-top lounges.
Engineering and safety are key considerations here, so professional advice is a must.
Ground-Level Tree-Inspired Structures
For those without the right trees or permissions, you can still enjoy the feel of a tree house by building at ground level with a tree-inspired design.
These might wrap around a trunk or be styled with natural materials like timber cladding and round windows.
They’re accessible, low-impact, and often don’t require planning approval.
What Type of Timber Should you use for a Tree House?
Once you have settled on the type of tree house you’re going to build the next step is to decide what timber you’re going to use to build it.
The type of timber you use will have a strong bearing over how long your tree house lasts, how weather resistant it is and also how sturdy and strong it is, so it’s important to choose wisely.
In terms of what you can use, the most popular and suitable choices are as follows:
Pressure-Treated Softwood: A Cost-Effective Favourite
One of the most popular choices for UK tree houses is standard pressure-treated softwood, such as pine or spruce.
Treated timber is infused with preservatives that help protect it from moisture, insects, and decay. It’s widely available, affordable, and ideal for framing, decking, and structural supports.
If you’re working to a budget, this is a reliable and practical option, just make sure all cuts and drill holes are treated with end-grain preservative to maintain protection.
Western Red Cedar: Naturally Durable and Attractive
If you want a tree house that looks great and lasts for decades, Western Red Cedar is an excellent choice.
Naturally resistant to rot and insect damage, cedar requires no chemical treatment, making it a great eco-friendly option. It also weathers beautifully, fading to a soft silvery-grey over time.
Although it’s more expensive than treated softwood, it’s low-maintenance and ideal for cladding or finishing touches that are visible and exposed to the elements.
Douglas Fir: Strong, Sustainable, and Stylish
Douglas Fir is another strong contender for tree house builds in the UK. It’s a durable softwood with a tight grain and natural resistance to moisture.
Commonly used in timber framing and outdoor structures, it has a warm, reddish-brown tone that gives a natural, rustic look.
Douglas Fir is often available from sustainable UK-grown sources, making it a responsible and durable choice for both frames and visible elements.
Oak: Beautiful but Heavy and Expensive
If you’re building a high-end tree house and want a premium finish, oak might be on your list. It’s extremely strong and naturally resistant to decay.
However, oak is heavy, expensive, and not always necessary unless your design demands it. You’ll also need to factor in that it can shrink or move slightly over time as it dries out.
It’s best used for visible structural beams or feature cladding where its natural beauty can be appreciated.
Sourcing Timber
Whatever timber you choose, make sure it’s suitable for structural use. Look for timber graded to BS EN 14081 standards in the UK. For outdoor construction, wood should be graded for C16 or C24 structural strength.
Always buy from FSC or PEFC-certified suppliers to ensure the timber comes from responsibly managed forests. Not only is this better for the environment, it also helps ensure consistent quality and long-term durability.
Do you Need Planning Permission for a Tree House?
This may seem like a very odd question to ask, but before building your tree house, it’s important to know that you may need planning permission.
Since 1st October 2008, any raised platform, balcony or veranda over 30cm high legally requires approval.
Local councils have ordered tree houses to be taken down for not following this rule. To avoid issues, always check with your planning department first.
When Tree Houses Are Likely to Need Planning Permission
As a general rule, you’ll likely need planning permission if your tree house:
- Is higher than 2.5 metres (measured from ground level to the platform or floor)
- Overlooks a neighbour’s property and may affect their privacy
- Is intended for commercial use, such as a glamping rental or Airbnb stay
- Is built in a conservation area, Area of Outstanding Natural Beauty (AONB), or near a listed building
- Requires significant groundwork, tree alteration, or uses permanent foundations
If any of these apply, you must apply for planning permission through your local council. The process usually takes 8–12 weeks and may involve neighbour consultations and site inspections.
When Tree Houses Might Be Permitted Without Planning
Small, low-level tree houses that are built purely for children’s play or personal use often fall under “permitted development rights”.
These rights allow homeowners to make minor changes to their property without planning approval — but there are still limits. To stay within the rules, your tree house should:
- Be no taller than 2.5 metres overall height
- Not be located forward of the front elevation of your home
- Not cover more than 50% of the original garden space
- Be used for non-commercial, domestic purposes only
Even if your tree house meets these criteria, it’s always wise to check with your local planning authority. Some councils may interpret rules differently or have additional restrictions in place, particularly in rural or protected areas.
Planning Advice for Tree Houses in Shared or Sensitive Locations
If your garden backs onto a neighbour’s property or public space, it’s especially important to think about how your tree house might affect others. Overlooking windows, noise, or blocking sunlight can all lead to complaints.
In these cases, even if your build is technically within permitted limits, it’s courteous (and strategic) to speak with your neighbours beforehand or submit a planning application for peace of mind.
What Tree is Best for Building a Tree House?
Aside from the type of treehouse you opt to build and the type of timber you choose to build it from, another very important consideration is the actual tree that you decide to build it in.
However, not all trees are built the same when it comes to supporting weight, resisting the elements, particularly winds and generally being suitable for hosting a tree house
With this in mind, selecting the right tree involves thinking about its health, position, ease of access and it’s overall strength e.g. are the branches thick and substantial enough to take the weight.
In terms of what trees you are likely to encounter, the most common are as follows:
- Oak: One of the best options for a tree house in the UK. Known for strong, dense wood and deep root systems, mature oaks can support large structures with minimal movement. They are also long-lived and highly resistant to disease
- Beech: Offer strong, broad branches perfect for smaller tree houses. Common throughout the UK and tend to grow with smooth trunks and open canopies. Make sure the tree is healthy and mature, young beeches can be brittle
- Sycamore: Often overlooked, but can be excellent for tree houses thanks to rapid growth, thick trunks and resistance to pests. Regular pruning may be needed as they tend to grow quickly and can become unbalanced if not managed.
- Scots pine: UK’s only native pine tree, can also work well, particularly for raised platforms or smaller elevated hideouts. Their tall, straight trunks are great for anchoring simple designs. Just be aware that pine doesn’t have the same lateral branching strength as oak or beech
Regardless of species, your chosen tree should be:
- Healthy – No signs of rot, fungus, or infestation
- Mature – At least 30 years old with a strong trunk and root system
- Well-positioned – Away from power lines, with good ground access and space around it
- Stable – Little movement in wind and no major leaning
If you are in any doubt at all about how suitable your chosen tree is and want some more qualified peace of mind then it’s a good idea to get in touch with a local arborist.
How High can a Tree House be in the UK?
While there’s no single height limit written just for tree houses, the height rules fall under general planning regulations for raised platforms and outbuildings. If your structure is too tall, overlooks neighbouring gardens, or affects privacy, your local council may require formal approval.
For most UK homeowners, the key to remember is 2.5 metres. If your tree house has a platform or floor higher than this, it may no longer be considered “permitted development”. This means you could need to apply for planning permission from your local authority. The height is measured from the ground to the base of the structure — not the top of the roof.
If your tree house goes above 2.5 metres, planning officers will assess its impact on neighbouring properties. They’ll look at:
- Privacy – Does it overlook gardens, patios or windows?
- Visual impact – Is it visible from the street or out of character with the area?
- Noise or use – Is it just for play, or used as an office, studio or Airbnb?
Even if neighbours don’t complain, councils can still issue enforcement notices and in some cases, people have had to remove or lower tree houses that were too high, so it’s always best to check your plans fall within the rules before you start.
Additionally, if the tree house is going to be for the kids, especially young ones then you may want to build it lower to the ground for safety reasons.
If you are fortunate enough to have the ideal tree for a tree house sat in your garden then whether it’s for you or the kids, it’s a great idea and also ideal summer project to get your teeth into.
How to Build a Tree House in Your Garden
In this final section of our guide, we will run through the entire process from start to finish on planning and building a tree house from scratch.
Step 1: Choose the Right Tree
Start by selecting a strong, healthy tree with suitable thick branches and a stable trunk that are capable of supporting the weight of your tree house and also any occupants.
In the UK, oak, beech, and sycamore are all excellent options and can feature in most larger and more established gardens.
The tree should be mature (at least 30 years old), completely free from disease, and located in a safe area away from power lines, any existing structures and also any neighbouring properties that you may risk overlooking and infringing on Building Regulations.
Step 2: Design Your Tree House
The next job now is to sketch out your tree house design so that you know how it’s going to look, have a rough idea of sizes, a rough idea of materials and quantities etc so that you can then also plan a budget for the build.
The best idea is to keep it simple — a basic platform with railings and a roof is often best for beginners and walls can be added fairly easily to such a design if you want these also.
Think about the height (keeping it under 2.5 metres may avoid planning permission), the number of users, and whether you’ll need extras like windows, ladders or more extravagant things like carpets, tables, chairs and the likes.
Also, it’s worth considering at this stage how you are going to enter and exit the tree house so that you can plan where trap doors, balconies, ladders etc. are going to go.
Step 3: Get Permission If Needed
As we have stated, pretty much all low-level tree houses in private gardens in the UK are classed as “permitted development“.
However if your structure is raised more than 2.5 metres or overlooks neighbouring gardens, it’s wise to check with your local council.
Also, if your proposed tree house is to be used from commercial purposes e.g. as a rental, AirBnB etc. then it will need planning permission.
As is the case also if you are located in a sensitive area e.g. a Conservation Area or if your construction is going to involve significant alteration to the surrounding area.
With all of this in mind, if you are in any doubt at all about anything then you should contact your Local Authority Building Control office as they will be able to advise you.
Step 4: Gather Materials and Tools
Once you have found your tree and finalised your construction plans for your tree house the next task is then to gather up all of the tools and materials you’re going to need.
As we have stated above, use pressure-treated timber to ensure strength, weather resistance and the overall longevity of the structure.
When it comes to materials, this will mostly include:
- Joists (at least 4×2, maybe 6×2 timbers)
- Decking boards or suitable timbers, 3×1 or 4×1 etc.
- Fixings including screw and nails, roofing nails/screws etc.
- Brackets for added strength where required
- Bolts e.g. coach bolts of a suitable size if bolting timbers together or to tree
- Felt, rubber or steel sheeting for the roof
- Sheet timber, boards or feather edge for walls
As for the tools you will need, these are likely to be as follows, with the odd exception here and there, depending on your build.
- Saw – preferably a reciprocating chop-saw, circular saw or hand saw if not
- Spirit level
- Tape measure
- Drill driver
- Selection of drill bits
- Hammer
- Selection of spanners/sockets
- Pen/pencil
Step 5: Build the Platform
Now the fun part can begin as at this point you can finally start to build something!
Start by building a strong, stable platform or base as close to the tree trunk as possible. Use sturdy branches for support or fit posts if needed.
You can bolt parts of the structure directly into the tree. Healthy trees can safely handle bolts without harm, making this a solid option for extra support.
Secure the main beams to the tree using tree-friendly supports like floating brackets or adjustable bolts that allow for movement as the tree grows.
The platform must be level and able to support uneven weight — kids rarely stay still or spread out evenly!
Next, lay your floor using exterior-grade wood boards or sheeting. For added strength, use tongue-and-groove planks if available. Always choose weather-resistant materials suitable for UK conditions.
Depending on the size of your tree house it may feature a deck area outside. This should be boarded at the same time as the treehouse floor, however it’s a good idea to use slatted timbers with a small (10mm’ish) gap in-between as this will allow water run-off, leaf debris to be swept away etc.
Use screws rather than nails as they hold stronger for longer and are safer. Check all fixings to make sure there are no sharp edges or exposed screw points that could cause injury.
For larger builds, consider pre-assembling sections on the ground and lifting them into place. It’s often quicker, safer, and more precise.
Step 6: Add Walls, Roof and Access
Once you have a nice stable and solid base you can then begin construction of your walls and roof.
Again, use sturdy timbers to construct a stud framework for the walls. If you are having a doorway or windows, construct a timber frame to house each in its desired location the correct size so any pre-made windows or door frames will drop straight in.
Once the framework is complete the walls can be closed in using sheet timber, boards or feather edge.
When constructing the roof, it should feature a slope to let rainwater run-off, just like a regular house. This helps keep the inside dry and comfortable. Cover the roof with waterproof felt, rubber or sheet steel to protect it from the elements and extend its life.
For windows, you can leave simple openings or fit proper ones. Avoid glass, as it can break and cause injury. Perspex is an ideal solution for this, it is a safer and shatter-resistant and that’s ideal for children’s spaces.
If you’re adding doors or opening windows, make sure they can be secured when open or shut. This prevents them from slamming in the wind and helps avoid trapped fingers.
Once the construction has finished, even though you have used treated timber, all wood should be protected with a weatherproof stain or paint designed for exterior use. Choose non-toxic options that are safe to touch and inhale, especially if children will be using the space regularly.
Finally the access should be constructed. This can be done several ways and will depend on your design of tree house.
It can either be internal inside the house up through the floor, through the floor in the deck area outside, up a ladder/ramp to the house or the deck, the choice is yours.
Step 7: Safety First
If you have added a deck or any form of outdoor area then safety is paramount when you’re at height so you will need to finish your build by adding hand rails for ramps/stairs and also a banister all the way around any deck or external areas.
Also you will need to sand and sharp edges, screw/knock in any proud screw or nail heads and ensure there is no possibility of splinters etc.
Also for kids, consider a gate or safety latch at the entry point.
To prevent any future accidents, always do regular maintenance checks, especially after storms or winter weather.
Ongoing Maintenance
Always inspect your tree house once a year, ideally after winter, before children start using it again. Check for loose fixings, signs of rot, mouldy or slippery surfaces, and any changes in the tree’s shape or growth that might affect safety.
To soften any falls, consider creating a safe landing zone beneath the tree house. A simple sandpit works well and adds extra play value.
For a more natural look, add a few inches of soft bark or woodchip. Both options help cushion any accidental drops.
Building a treehouse in your garden is fantastic fun for the kids and will keep them occupied for hours and can also be great for adults too, so if you have the space, the tree and are up for a project, then get on it!