When using a ladder, safety should be your primary concern. Never work on a ladder alone.
Cleaning gutters is a very popular question at DiyDoctor. We have decided to combine this project with one on ladder safety as it is a big concern to our users how someone can use a ladder safely on their own.
Firstly its important to know that the optimum safety angle for a ladder is 4 to 1. This is demonstrated in the image below.
Safe working angles for ladders
The bottom of a ladder, (and ideally the top also) should be secured to the surface you are working on. Usually we ask someone to stand at the bottom or "foot" of the ladder to stop the feet of the ladder sliding away from the wall.
Inspect the Condition of Your Ladder
It is also important to check the condition of your ladder before you use it. When it comes to ladders, there are two main types – timber and aluminium.
Most ladders available on the market these days tend to be of the latter kind due to the longevity of aluminium as a material as it doesn’t rust or degrade terribly quickly. Use the following checklist to evaluate the condition of your ladder:
Timber Ladders
- Check both the side lengths of the ladder for chips, splits and cracks
- Check all the rungs for chips, splits and cracks
- Check any joints for signs of movement or separation
- Check any screws or bolts for damage, movement or wear
- Check the entire ladder for any evidence of woodworm or boring insect damage
- Check for any damp or general storage damage

Single section wooden ladder – Image courtesy of ramsayladders.co.uk
Aluminium Ladders
- Check the whole ladder over for signs of movement or separation in the joints
- Check for any kinks or crush damage. Due to the box nature of these types, they can be crushed and kinked causing significant weakness in the structure
- Occasionally, some manufacturers feature rubber caps on the feet of the ladder, check these are in place and are in good condition
- Check all rivets and bolts and ensure there are no signs of damage or movement
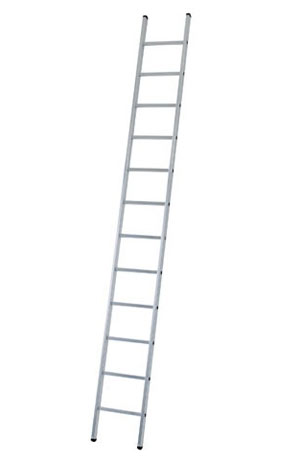
Industrial 8 rung single ladder
Most homes and places of work have at least one folding step ladder and these should also be checked regularly for their condition. In most cases these types of ladder will either be steel or aluminium but vocationally they can also be wood. Along with the points below please also reference the points for timber ladders above:
Folding Step Ladders
- Check all hinges and movable joints for dents, kinks, bends or splits. Also check any rivets or bolts that make up the joint for damage, excess movement or loose nuts etc….
- Check any and all locking mechanisms to ensure that the fully engage and lock into place and again for dents, bends or damage
- Check both side upright sections for splits, dents, kinks etc….
- Normally, all four feet will feature a rubber cap to prevent the ladder slipping – ensure they are all in place and in good condition
- Check all the rungs or steps for damage, movement in the joining bolts or rivets and also damage or movement in any stays
- Additionally, although unlikely, check for any corrosion or rust that may cause weakening
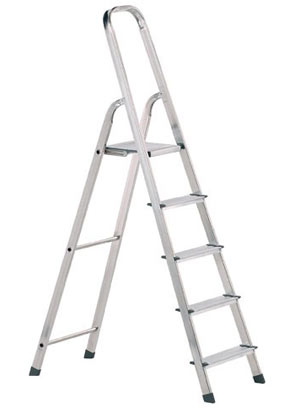
Light trade 6 step folding step ladder
If you are in any doubt about the condition of your ladder then it is best not to risk using it as the consequences could be drastic!
How to Secure Your Ladder and Prevent it Sliding out
There have been many ingenious ways of supporting the bottom of the ladder when no-one is about including filled sand-bags, parking the car against the ladder feet and so on, but at DiyDoctor we wanted something that was easily done, can be used time and again and will be 100% safe.
Use an Anchor Eye to Secure the Ladder to the Wall
Using a fixing called an Anchor Eye and inserting it into the wall at regular intervals can allow you to secure the bottom of your ladder in all positions around the house. This allows you to move around clearing and cleaning gutters in perfect safety.
Phone a Friend
We would at this point suggest, especially if you live on your own, that if you intend to use a ladder and you are at all unsure, its a great idea to call a friend and tell them you will call them back when the work is finished. If something awful happens, you fall and are unable to ring, you will not lay there in pain for too long.
Workout Position for Ladder
Firstly work out where you are likely to need to put the ladder. Work out how far you can reach with either arm extended, and mark the wall in the position where the ladder will go each time you move it.
You should find, that to stay safe, the centres of the bolts need to be at about 1600mm.
Drill Hole for Your Anchor Eye
Next, drill a hole (we use a 14mm Anchor Eye which needs a 14mm hole) if possible under the Damp Proof Course, angled downward slightly. If any water gets into this hole it will run out again straight away.
Drilling hole for anchor bolt
Tap in Anchor Bolt Sleeve
Next tap the Anchor Eye into the hole. This can be done with the eye bolt screwed in, or as we have done, just the casing.
Knocking in anchor bolt sleeve
Insert and Tighten Anchor Eye
Insert the eye bolt. As the bolt is tightened the outer casing expands, griping the masonry. If you have any doubt as to the effectiveness of these bolts just picture the modern day climbers risking their lives on exactly this principle to hold them on a rope at 20,000 feet!
Anchor bolt with closed sleeve
Open anchor bolt showing how it grips into wall
Secure Your Ladder With a Strap
Once you have inserted your anchor eye and successfully screwed it up tight and it is firmly fixed you can now go about securing your ladder to it.
Using a ladder safety strap or ladder tensioning strap as they are sometimes known, thread one end through the anchor eye and secure one end to the ladder at its base using the loop on the strap itself.
Now run the other end of the strap around to meet the feet of the ladder on the other side and secure it using whatever method is supplied with the strap.
Depending on the who manufactured the strap will depend on how it is clipped or secured to the ladder and to the anchor eye but the principles will be very similar for all. If in any doubt, please refer to the manufacturers guidelines.
You can also make you own ladder strap – Thread a length of rope or webbing through the eye bolt and tie two loops in the ends at the required distance away from the wall. If you are making your own, please make sure that the material you are using for the strap is strong enough and it does not break under the tension and pressure applied to it by the ladder.
Wire rope can be used and can stay within the eye when removed, then just hung up in the garage when not being used.
Anchor Eye screwed to wall and safety strap attached
Once the ladder is fixed with the strap pull the bottom put until the strap is tight. This will prevent the ladder from striking out as the straps are now under tension.
Pull ladder out until strap in tight
Ladder strapped safely to wall
Bucket hook
You can see from the final image above that we use a paint hook to hang the bucket on while we clean gutters. This means we have always got one hand free to hold on with. We also use an elbow length pair of rubber gloves because sometimes the stuff in the gutter is not as fragrant as one would like!
Using a Ladder to Clean Your Guttering
Most householders tend not to think about gutters until it rains, which is usually not a great time to be cleaning them anyway! The damage caused by blocked gutters can go unnoticed until there are bigger problems with damp walls or mould. Ensuring your gutters are able to do the job they are designed to do is therefore important.
This is a very simple project but one which will keep you safe and stop you putting off the high level jobs you may have been scared to tackle until now. Its a great idea to do the same thing at the top of the ladder as well to tie off the top and sometimes screw eyes can be put into the facia board to make it even easier.
If you prefer to work off an even safer platform, multi-way scaffold ladder with a platform are inexpensive and very versatile. Just visit our scaffold and scaffold towers project.