At DIY Doctor, we receive many inquiries about multi-fuel and wood burning stoves, especially regarding installation. Common questions include whether one can install a wood burning stove independently, choosing between multi-fuel and wood burning stoves, regulations for installation, preferred flue types, and the differences between multi-fuel stoves and wood burners.
In this project we aim to provide answers to these questions and covers how to install a multi-fuel stove in a workshop, including stove selection, flue options, routing, and compliance with safety and Building Regulations.
If you are looking to install a wood burning stove in your home, check out our wood burning stove project here.
Choosing Between Wood Burning and Multi-Fuel Stoves
When deciding on the type of stove, you have two main options:
- Wood Burner: Burns only wood or waste timber.
- Multi-fuel Stove: Burns various materials like waste wood, logs, peat, turf briquettes, anthracite, and smokeless fuels.
The decision between them depends on your preferences and what you plan to burn. If you have a carpentry shop with plenty of timber offcuts, a wood burning stove is suitable. However, for a mechanics workshop where fuel needs to be purchased, a multi-fuel stove offers versatility. 12kW output multi-fuel stove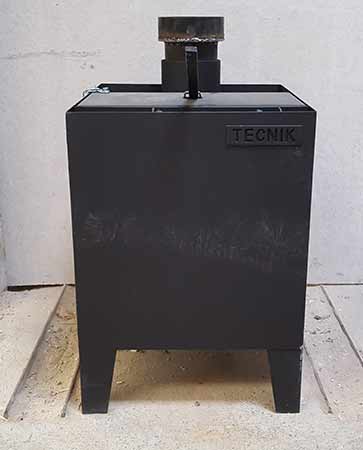
Both types provide similar heat output, so you’ll get comparable warmth regardless of your choice.
Choosing Between Internal and External Flue Installation
If you’re new to wood burning or multi-fuel stoves, you might not be familiar with what a flue is.
The flue is essentially the chimney section that removes smoke or fumes generated during fuel burning, preventing them from filling the building.
There are two options for running the flue:
- Internally: Runs vertically straight up from the stove and out through the roof.
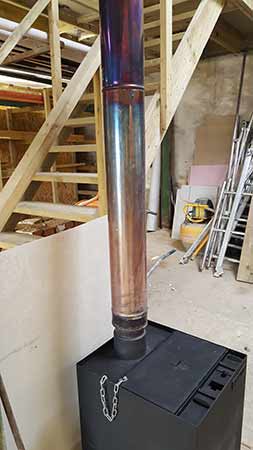
Flue pipe run internally and vertically straight up through the roof
- Externally: Flue pipe runs from the stove to the nearest external wall, then vertically upwards to the desired height above roof level.
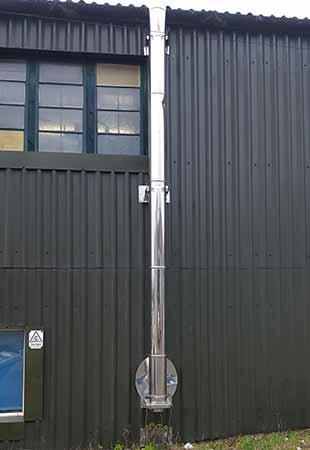
Flue pipe run externally outside of the building
It’s generally best to run the flue internally and vertically whenever possible for several reasons:
- Hot gases and fumes naturally rise, so a straight run is optimal.
- Bends and T-pieces restrict gas and fume flow.
- Bends are difficult to clean and can lead to soot and tar buildup.
- Straight runs are cheaper than bends and T-pieces.
- Bends reduce draw efficiency, leading to inefficient smoke and fume disposal.
- A warmer flue reduces the risk of soot and tar buildup, which can cause fires.
Considering these factors, running the flue internally is the safer, more cost-effective, and easier-to-maintain option.
Understanding Asbestos Risks
If you’re considering installing a stove in a building with an older roof, particularly corrugated cement fibre sheets, be cautious.
These sheets may contain asbestos fibres, which are extremely hazardous to your health!
Never attempt to cut, break, or penetrate these sheets in any way! Doing so can release asbestos fibres into the air, posing serious health risks.
Asbestos exposure has been linked to various fatal health problems, so it’s crucial to avoid disturbing it.
In such situations, it’s safer to install the stove through the wall instead of risking asbestos exposure from the roof.
If you’re uncertain about your roof’s material, refer to our asbestos project for guidance.
This resource also includes information on a DIY Asbestos Test Kit to help you identify your roof’s material safely.
Should you use a Single Skin Flue or Insulated Double Skin Flue?
Firstly, lets look at what single skin and double skin flue pipe is:
Understanding the Single Skin Flue Pipe
Single skin flue pipe, also known as single wall or vitreous enamel flue, is a basic steel pipe coated with enamel or made from stainless steel.
It lacks insulation or any internal material, making it susceptible to becoming very hot! Single skin flue pipe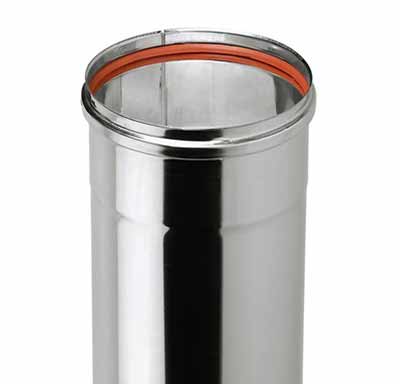
Understanding the Double Skin Flue Pipe
The double skin flue, also called twin wall flue, consists of a pipe within a pipe with high-grade heat proof insulation filling the gap between them.
Most twin wall flue pipes are made from stainless steel, allowing the outer skin to remain cooler. This enables it to be powder coated or painted with specialist high-temperature paint.
Twin wall flues enhance burner and flue efficiency by maintaining consistent temperatures. This reduces condensate buildup, minimising the risk of flue or chimney fires. Double skin or twin wall flue pipe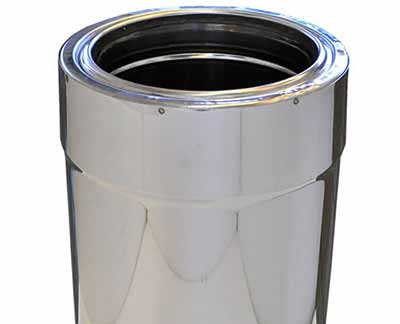
Understanding Flue Sizes
Manufacturers typically specify the flue size required for your stove to ensure optimal efficiency.
As a general guide, if your stove meets DEFRA Clean Air Act requirements or burns smokeless, low volatile fuels, a 125mm flue is suitable. This applies to stoves under 20kW output, or those burning wood or pellets while meeting DEFRA standards.
For stoves with outputs up to 30kW or burning non-smokeless fuels like coal or untreated timber, a 150mm flue is necessary. If your stove outputs up to 50kW and burns non-smokeless volatile fuels, a 175mm diameter flue is required.
Most stoves have a 125mm outlet, so if you need a larger flue, you’ll need to purchase an adaptor to connect them.
Wood Burning Stove Installation Regulations
Can you install your own wood burning or multi-fuel stove? Yes, but there are rules to follow.
Installing a solid fuel stove is regulated by Building Regulations, especially in England and Wales. Scotland doesn’t require notification.
Before you start anything you have to contact your local authority’s building control department for guidance on exactly what you need to do, in respect to installation, inspection schedules, and fees.
Hiring a HETAS registered engineer is an option as they can self-certify their work.
For any information or guidelines concerning regulations, refer to Building Regulations Document J. Adhering to these rules ensures safety and compliance. Building Regulations Document J
Carbon monoxide, a byproduct of solid fuel burning, is extremely dangerous and hard to detect without a carbon monoxide detector.
Incorrect installations of wood burning and multi-fuel stoves can lead to carbon monoxide buildup, and lead to serious health risks and in worse case, even fatalities.
To avoid any such consequences, closely following the regulations to prevent disasters and safeguard lives is an absolute must.
For information on detecting carbon monoxide and staying safe, see this resource.
Clearance Requirements for Wood Burning and Multifuel Stoves
Alongside Building Control regulations, specific rules dictate stove placement and required distances from certain materials.
Clearance Requirements for Stoves
Wood burning and multi-fuel stoves need adequate clearance around them to allow heat to disperse safely. Without proper clearance, heat buildup can lead to overheating of the stove and surrounding objects and the potential for fire.
With this in mind, it’s essential that you consider the materials surrounding the stove:
- If combustible materials like timber are nearby, maintain at least 400mm clearance on all sides and 450mm above, as specified by the stove manufacturer.
- For non-combustible materials like solid walls, clearance can be reduced to around 150mm on the sides and rear, and 350mm above, with manufacturer confirmation.
To reduce clearance for combustible materials, use heat shielding like sheet steel or fibreboard, ensuring a 1-inch (25mm) air gap behind the shield to allow airflow. Any heat shielding should also have an air gap at its base and be raised off the floor.
Refer to your stove’s user manual or contact the manufacturer for specific heat shielding recommendations and advice.
Clearance Requirements for Flues
The necessary clearances around flue stacks or chimneys depend on the materials nearby, particularly whether they are combustible.
If using a single skin flue pipe near combustible materials, maintain a clearance of at least 3 times the diameter of the flue. For example, a 150mm diameter flue requires a minimum clearance of 450mm from combustible materials.
Additionally, single skin flues must be at least 150mm away from combustible surfaces like ceilings, roofs, or floors.
When transitioning from single to twin wall flue pipes, adhere to BS EN 15287-1 guidelines, ensuring a minimum distance of 425mm from the ceiling and where the 2 pipes join, this must happen in same room as the stove.
Combustible materials near single skin flues can also be shielded with suitable materials which will then allow closer placement to such combustable materials. Consult the manufacturer for recommended shielding materials and distances.
Double skin flues, being inherently shielded due to their nature, generally require a clearance of 5cm to 8cm from combustible materials, but tis will depend on the manufacturer or model of flue, but refer to the manufacturer or your local Building Control office for specific safe distances.
Managing Flue Direction with Bends and T-Pieces
While a straight, vertical flue is ideal and the most efficient route for a flue, sometimes an external wall exit is necessary. In such cases, flue bends or T-pieces are employed to redirect the flue.
However, Building Regulations impose certain guidelines on their use:
- Limit flue bends to a maximum of 4 throughout the entire run.
- Ensure bends do not exceed 45°, except for a 90° T-piece from the stove’s back, which counts as 2 bends.
- Flue components should be at least 6 inches in diameter, unless DEFRA-approved.
If using the maximum 4 bends, include a hatch between bends 2 and 3 for access and cleaning.
Adhere to these guidelines to optimise flue efficiency and minimise restrictions. Avoid using a 90° T-piece if possible to maximise bend allowances. 45 degree single skin flue pipe bend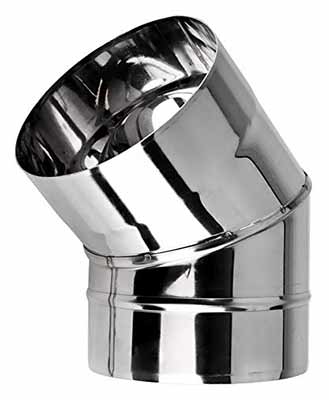
How High Does a Flue Need to be?
Building Regulations, specifically Document J, outlines the recommended height for flues.
Typically, a flue should extend at least 4.5m above the stove, although exceptions may apply.
Modern twin wall flues can sometimes be 3-3.5m above the stove, but this should be verified with your local Building Control Officer.
Moreover, if the flue is within 60cm of the building’s ridge, it must extend at least 60cm above the ridge. Flue must be at least 60cm higher than the ridge if within 60cm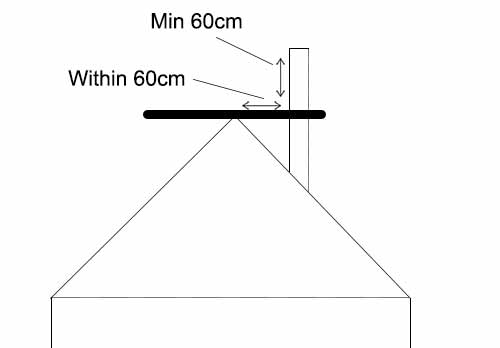
Furthermore, ensure no objects encroach within 2.3m of the flue, including neighbouring structures or the roof ridge/slope. Ensure a 2.3m clearance from neighbouring structures or roof slope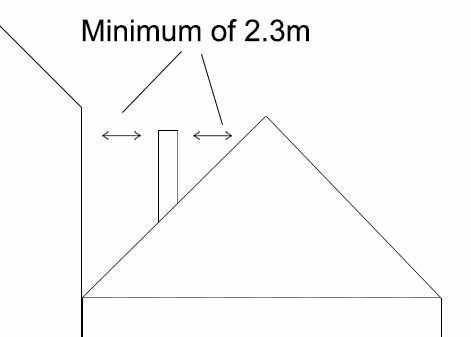
Understanding Hearth Requirements for Your Stove
When determining whether you need to install a hearth for your stove, consider the combustibility of the floor surface. If it’s combustible, like timber, then yes absolutely, you’ll need a non-combustible hearth to shield the floor from the heat generated by the stove.
If the stove’s heat won’t exceed 100°C on the floor, a 12mm thick hearth will suffice for both combustible and non-combustible surfaces.
For combustible floors where heat levels will likely exceed 100°, opt for a 250mm thick hearth or 125mm with a 50mm air gap beneath.
Even for non-combustible floors, you will need a 250mm thick hearth or 125mm with an air gap.
As per regulations, if the stove doesn’t heat the hearth below to over 100°C, it must extend 150mm beyond each side of the stove and 300mm in front.
If it heats the floor past 100°C, extend the hearth 500mm in front.
For free-standing stoves, the hearth should be 840mm long and wide, extending at least 300mm from the front.
Extending the hearth creates a safety zone, preventing injuries and defining the stove area.
The boundary of the hearth should be visually distinct e.g. such as a raised step, alerting users and preventing any future combustible materials encroaching within this forbidden area.
In terms of construction, your hearth should be made from from solid, non-combustible materials like concrete or masonry as stated in the regulations.
You can build it using concrete or brick, using the right mortar mix (one that is resistant to extreme heat levels), or opt for luxurious options like slate, however these ultimately come at a higher cost.
If unsure on any points, consult your local Building Control Officer for guidance. A solid concrete hearth ensures safety and compliance for your stove installation.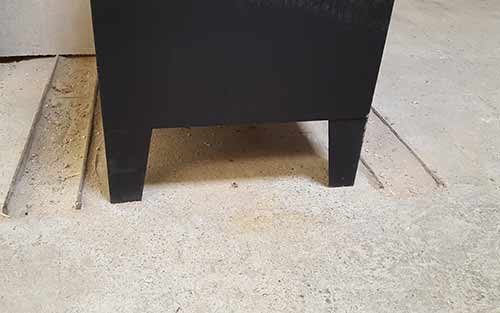
Supporting Your Flue System
For long flue runs, support is crucial to not only prevent toppling, but also for distributing the weight of the flue from bearing down on top the stove.
Long vertical sections especially, require suitable support to prevent bending or collapse, especially in areas subject to high winds.
Typically, this is done by attaching brackets to the flue and securing them to nearby solid surfaces.
Consult your flue pipe manufacturer for suitable brackets, or craft your own if you have the necessary skills. Standard flue pipe support bracket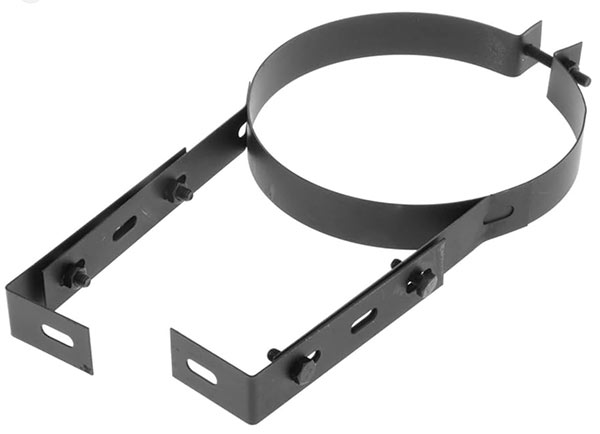
Ventilation and Fire Safety Considerations
Preventing fire hazards is crucial when dealing with stoves. Keep all combustible materials away from the stove to avoid accidental ignition by stray embers, this is absolutely essential.
Also, regularly clean up flammable debris like sawdust and timber offcuts to minimise fire risks.
If you do cut a lot of timber and create a lot of sawdust make sure any machinery is fitted with the correct dust extraction so that it is all sucked up and contained.
It is essential to ensure proper ventilation throughout your workshop to support combustion and effective smoke removal in another key consideration.
If natural ventilation is insufficient, consider installing fixed vents as per Building Regulations Document J, which recommends 550mm2 of ventilation per kW output above 5kW. As an example, if you have a 10kW stove you will need to supply 2750mm2 of ventilation (5 x 550mm2 = 2750mm2).
How to Install a Multifuel Stove in a Workshop
Before we can start installing our multifuel workshop stove we need to make sure we have all the necessary items to complete the installation. These should be:
- A multifuel workshop stove
- The required length of flue pipe
- Any bends or T-pieces (if needed)
- Any heat resistant shielding required
- Flue cowl to sit on top flue
- Fire cement and/or fire proof rope
- Storm shield for flue
- High temperature sealant
- Flue bracket
- Lead tile to seal hole in roof or suitable object to seal hole through wall
- Installation tools (drill/driver, screws, gloves, eye protection, masks)
Step 1: Position and Secure Your Stove
Begin by placing your stove or wood burner in its designated spot. If you’re constructing a hearth, do this beforehand and allow it to cure correctly.
Ensure the stove sits level and stable. Any rocking motion indicates instability and requires adjustments to the hearth or floor.
Check all distances around the stove to ensure safe clearance from combustible items. Refer to spacing guidelines below for details.
In this example, despite adequate distances, heat shielding was added as an extra precaution due to nearby timber stairs and cross beams. The multi-fuel stove rests on a solid concrete base.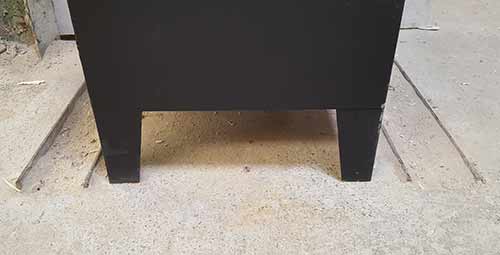
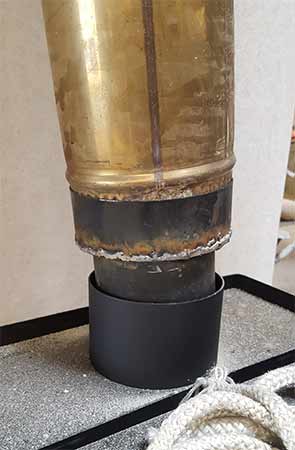
Step 2: Check Flue and Adapter Fit
After positioning the stove, insert the flue adapter into the stove’s outlet. The adapter, slightly smaller than the stove’s collar, ensures a tight seal to prevent smoke or fumes from escaping. More below on how the flue was correctly sealed. Flue pipe adaptor connecting 125mm stove outlet to 150mm flue pipe. The flue pipe and adapter collar are test-fitted to ensure proper alignment.
Step 3: Create Flue Pipe Opening
To run the flue vertically through the roof, first, a plumb bob was hung down from the roof to locate the centre of the stove outlet. With careful positioning, the exact spot on the roof for cutting the hole was determined.
Once marked, a circle slightly larger than the flue’s diameter (about 40mm extra) was drawn on the roof to allow for adjustment to ensure vertical alignment. Cut hole in the concrete roof with flue inserted.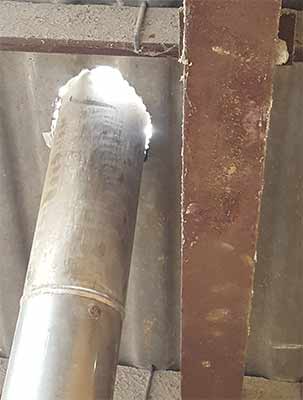
Step 4: Install Flue and Seal Around Adaptor
After cutting the hole in the roof, additional flue sections were added and fed through the opening.
The flue was centred in the adaptor on top the stove, ready for sealing. Before sealing, it was carefully levelled using a spirit level to ensure it was perfectly vertical. The flue was levelled with a spirit level before securing it.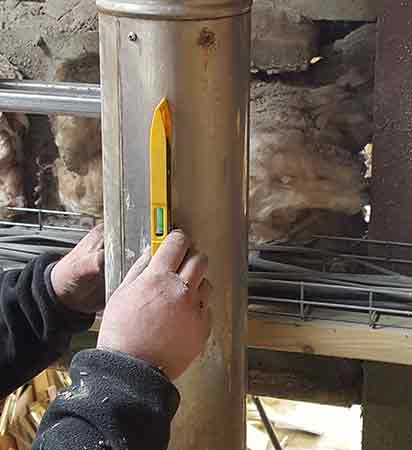
To seal the flue, fireproof rope and cement were used. The rope was layered around the flue and pushed into the adaptor collar, compacting each coil until about 20mm from the top, then snipped off. The remaining gap was filled with fireproof cement to ensure a tight seal.
While fireproof cement alone can be used, combining it with fireproof rope provides a better and better longevity as cement alone will crack over time. The flue pipe was sealed using fireproof rope and fireproof cement.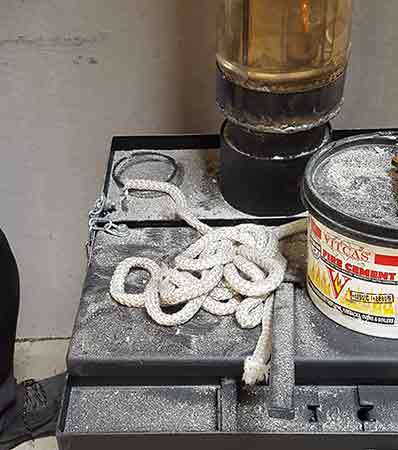
Step 5: Secure Lead Tile and Seal Roof
The method for sealing the roof hole depends on the type of roof you have, such as tiles, roofing sheets, or a flat roof. There will be a suitable sealing method for every roof, regardless of type.
In our example here, the roof was made of large modern cement fibre sheets (non-asbestos type, we tested beforehand).
A lead tile was chosen to cover the hole, which was secured with roofing sealant where it sat over etc existing roof sheets, due to the size of the sheets.
If dealing with large sheets and aesthetics aren’t a concern, this is a suitable choice. For tiled or EPDM rubber roofs, consider specialised options made specifically for that roof-type.
Consult your flue manufacturer for advice and possibly suitable supplies. Ensure whatever you use is properly sealed to prevent leaks.
Step 6: Assemble Flue Top and Ensure Seal
After sealing the roof hole, the final flue section was added to ensure proper height and compliance with distance requirements from the roof line.
A cowl was attached to this section to prevent debris and water from entering the flue.
To prevent water ingress between the flue and the lead tile, a tight-fitting rubber gasket was installed, followed by a storm guard secured with heat-resistant silicone.
All components were clipped together for secure assembly.
Step 7: Install Flue Bracket
To ensure the flue’s stability, a bracket was added and secured to a nearby steel beam.
After marking and drilling holes in the beam, the bracket was fixed around the flue.
With the bracket in place, the installation was now complete.
The final step was to light the stove and test it out! Flue pipe bracket secured to flue and nearby steel beam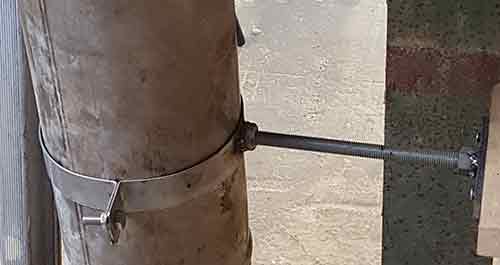
Installing a multifuel stove in a workshop is a fairly straight forward job and if you are thinking of installing your own, just make sure you have read and understood all of the relevant building regulations and have also contacted your local building control officer to notify them of your intended plans.