Fitting a wood burning stove is a great way to fairly cheaply and efficiently heat your home, however before one can be installed a flue needs to be created to pipe away the smoke and fumes.
If you are using an existing chimney for your install then a flue liner will need to be installed and in this guide, we run through the process of how this is done.
What is a Flue Liner
A flue liner is a protective layer installed inside a chimney or flue to help guide smoke, gases, and combustion by-products safely out of a building, produced by an appliance burning fossil fuels.
Typically made from stainless steel today, but clay or ceramic materials in years past, flue liners provide an added layer of safety and efficiency to any heating system, such as fireplaces, wood stoves, or boilers.
The primary purpose of a flue liner is to protect the chimney walls from heat and corrosion caused by gases and debris from the fire. Over time, without a liner, these by-products can damage the chimney, leading to cracks or leaks that may allow dangerous and lethal fumes like carbon monoxide to seep into your home.
A well-installed liner ensures that the chimney can operate safely and effectively, keeping your home protected from fire hazards and harmful gases.
Another important function of the flue liner is to improve the efficiency of your heating system by maintaining proper airflow. They help to regulate the temperature within the chimney, reducing the build up of soot and creosote, which can become fire hazards. Installing or upgrading to a flue liner can extend the life of your chimney and enhance overall heating performance.
When choosing a flue liner, it’s important to consider the type of fuel being burned and the size of the appliance. Stainless steel liners are durable and versatile, often recommended for wood, gas, and oil-burning systems and are in almost all cases the go-to solution today.
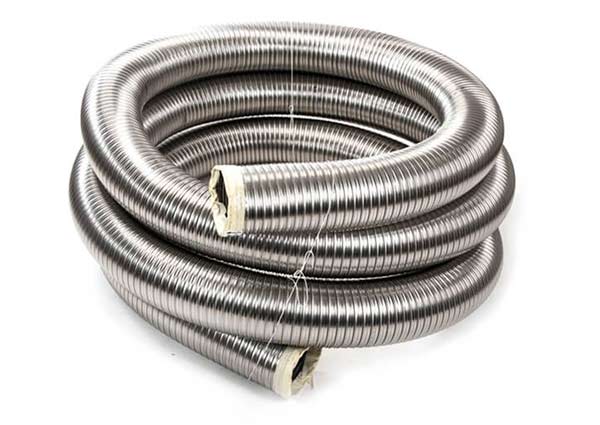
Modern stainless steel flexible flue liner
Can you Fit a Flue Liner Yourself?
In short, if you8 are fairly competent with DIY and have a good, grounded knowledge of basic construction techniques then yes, you certainly can fit a flue liner yourself. You should also be comfortable at work at heights as you will need to access your roof.
If you do indeed install your own flue liner then you will also need to notify your local Building Control Office as, once completed, they will need to inspect it to ensure that it meets Building Regulations criteria, which is a legal requirement.
Do You Have to Have a HETAS Certificate to Sell my Home?
The question of whether you need a HETAS certificate, for either the installation of your wood burning appliance or for the sale of your home is a bit of a grey area.
However, despite this, the short answer is: No, you don’t always need a HETAS certificate to sell a house with a wood burner, but it’s definitely worth considering getting one.
In the UK, wood-burning stoves and open fires must comply with Building Regulations Document J to ensure they are safe for the current and any future occupants. While a HETAS certificate isn’t legally required, it provides proof that your installation meets these regulations and is safe.
When it comes to selling a property, quite often things like this offer peace of mind to any new potential buyers and are also a good sign of the current owners attitude towards safety and compliance of any other home improvements that have taken place.
The certificate confirms compliance with Building Regulations and, in England and Wales, serves as a notification to your Local Authority Building Control (LABC). Since 2005, notifying the LABC of such installations has been a legal requirement.
It’s also worth noting that some mortgage lenders and also insurance companies require a HETAS certificate for such installations and won’t lend or insure without one.
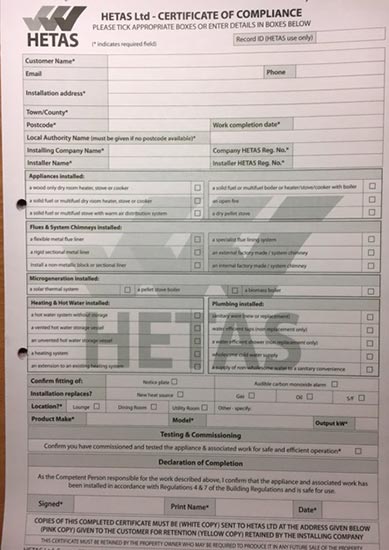
Example of a HETAS certificate
Safety Considerations With Wood Burners and Flue Liners
When using a wood burner, safety should always be a top priority, and a properly installed flue liner plays a critical role in ensuring that your system operates safely and efficiently. Flue liners help guide smoke and harmful gases like carbon monoxide out of your home while protecting the chimney from excessive heat and damage. Without a well-maintained flue liner, creosote and soot can build up, increasing the risk of chimney fires and poor ventilation.
One of the key safety considerations is ensuring that the flue liner is the right size for your wood burner. A liner that’s too large or too small can lead to inefficient burning and excess creosote accumulation, both of which pose fire hazards. It’s also important to have your flue liner regularly inspected and cleaned by a professional to prevent blockages or damage that could compromise the chimney’s safety.
In addition, maintaining proper ventilation is essential for reducing the risk of carbon monoxide poisoning. Ensure that your wood burner is fitted with a carbon monoxide detector and test it regularly. If you’re installing a new system, it’s recommended to use a certified installer, such as one registered with HETAS, to ensure the wood burner and flue liner meet all safety and building regulations.
Finally, always burn seasoned or kiln-dried wood to minimise soot build up and keep the air quality inside your home safe. Burning unseasoned wood or household waste can produce excessive smoke and tar, which can quickly block the flue and reduce the lifespan of both your wood burner and flue liner.

Carbon Monoxide alarm to detect dangerous gases and fumes
Other Legal Considerations
One question we do hear quite often is: Do we need to install a flue liner? While installing a flue liner isn’t required by Building Regulations, it is certainly considered best practice and highly recommended, especially for chimneys built before 1965, which often lack proper lining and may be in poor condition.
If your solid fuel appliance was installed by a HETAS registered installer, you should have a certificate of compliance. This certifies that the installation meets building regulations. If a non-HETAS installer did the work, you may need to have the installation inspected by a qualified person for proper certification.
Additionally, if your property is in a smoke control area, make sure your wood burner or solid fuel appliance complies with local fuel restrictions.
Should a Flue and Chimney be Insulated?
Insulating a flue and chimney is highly recommended for improving the safety and efficiency of your heating system. Proper insulation helps maintain the temperature inside the flue, ensuring that gases like smoke and carbon monoxide are safely expelled from your home. Without insulation, these gases can cool too quickly, leading to condensation and the build up of creosote, which increases the risk of chimney fires.
Insulating your flue also enhances the overall performance of your stove or fireplace. A well-insulated chimney allows for better draft, meaning that your fire will burn more efficiently and produce less smoke. This not only improves air quality inside your home but also reduces the amount of fuel you need to burn, saving energy and money in the long run.
For homes with external chimneys, insulation becomes even more crucial. External chimneys are more exposed to the elements, causing them to lose heat quickly. Insulation prevents rapid heat loss and again, helps keep the flue gases at an optimal temperature for safe venting.
Another issue is without a decent liner, your chimney is more prone to dampness and damage from condensation, which can deteriorate the structure over time.
There are different methods to insulate a flue, such as wrapping the flue with a specialised insulation material or using a double-skin flue liner.
The above methods can be tricky however as the flue becomes much bulkier and much more difficult to pull down an existing chimney stack.
One of the best insulating methods is to install a standard flue liner and then backfill the entire chimney void with lose vermiculite insulation, which can be easily poured in from the top, after the register plate is installed at the base to prevent it all pouring out.
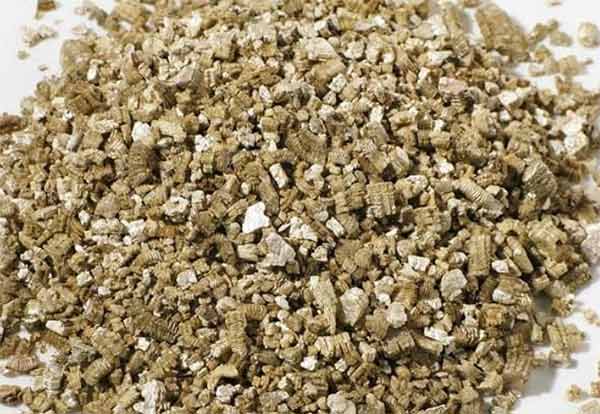
Vermiculite insulation to insulate a chimney flue
What Size Flue Should be Installed?
Choosing the right size flue for your stove or fireplace is crucial for both safety and efficiency. The size of the flue must match the outlet on your appliance to ensure proper extraction of smoke and gases. Installing the wrong size flue can lead to poor draft, inefficient burning, and even dangerous backflow of smoke and carbon monoxide into your home.
As a general rule, the diameter of the flue should match the size of the stove’s outlet. Most wood-burning stoves require a flue with a diameter of either 5 inches (125 mm) or 6 inches (150 mm), but it’s important to check the manufacturer’s specifications for your specific appliance. For open fireplaces, the flue size typically needs to be larger, depending on the size of the fireplace opening.
Building regulations in the UK state that for stoves burning wood alone, a flue diameter of at least 6 inches (150 mm) is required. However, if the stove is DEFRA-approved for use in smoke control areas, you may be able to install a 5-inch (125 mm) flue. Always verify that your flue meets the legal requirements for your area and appliance.
Using a flue that’s too small restricts airflow, leading to smoke build up and poor combustion, while an oversized flue can cause cooling of the gases, resulting in creosote build up. Proper flue sizing ensures optimal draft, better fuel efficiency, and reduced risk of chimney fires.
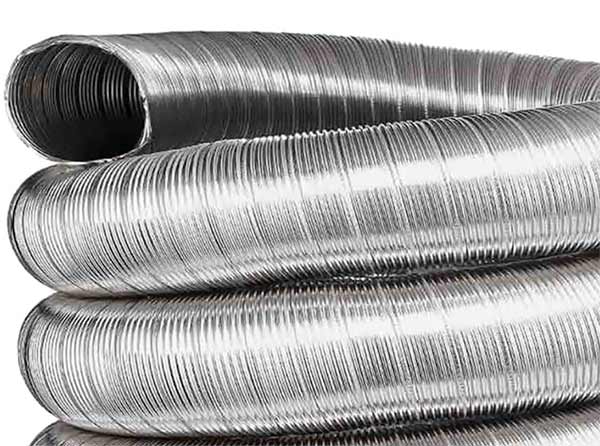
150mm or 6 inch flexible flue liner
How to Fit a Flexible Flue Liner
As we have now looked at all the different aspects of chimneys flues and what legal and safety implications are involved, it’s now time to look at how one is installed.
The below image depicts all the different elements you need to think about and what needs to be installed to complete the job.
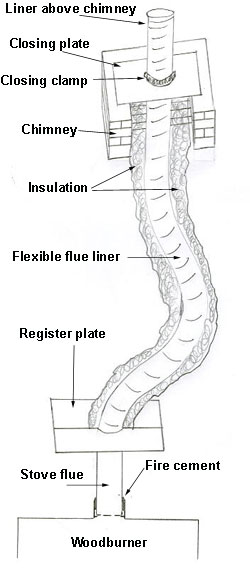
Flue liner and insulation diagram
NOTE: Please make sure you stay safe while you are working on the roof. Proprietary scaffold/scaffold towers and roof ladders must be used and under no circumstances should you attempt this job on your own. It is a two person job!
Step 1 – Clean the Chimney
The first step is to thoroughly clean the chimney. Skipping this will cause no end of problems later.
Chimneys collect a huge amount of soot and dust, which can easily get dislodged during a new liner installation. If this happens, soot and dust can cover an entire room, and it’s a total nightmare to clean up.
Step 2 – Measure the Flue Length
Start by tying a large knot at the end of a 10mm nylon rope and lower it down the chimney to the hearth. Secure the other end to the chimney pot to avoid losing the rope down the stack.
If the rope goes slack before reaching the hearth, it may be caught on a ledge or bend in the chimney. Lift and drop the rope a few times to free it. Once it reaches the bottom, mark the rope at the top of the chimney pot.
The distance between the knot and the marked point is the length of flue liner you need. To air on the safe side add on a little more so you have a little to play with, say 500mm or so either end.
Also, measure the chimney stack to order a closing plate, ensuring it overlaps the brickwork by 25mm, leaving 75mm exposed around the edges.
Step 3 – Remove Chimney Pot
To enable better access to the chimney and more space to get the flue down the chimney, the next job is to remove the chimney pot.
Depending on the type of chimney pot you have will depend on how this is done. If it’s simply a cap on a sleeve, you should be able to unscrew the cap, however if it is a traditional chimney pot that’s been cemented on, this is more tricky!
To remove these, you essentially have to chip off the cement and then remove the pot. If this is done very carefully and methodically then in most cases the pot can be saved and reused, however they are rather brittle and damage easily!
Once removed, put it safely to one side.
Step 4 – Pulling the Flue Liner Down
The next task is to actually now get the flue liner down the chimney.
Start by flattening the last 9 inches of the liner and fold it back on itself. Thread the rope through the fold and tie it securely. Use strong duct tape to hold the fold in place, applying extra tape to smooth any sharp edges.
When pulling the liner down the chimney, it’s likely to get stuck. Using more tape to smooth any sharp, jagged edges will help reduce snagging during the process. This can be a tricky job so reducing any area that could potentially get caught up in anything will help make it a bit easier.

Pull through flue liner
Drop the rope down the chimney again and have someone gently pull from the bottom while you feed the liner down from the top. If it gets stuck, pull it up slightly and then guide it back down. Chimneys often have several bends, so be prepared for some resistance and fiddling to get it down all the way.
As we have mentioned, during measuring you should add a little on for adjustment as it’s better to have extra liner at the bottom than to cut it too short.
As the image below shows, excess liner, although expensive and a bit of a waste, is much better and more cost-effective to trim the excess than to come up short by even a small amount, and have to buy a whole new liner.
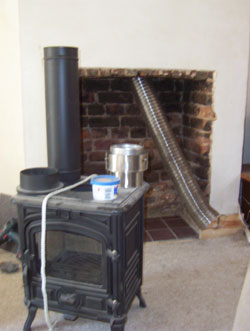
Flue liner all the way down
Step 5 – Install Wood Burning Stove
Now that you have your chimney flue liner fully installed in place, the final job now is to get your wood burner installed.
This is a little outside the remit of this guide so for help doing this, you should now go to our project on fitting a woodburning stove or fire.
Installing a flue liner is absolutely essential if you are installing a wood burner or similar appliance to ensure the installation is both safe and complies to Building Regulations, and as long as you can work competently at heights, it’s certainly something you can do yourself.