Air locks in hot water and heating systems can be a real pain especially when they restrict the flow of hot or cold water, cause radiators not to work or even cause pipework to knock, bang and create a right racket.
In this DIY guide we show you how to fix an air lock in cold or hot water pipes and restore your water flow back to normal.
What is an Air Lock?
An air lock occurs when air is allowed to get into a series of pipes where it can then collect over time to form a barrier that either fully blocks the pipe or only allows a small amount of water to pass, creating just a trickle.
This can be highly frustrating, especially when it happens with a shower as the poor flow makes it almost impossible to use.
In terms of how an air lock develops, the reasons can be various but in pretty much all situations, they will only occur with water systems that use a header tank or tanks in the loft, or a gravity fed system as they are also known.
The reason for this is that if your cold water is supplied purely by mains then at mains pressure this will be more than enough to easily force out any air that may enter the system.
Likewise, if your hot water is supplied by a pressurised non-vented system e.g. a combi boiler, then again, the fact that it’s at, at least 1 bar of pressure will be enough to force any air out of the system.
With air locks in heating systems, these will differ slightly and will generally manifest themselves as cold spots on radiators or no heat in certain radiators at all. To fix air locks in a heating system, see our bleeding radiators project here
Why do I Keep Getting Air Locks?
In the majority of cases an air lock will develop due to the fact that when cold water is drawn from the cold water header tank, it is pulled too fast meaning it eventually runs dry. When there is no water to pull in, air can then be sucked in.
In such a setup, all of the cold water, except maybe 1 kitchen tap or garden tap will be fed from the header tank and in turn any appliances such as the hot water tank will also draw cold water to fill it. If there is air in the cold water it will eventually be sucked into the hot water system also.
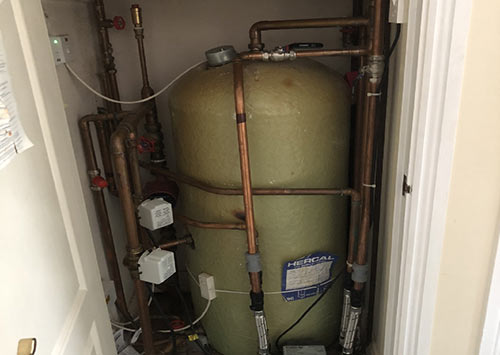
Hot water tanks can use the cold water from a header tank to fill them – Image courtesy of parkstone-yorkshire.co.uk/
One of the main reasons for water being drawn too fast is simply running a tap or several taps flat out, or having a very hungry shower pump that can all pull too much water all at once. Even though the tank will fill back up again, if that doesn’t equate to the volume being drawn, it will run dry.
With the above in mind, one of the potential causes of the tank not filling correctly is the mechanism that fills it, in this case a simple ball valve. Over time they can become blocked with debris or the washer within them can degrade and result in the valve not opening fully.
A sure fire way to test this is to access the loft and the tank and simply push down on the ball and watch the water flow. It should flow freely but if not and you only get a trickle then get it replaced.
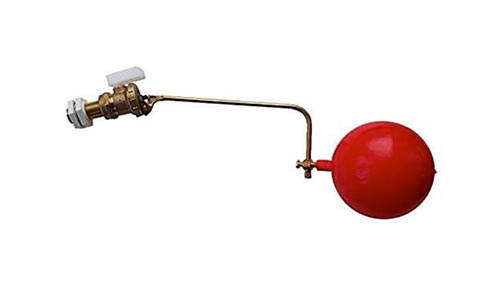
Standard ball or float valve used on cold water header tank
If you find that the valve is working as it should then one other solution is simply to get a bigger storage tank to hold more water or indeed ensure you don’t use too much at the same time.
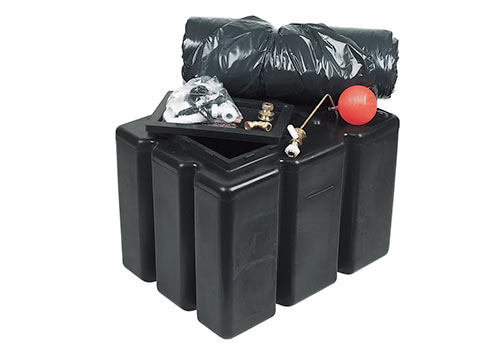
Large cold water header tank
What are the Symptoms of Air in a Water System?
In terms of what signs to look for to know if you have an air lock somewhere in your heating or water pipework, the following are generally a sure sign:
- No hot water flow from hot taps or hot water from shower (hot water air lock)
- No cold water flow from tap fed by header tank in loft (cold water air lock)
- Spluttering water from hot tap (hot water air lock)
- Spluttering water from cold tap fed by header tank (cold water air lock)
- Cold sections on radiator (air lock in heating system)
- 1 or more totally cold radiators and some hot (air lock in heating system)
How to Remove Air From a Water System
Now that you know exactly what to look for in your hot and cold water systems to know whether you have an air lock or not, it’s time to look at how to then get rid of them.
Removing Air Locks From Hot Water Pipes
As this is one of the most common forms of air lock we’ll make a start here.
Using a Cold Water Tap
One of the best ways of getting rid of an air lock in a hot water system is to use the pressure from a mains fed cold water tap to force the air out.
The cold water has to be at mains pressure as a gravity fed system just won’t have the power to force the air out.
In most cases, the mains fed tap will be a kitchen tap or outside tap and to find out, find your incoming mains supply and follow any pipes coming off of it until you find a tap.
If you only have a mixer tap, you’ll need a long section of hose to run from the mains supply pipe to a single hot tap in another room.
- Step 1 – Choose a sink in your home with 2 separate taps, with the cold tap being fed bymains pressure
- Step 2 – Take a length of hose pipe (around 1 metre) and connect both taps together. Use Jubilee clips or duct tape to tape the hose pipe on so it doesn’t blow off
- Step 3 – Turn the hot water tap on, around half way
- Step 4 – Turn on the cold tap for around 5 seconds and shut it off again
- Step 5 – Go to another sink and run the hot water. If the air locks gone it should now run freely
- Step 6 – Repeat the above steps for a further 6 or 7 times to be sure all air is flushed out
- Step 7 – Check all other hot taps in the house and ensure water is running freely and the flow is good and not restricted or spluttering
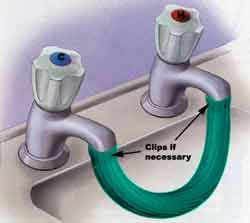
Taps joined together with hose pipe
Using Washing Machine Supply Pipes
Another technique you can use, if there aren’t any taps handy is to use the hot and cold supply pipes for your washing machine.
As most modern washing machines now only use a cold water supply and heat their own water on demand as it’s much more environmentally friendly, this is rather an old and out dated technique as in modern properties you’ll only have a cold supply, however in case you do have both hot and cold supplies, it’s certainly worth mentioning.
Again it needs to be ensured that the cold supply is mains fed.
- Step 1 – Check to ensure cold feed is mains fed and at mains water pressure
- Step 2 – Move washing machine out of the way and access water supply pipes
- Step 3 – Turn off the cold water supply at the valve the pipe to the machine is screwed on to
- Step 4 – Unscrew the cold water supply pipe from the back of the washing machine
- Step 5 – Turn off the hot water supply (if it’s on and connected) and unscrew it from the isolation valve
- Step 6 – Screw the free end of the cold supply pipe on to the isolation valve for the hot supply
- Step 7 – Turn on the hot supply valve and then turn on the cold supply valve for around 30 seconds and turn them both off again, cold first
- Step 8 – Go to another hot tap and turn it on and check if the supply is now flowing freely
- Step 9 – If not, repeat the above a few more time to force any remaining air out of the system
- Step 10 – Test all hot taps in the house
If You Have a Mixer Tap
A Further method was sent in by a user, Dave Maynard:
This method works when you need to pass mains cold water pressure across to air locked hot water supply using kitchen mixer taps.
This method is easier than trying to find another tap and having to use a long hose which may, in some cases, not fit the shape of the taps. It is also much simpler than playing around with washing machine hoses.
- Squeeze the single mixer tap outlet with your hand, so that the palm of your hand covers it firmly
- Turn on the hot, then the cold, (this order is important to prevent confined mains pressure from forcing your hand away from the tap outlet)
- The cold supply, now unable to exit the tap outlet that’s blocked by your hand, will instead flow across to the hot water pipe causing a backflow in the hot water system, clearing the airlock. Run this for 6 seconds or so
- Turn off cold and then hot taps
- Turn on hot tap and check flow, it should be smooth and constant
Air Lock in Hot Water System With Hot Water Tank
Before starting, we have to state that in most cases, hot water tanks or cylinders cannot necessarily cope with the same pressures that standard pipework is subjected to, so in some cases, forcing mains pressure water into them can cause them to rupture, so be very careful!
The following method is to be used when you have a cold water header tank in the loft that feeds a hot water tank that heats and stores hot water for your home.
Sometimes when air locks occur in cold water systems they can work their way through the cold water supply to the hot water tank and enter the hot water system.
With this particular setup, air locks can occur in either the cold feed pipe to the tank or in the pipework running from the tank to the taps.
— Fix Method 1
The quickest and most straight forward fix, try this first.
- Step 1 – Make sure all taps are turned fully off
- Step 2 – Go up to the header tank in the loft and press the ball valve down to open it. Overfill the tank to just below the overflow point
- Step 3 – Using a family member or friend for help, turn on every single hot tap in the house, fully and at the same time or as quick as possible
- Step 4 – Air should be forced out of the pipes and they should eventually run consistently
- Step 5 – Turn all taps off and try them one at a time to make sure all is running freely
— Fix Method 2
If the above doesn’t work and get rid of all the air, move on to the below method.
- Step 1 – Run a long length of hose from a mains cold tap up to the header tank. When there, push the end of the hose into the feed pipe that runs from the header down to the hot tank. You may need to hold this in place and you will need 2 people to do this
- Step 2 – Being very careful and taking note of where the vent pipe from the hot water tank runs back up to the header tank (don’t stand in front of it as boiling water from the tank could come pouring out), steadily turn on the mains cold water tap and run for 10 seconds and turn off. Again ensure that boiling water doesn’t pour out. While you’re doing this you can run a few hot taps to reduce the amount of hot water in the tank
- Step 3 – Test hot taps one at a time and they should now run freely
If you still have air in your hot water supply then it’s got into the pipework that feeds the taps from the tank.
To remove this final bit of air you will need to work through the first set of steps above entitled Using a Cold Water Tap. This should then flush any remaining air back up the vent pipe from the tank and resolve any further issues.
Removing Air Locks From Cold Water Pipes
Now that we have looked at how to get rid of air in a hot water system it’s now time to look at how to do the same for your cold water pipes. As we have stated above, in almost all cases, air will only get into a cold water system that uses a header tank in the loft, commonly known as a gravity fed system.
Using Cold Water Header Tank in Loft
This first method uses a principle similar to the above in that it uses mains pressure water to force any air out of the system.
- Step 1 – Run a long length of garden hose from a mains fed cold tap up to the header tank
- Step 2 – Using a second pair of hands, push and seal the end of the hose in the outlet from the tank that supplies the cold taps. Make sure it is for the cold taps and NOT the supply for the hot water tank, if there is one
- Step 3 – Turn on one or two cold taps in the house such as a basin tap fully allowing them to flow at max rate
- Step 4 – Turn the mains fed tap on full to give maximum flow and pressure through the pipework from the header tank to the cold taps. This will then force any air out of the system. After 20 seconds or so, turn the mains tap off
- Step 5 – Test several cold taps in the house and the water should now flow freely
- Step 6 – If there is still air in the system, repeat the steps above
Note: As you are forcing water into the header tank, make sure you don’t over flow it. It should have it’s own overflow but if the water flow rate is too great sometimes it can over power it.
Cold Mains Tap to Cold Tap
This method is basically the same as the above but works in the opposite direction e.g. pushes water and air from a mains tap back up through the pipework to the header tank.
- Step 1 – Connect a hose pipe to a mains fed cold tap
- Step 2 – Connect the other end to a cold tap fed from the header tank. Use Jubilee clips or duct tape to hold it securely on as you don’t want it to pop off
- Step 3 – Turn on the header-fed cold tap
- Step 4 – Turn on the mains tap and run for 20 seconds or so. This will then force trapped air back up into and out of the header tank
- Step 5 – Test each cold tap in the house to ensure it flows freely
If You Have a Non-Electric Shower Mixer Tap Upstairs
One final method to try, if none of the above are practical is if you have a non-electric shower mixer tap on either the bath or shower upstairs.
The below steps need to be done before you start with the tap squeezing exercise outlined by Dave Maynard above in the section entitled If You Have a Mixer Tap.
- Unscrew the showerhead from the pipe
- Place 2 or 3 layers of plastic bag over the end of the pipe to form a strong membrane
- Re-screw the shower head with the membrane still in place
- Go to the header tank and turn ONLY the hot outlet OFF. Leave the cold one ON
- Go back to the shower taps and turn both hot and cold ON, with the diverter in the SHOWER position
- Go back downstairs and carry out the procedure initially described i.e. using hand pressure over the mixer taps.
The mains pressured water will now back flow up into the hot water system but then, flow across to the non-mains pressured cold water system via plastic bag blocked mixer in the bathroom thus clearing any air locks in the non-mains pressured cold supply.
Air Locks in Mains Supplied Cold Water Systems
As we have stated, getting air into a cold water system that runs exclusively off of mains water (e.g. no header tank) is extremely unlikely, however in some cases after maintenance where sections of pipework have been disassembled, air can get in.
In this event work through the below steps.
- Step 1 – Locate your mains stop tap and turn it fully off
- Step 2 – Starting with all the cold taps upstairs, turn them on and then work your way downstairs turning them all on also. As the mains water is of they will eventually all run dry
- Step 3 – Again starting upstairs and working downstairs, flush all the toilets and drain them dry
- Step 4 – Go back around all cold taps and turn each off so it is almost off and only a trickle will flow when they’re back on
- Step 5 – Go back to the mains stop tap and turn it back on
- Step 6 – Work your way around all taps once again and this time turn each one half way on
- Step 7 – And finally go back around and turn them on full flow. Each should now flow freely
- Step 8 – Turn them all off again and individually test each one, one more time
Removing Central Heating Air Locks
As we have mentioned, all of the above tips are to get rid of air locks that occur in either hot or cold water systems and pipework.
If you have noticed that your radiators are either cold at the top or bottom, have cold areas across their surface or indeed one or more radiators are completely stone cold then there is a good chance that you have an air lock in your heating system
In this case, see our project here and how to bleed radiators to drain it out and return your heating system to full working order once more.
In the information above we have listed a great many different methods for curing air locks in hot and cold water system. Each particular method is suited to a particular situation so ensure that you choose the right one.
If after working through the steps your air lock issues still remain, there may be something more sinister up with your pipework so it may then be time to call in a professional plumber.