The Suffolk Latch, Norfolk Latch and the Ring Latch
This project is the same for fitting both the Suffolk latch and the Norfolk Latch, however the Ring latch (below) is a different job and dealt with in a different project. The tools required however are the same, as is the principle of lifting a simple lever over a hooked latch.
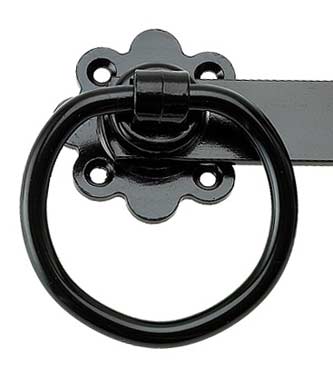
Fitting a Suffolk or Norfolk latch it the same as fitting a ring latch
History and Origin of the Suffolk and Norfolk Gate latch
Today unfortunately the history of the old wrought iron work of years gone by has gotten confused and merged. There was once a definite distinction between a Suffolk Latch and a Norfolk Latch but now the names of the latches are intermingled and the difference is usually defined as the Suffolk latch being a hand-made latch while the Norfolk latch is a mass-produced version of the same thing. This is not so.
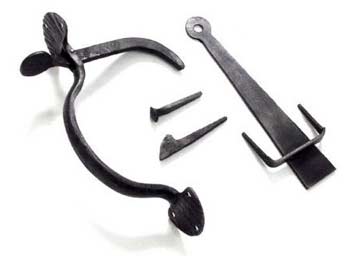
Suffolk latches have no back plate
The Suffolk latch predates the Norfolk Latch by only a few years and both were invented by a chap called William Twopenny, a great architect and metalworker of the late 18th and early 19th Century.
He was a pioneer in English metal work and the subject of a wonderful book of ninety three metal work drawings published in London in 1904.
Norfolk Latch made of forged Steel
The real difference between the two thumb latches is that the Suffolk Latch, seen in the top image above, has no back plate and the handles are connected to the gate with screws through the (usually ornate) plates at the top and bottom of the handle.
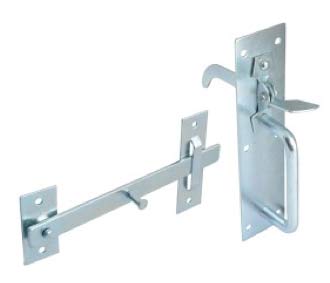
Norfolk latch made of zinc
The design of the handle has varied much over the years and as we have increased our ability for form metal work more easily the latches, which were originally made out of iron, are now available in any number of metals with forged steel and zinc being shown on this page in the form of Norfolk Latches which have a back plate and gives them a much more modern look, which has lead to the idea that the only difference is the mass production of Norfolk Latches.
The idea of the Norfolk Latch, with a back plate, was that in the 18th century most doors were made of plank timber and the back plate, together with tee-hinges (almost always used on old plank, or ledged and braced doors) helped to hold the planks together when the door plates were fitted.
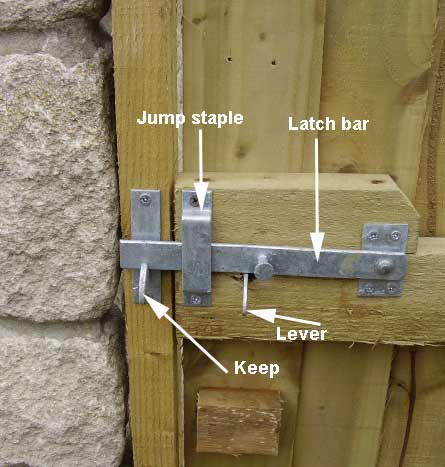
Parts of a Suffolk or Norfolk Latch
The main parts that make up both the Suffolk and Norfolk latches can be seen in the image below:
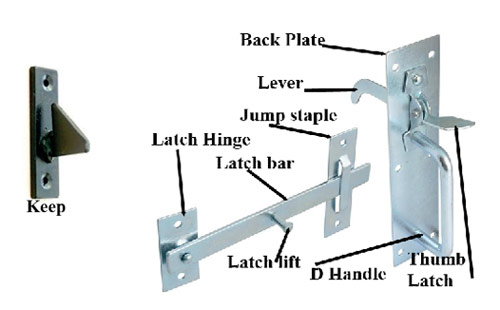
Names of the parts for a Suffolk or Norfolk Latch
Tools Required to Fit a Norfolk or Suffolk Gate Latch
18 Volt Drill-Driver
You will need a decent 18V drill to drill holes for the Latch bar. The drill can double up as a screwdriver (Drill/Driver) and our suggestion is the one in the image to the left or similar.
Clicking on this image will take you to our toolstore where you can but the drill/driver.

Great general purpose 18V drill driver from Black and Decker
Screwdriver Bits and Holder
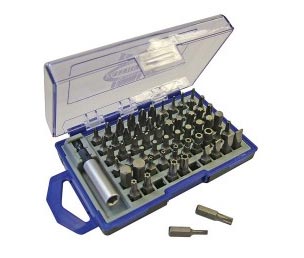
61 piece screwdriver bits and holder from Faithfull
32 mm Flat Wood Bit
You will need a 32mm of sufficient length to get through the cross rails of your gate. This 32mm bit from Milwaukee will do the job perfectly.
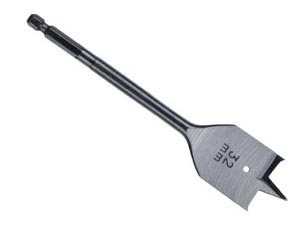
150mm long wood bit 22mm wide from Faithfull
3mm HSS Drill Bit
A 3mm HSS drill bit is ideal for the pilot holes you will need for fitting the back plate to the latch plus the keep, latch staple and latch hinge.
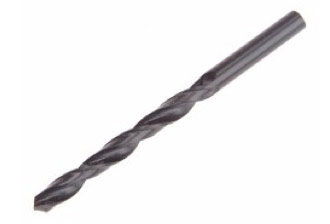
Drilling pilot holes with 3mm drill bit
Tape Measure
We suggest a 5m tape measure which will stand you in good stead for many other jobs too. Measurement is important for fitting a Suffolk or Norfolk latch as it’s vital the latch bar drops (and stays) into the keep.
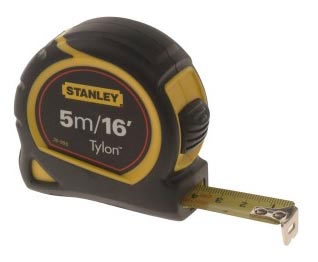
5m tape measure from Stanley
Practicing to Fit a Gate Latch and Other Carpentry
Most DIYers and home improvers are a little scared when doing a job like this for the first time. Gates are expensive and the gate fittings are not cheap either!
Rather than launch into the final job and being very fightened to mess it up, why not practice the fitting of your gate latch into a timber offcut which you can use to represent your gate.
Woodworking from Offcuts book available on Amazon
It is surprising how much confidence this simple practice procedure will give you and the workings of every part of your gate latch become obvious as you fit the latch to your practice timber.
This idea applies to pretty much every carpentry (and other trades) you try at home. Obviously this is not your main job, there is no reason to expect that your first attempt will be wonderful, but with a little practice you can get really great results and not worry about the cost of the original product. Working with timber offcuts (see in teh image above) is something every apprentice carpenter is expected to do so why not follow this principle at home.
Fitting a Suffolk or Norfolk Gate Latch
Please note, before you email us, in this example the client ordered the gate, then changed her mind as to which side it was to hang. The diagonal strut of the gate should run from the bottom hinge to the top, opposite corner, for maximum strength. This was pointed out to her but she insisted that we hang it anyway.
Siting the Latch at Your Preferred Height
While the actual latch names may be two different things, fitting both of these latches is the same. Follow the instructions below to make a good job of your gate latch.
First look at the back of the gate and make sure you have a cross timber through which you can fix the latch. This can be seen in the picture below, left. If the cross bar is not at the right height (this is purely a matter of personal preference) a lock block can be added easily by simply fixing an additional piece of timber to the gate.
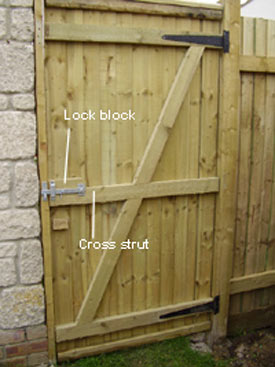
Garden Gate with Lock Block and Cross Strut
Measuring for the Latch Bar Hole in the Gate
Drill a hole 32mm in diameter, the centre of which is 50mm in from the leading edge of the gate.
32mm is the maximum distance your latch lever will need to travel as it lifts up the latch and drops it into the keep.
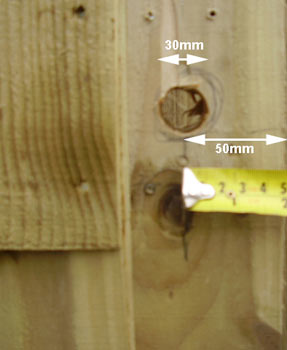
Measurements for fitting Norfolk latch to garden gate
Fitting the Latch Front on the Back Plate
Insert the handle and lever of the latch so that the lever sits on the bottom of the hole and is level through the section of the gate as yu can see in the picture. It is really important that the lever lays on the bottom of the hole. It will never need to go downwards anny more than that but when the thumb is applied to the thumb latch it will need to go up to lift the latch on the other side of the gate.
Fitting the handle and latch lever to a Norfolk Gate Latch
Now fix the latch bar across and over the lever. This again should be level with at least 35mm overhanging the gate post taking into account the gap between gate and post.
Fixing the latch bar to a Norfolk Gate latch
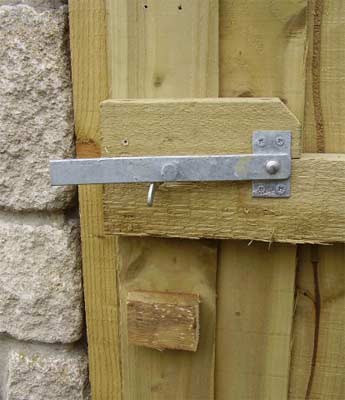
Fitting the Jump Staple and Keep to the Gate Latch
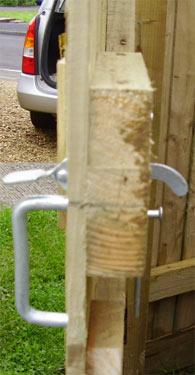
In this position, with the latch bar sitting on the lever, slide the keep up to the latch bar and fix so the latch bar sits in the notch in the keep. Then fix the jump staple (so called because it stops the latch bar jumping over 180 degrees when the gate bangs) in position level with the keep.
This should allow, when closing the gate, for the latch bar to slide up the slope of the keep and drop into the groove. If, as sometimes happens, the latch bar just bangs into the point of the keep, then just drop the keep a little, or raise the jump staple.
Complete Gate latch fixed in place