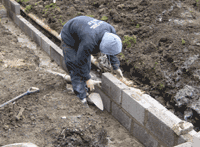
Building a garden wall is a little daunting for some people but it is not a difficult job if you take your time and follow a few simple basic instructions. Firstly a garden wall foundation must not be taken lightly. The absolute minimum thickness of a foundation used anywhere on, in or around a property is 150mm (6 inches). This thickness, providing the wall is not loadbearing, will be enough to ensure your foundation will not crack.
If you intend to use your garden wall to retain any soil behind it, then see our project on garden retaining walls and also look at our foundations project especially if your wall is to be built on a slope.
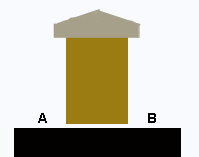
Foundation for garden wall
The width of the foundation should be 250mm wider than the wall you intend to build and the wall should be built in the centre of the foundations making sure that the distances A and B are the same. Its also important that the foundation trench is dug with a flat smooth bottom and the thickness of the concrete is the same throughout the length of the foundation. See our project on mixing concrete to get the correct mix for your foundation.
How to lay the bricks and/or blocks for your garden wall is best seen in our laying bricks and block project but the few images below will give you a good idea to start with.

Laying a bed for the first course
Laying the first course of bricks

Laying a corner
Levelling the corner
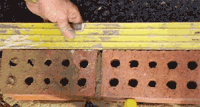
Using our mixing mortar projects as a guide, place a layer, or bed, of mortar on the concrete foundation. This operation is exactly the same if done with blocks as seen below.
The bricks are then pushed in to this bed until they are level and the joints between them are filled.
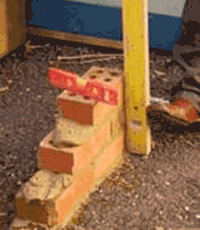
The spirit level is placed on the back of the bricks to make sure the first course is running in a straight line. The same operation is used for the next course but it is as well to build up one end, or corner, first.
Keep checking in every direction with the level to make sure your wall is completely flat and upright. Much more instruction is given in the laying bricks project.
When the corner is built up, a corner can be built at the other end and a line strung between them. This means you can lay the bricks or blocks in between the corners, to the line, and everything will look neat in rows.
The image below shows the line being used to lay a course of blocks.
Laying blocks
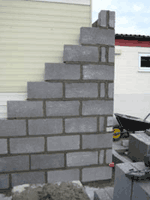
Blockwork corner

Using a line
You can see from both the brick and the block wall that the joints are staggered. Each brick or block overlaps the brick below it by half. This half bonding keeps the wall strong.
There are so many ways a garden wall can be built and so many different bricks, blocks and stone that can be used we have listed a few below and explained what they are called and why they are built the way they are.
This wall is made from old red bricks which can be bought at most demolition yards or as they are known now, architectural salvage yards. The feature of this wall is the top section.
The very top of the wall is built from bricks which have been laid on their edge. Understandably these bricks are called Brick on Edge!
Under this course you will see a single course of bricks jutting out slightly. This jutting out is not just a nice visual feature it is done for a purpose.
Called corbelling, the brick is made to stick out so any rain water running off the top of the wall runs onto the corbelling and then drips down to the ground rather than run down the face of the wall. This avoids unsightly stains made by water constantly running down the face of a wall.
Brick on edge on split block walling
This wall is constructed out of split block walling. This means the blocks themselves were part of larger blocks which have been split by special blades and hammers.
Split block walling is in itself attractive as it is mostly used to represent stonework. The brick on edge in this wall is a completely different colour brick making an even more attractive feature.
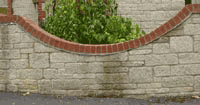
You can see however, the rain has run down the curve on the top of the wall and has then run over the edge. This will eventually cause a stain and it would have been a good idea to place a corbel on this wall. You can see from this example that even a simple garden wall requires some thought.
Coping stones
Another example of corbelling but this time it is constructed using some old roof tiles. These roof tiles are small 10 inch x 6 inch concrete tiles called Plain Tiles. They can be bought at any builders merchants and make a very attractive corbel which protects the face of the brickwork.
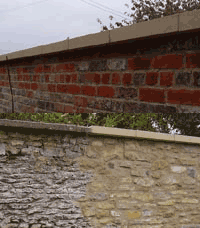
The walls on the right are topped, or capped, with purpose made coping stones which give an attractive finish to the wall as well as providing the necessary overhang required to "throw" the rain water away from the face of the walls.
The lower of the two walls is an old stone wall which has been extended. The mortar used in this wall is lime mortar which you can find out more about in our project on mortar mixes.
Lime mortar is a great deal more flexible than cement mortar and this allows the wall to move a little while the elasticity of the mortar also allows it to breath.
This allows water that has soaked into the stone to evaporate out again whereas water that is trapped behind cement based products is pretty much sealed in.
You can see from these few examples that building a garden wall needs a bit of thought but whatever you decide to build the basics will stay the same.
- It must be built on a solid foundation
- The concrete and mortar mixes must be strong
- The joints must be staggered and all joints must be filled to stop the water getting in too easily
If you walls becomes saturated it will not be long before the frost freezes inside the walls causing freeze-thaw action which can ruin a wall very quickly.