Installing Venetian, Roman, and Vertical blinds follows a similar process. Start by fixing brackets or the entire carriage to either the window recess (top fix) or above the window (face fix).
The blind mechanism is housed in a box called a blind carriage. If not fixed directly to the wall, the carriage is attached to the brackets, and the blind is ready to use. Vertical blind carriage and fixing within window recess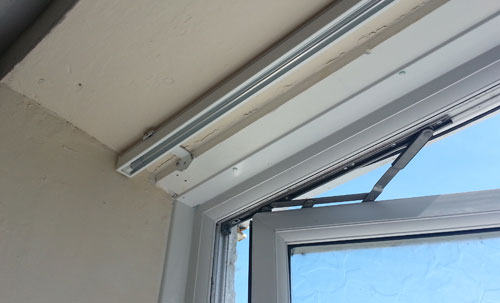
Brackets are usually used to secure the carriage to the wall. The type of blind determines the brackets used, which can vary even for a single blind type, like Roman blinds, depending on the manufacturer. Below, we explain the general method for fixing brackets, as this process is typically the same, regardless of the type of blind.
Different Ways to Fix Window Blinds
Blinds can be installed in two ways: “face fixing” on the wall above the window, or “recess fixing” on the soffit or head of the window opening. However, before any installation takes place, ensure the blind is the correct size for the opening you are fitting it into. Centre the blind to the window opening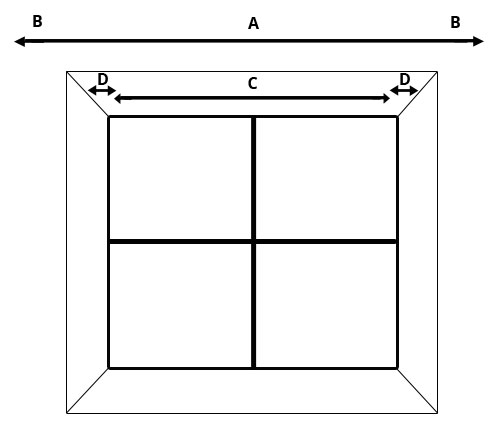
Face Fixing
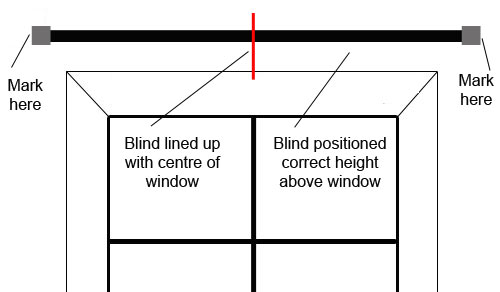
For face fixing, align the centre of the blind carriage with the centre of the window opening. This will ensure equal overhang on both sides, marked as B in the diagram above.
To block more light, let the blind overlap the wall by at least 8 cm on either side. If blocking light isn’t a priority, just ensure the blind fits your desired width.
Decide how high above the window recess to mount the blind, aiming for 8-10 cm above to maximise light blocking, if this is a priority.
Recess or Head Fixing
For recess fixing, ensure the gaps on either side of the blind (marked as D) are equal.
The type of blind and its brackets will dictate where they are fixed. Usually, brackets attach to the head of the window recess, but some may need to be fixed to the sides.
These side-fixed brackets are strong but can be tricky to install and level. Either way, you will need to ensure the blind or carriage is the exact width needed.
To block the most light, make sure the blind covers the full width of the recess, blocking all available light entry points.
Most blinds can be fitted either way as their brackets have fixing points for both face fix and recess fix. However, some blinds are better suited to specific methods:
- Roman Blinds: Suitable for both inside and over the window recess (face and head fixing)
- Venetian Blinds: Can be fitted inside or over the window recess (face and head fixing)
- Vertical Blinds: Generally best for inside the window recess (head or recess fixing)
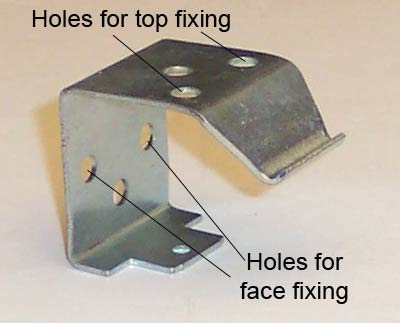
The different fixing points on a bracket for face and head fixing
Measuring the Size of Blind You Need and Getting It Cantered
Accurate measurements are crucial for fitting blinds correctly, ensuring they are the right size and centrally positioned.
Your chosen fixing method of face fixing or recess fixing will determine how you measure your blinds.
To measure for the size of blind you need:
- Face Fix: Measure the width of the window recess and add 8-10 cm on each side if you want the blind to cover the entire window area.
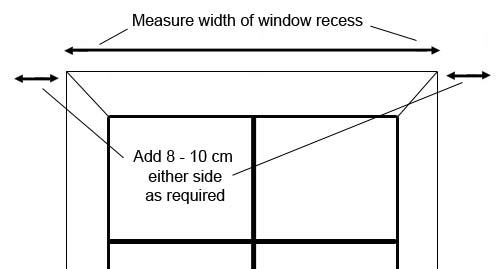
Measuring for a blind that will be face-fixed above the window recess
- Recess Fix: Measure the width of the window recess and deduct 5-10 mm from each side for some movement if needed.
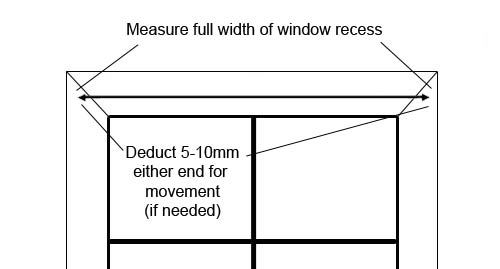
Measuring for a blind that will be recess-fixed within the window recess
Ensure the carriage and blind edges are equal in width. If the blind sections extend beyond the carriage, account for this in your measurements, especially for recess fixing.
Measure your window in three places — top, middle, and bottom — for height, and left, middle, and right for width. If the window isn’t perfectly square, use the smallest width and the longest height for your measurements.
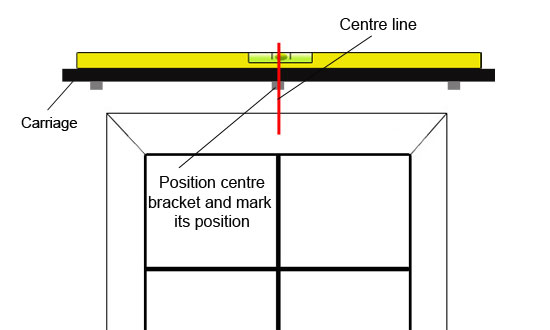
To centre the blind, measure and mark the centre of the window opening and also do the same for the blind carriage with a pencil. Align these marks during installation to ensure the blind is centered. Centre line of the window and blind should both line up once fixed in place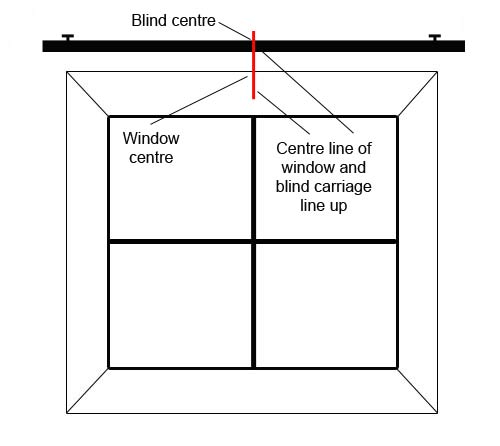
Fixing the Blind Brackets or Carriage to the Wall
Once you’ve confirmed the position of your blind carriage, the next step is to install the brackets that hold it in place, unless the entire carriage needs to be fixed directly to the wall.
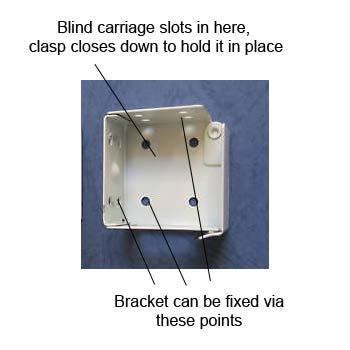
There are various types of brackets for different blinds, but generally, brackets are mounted by drilling holes, inserting wall plugs, and screwing them in. The carriage then clips or slots into these brackets. Clip-in type bracket for blind carriage Slot-in type bracket for blind carriage, mostly Venetian blinds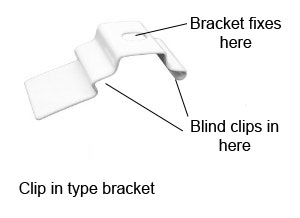
Your blind should include at least two brackets, one for each end. If there are three brackets, place one at each end and one in the middle to evenly distribute the blind’s weight.
If fixing the entire carriage to the wall, there will typically be three mounting points inside the track of the carriage — one at each end and one in the middle.
Fixing the Brackets in Place
When it comes to fixing the brackets in place, this can be done one of two ways – fixing to the outside face of the wall or fixing inside the window opening recess:
For face fixing your blind, follow these steps:
- Determine if you will fix the brackets at either end of the carriage or above it:
- Either end: Attach the brackets to the ends of the carriage, then position it above the window, aligning the centre marks on the carriage and window reveal. Mark the wall where the brackets will go, remove the blind, and detach one bracket. Place the bracket on the marked spot and mark the fixing holes.
Position blind and then mark desired location of brackets
- Above: Measure from the left edge of the window recess to the desired height, mark with a pencil, place the bracket on the mark, and mark the fixing holes.
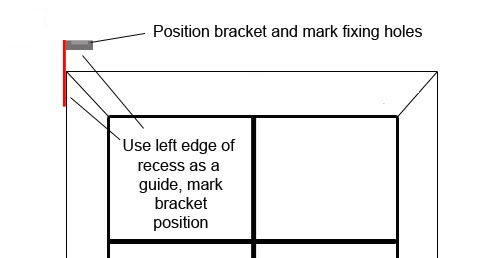
Using the left hand edge of the window recess, measure and mark bracket position
- Either end: Attach the brackets to the ends of the carriage, then position it above the window, aligning the centre marks on the carriage and window reveal. Mark the wall where the brackets will go, remove the blind, and detach one bracket. Place the bracket on the marked spot and mark the fixing holes.
- Drill the marked holes using a 6mm drill bit.
- Insert wall plugs into the holes, tapping them in with a hammer if needed.
- Position the bracket, screw it into the centre fixing hole, and tighten until snug.
- Level the bracket with a small spirit level, then use a long spirit level (6 feet) across the bracket to mark the position for the other side.
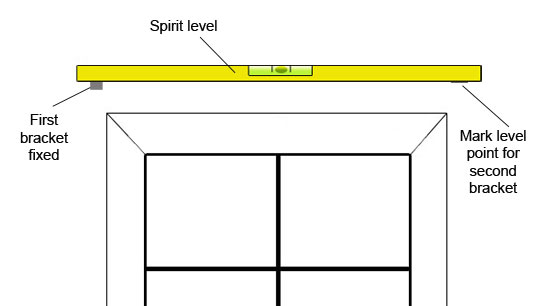
Using spirit level to level second bracket
- Attach the carriage to the first bracket, then lift the opposite end to match the level mark. Mark the bracket position, remove the blind, and drill the marked holes. Insert wall plugs and screw the bracket in place.
- Check that the carriage is centrally aligned and level. If not, adjust the brackets as needed.
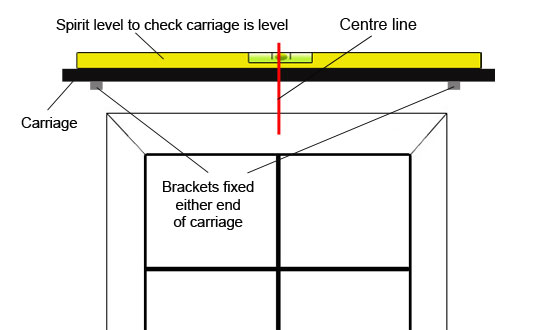
Check that the carriage is both level and central
- For a third, middle bracket, position it on the carriage, mark the spot, drill, insert wall plugs, and screw it in place.
Position third bracket in centre and mark its position
- Secure all screws tightly and check the carriage alignment one last time. Attach the blind to the carriage as per the manufacturer’s instructions.
Admire your handy work and ensure the blind operates smoothly!
For head or recess fixing your blind, follow these steps:
- Measure the width of your window recess to ensure the blind fits perfectly. Deduct the blind’s width from the recess width to determine the gap, which should be 1-4 cm.
- Divide the gap by two to get the space needed on each side for centering the blind. Mark these points at the top of the recess with a pencil.
- Decide how far from the window you want the blind. Measure and mark this distance at both ends, aligning with the previous marks to set your bracket positions.
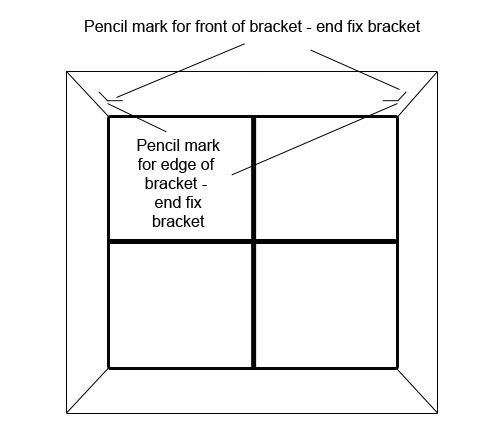
Marking for end fix brackets in recess
- For top brackets, position them 8-10 cm in from the ends of the blind carriage. Mark these points as well.
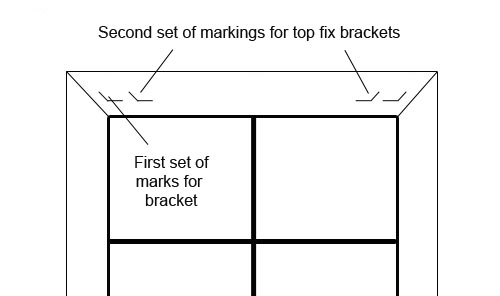
Marking for top fix brackets in recess
- Hold the blind carriage in place to check the alignment. Ensure it’s level and properly positioned. You may need help for this step.
- Mark the fixing holes for each bracket on the pencil marks.
- Drill the holes using a 6mm masonry drill bit, especially if drilling into a lintel. Insert wall plugs into the holes, tapping them in with a hammer if necessary.
- Screw the brackets into place using the provided screws or 6-10 size screws if using red wall plugs. Tighten until snug.
- Fit the blind carriage into the brackets and ensure it fits correctly. If you have a third bracket, mark its position, drill, plug, and screw it into place as well.
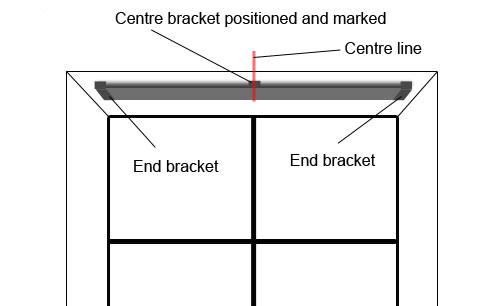
Carriage fixed in place to check all square and level and third bracket added and position marked
- Install the blind or carriage and ensure it operates smoothly. Refer to the manufacturer’s instructions for any additional details.
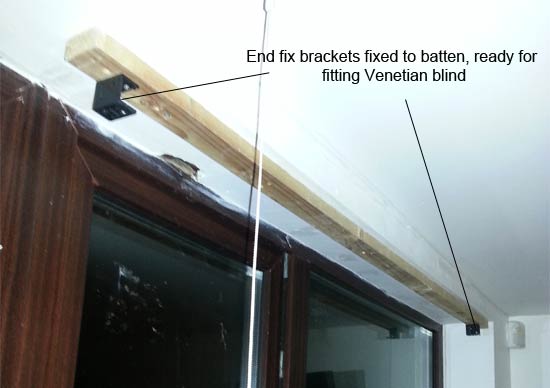
End brackets fitted to batten, fixed inside window recess, ready for installing Venetian blind
Attaching Blind Sections to the Carriage
After securing the brackets and carriage, it’s time to attach the blind sections (or vanes).
For Venetian Blinds: The vanes are usually pre-attached to the carriage. Once mounted, your installation is complete!
For Roman and Vertical Blinds: The vanes are typically separate and need to be attached.
Follow the manufacturer’s instructions for your specific blind model. Generally, for vertical blinds, clip each vane onto the carriage clips. For Roman blinds, clip the fabric and insert the dividers.
Once everything is in place, test the blind to ensure it operates smoothly.
Fitting a blind of any type is a pretty straight forward and easy task and as long as you take your time measuring, ensuring you position any and all fixings exactly where they should be, e.g. central, then you are sure to get a professional finish!