Fixing conservatory blinds, or fixing blinds to PVCu or plastic windows is a hugely popular topic on DIY Doctor and there’s several ways to do this, depending on whether you can drill into the frames or not
To find out how to fit conservatory blinds correctly, depending on the situation, read on below.
Can you Drill and Screw into UPVC?
Yes it is possible to drill into UPVC door frames, window frames and conservatory frames, however you have to be extremely careful and know exactly where you are drilling so that you don’t hit the glass or damage the frame so that it doesn’t seal correctly.
As you can see in the image below there is a safe area that you can drill and fix into, this has a steel frame within it. In the image below this appears as red section.
However, if you are wanting to screw into a UPVC frame, there are a few other things you need to be aware of. This is covered in more detail below.
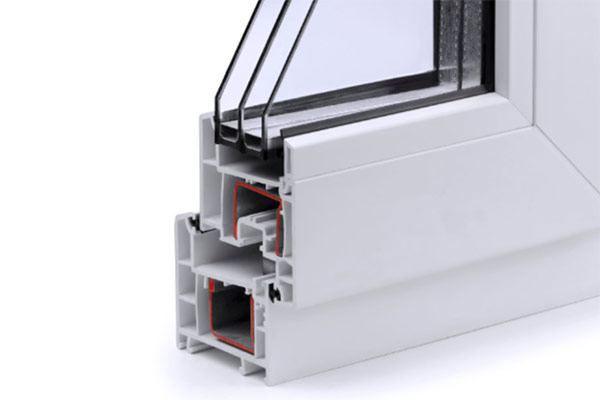
Cross section of UPVC frame
Methods of Installing Conservatory Blinds
If you are wanting to add blinds to your UPVC conservatory, window or door for that matter, there are really two different routes you can go down to achieve this:
Installed by a Specialist
If you are a little unsure about the possibility of drilling and fixing into frames or you’re not a DIY fan, then this is certainly the route to go down.
Quite often, installers such as this will use blind kits that either don’t require drilling or will offer some sort of guarantee that covers their work.
Normally this will start with you contacting a company in question. They will then send out one of their reps to discuss colours, styles and measure up.
Once this has been done they will either manufacture the blinds for you or create some to the correct sizes.
A member of their installation team is then dispatched on an agreed date to fit them. This may be the ideal choice for some, but it does cost!
DIY With a kit aka Self Measure and Install
This is the ideal choice for the avid DIY’er and those that want to save a little money by installing themselves.
There are a few ways in which this route can work and it depends on the type of blind being used as to what needs to be done in order to fit it.
Whatever the case, the first task is to measure up so that you know the size of blind needed.
Once the size is known a blind can then be purchased that’s either made to measure (e.g. made to the right size), or one that’s off-the-shelf and needs to be cut or adjusted to fit.
The made to measure type often give the best and most professional finish as they are obviously made to exactly the right size.
The off-the-shelf type are often roller blinds or venetian blinds that can be cut to fit to some degree, however when cutting, you need to take the utmost care as any mistakes will stand out a mile off!
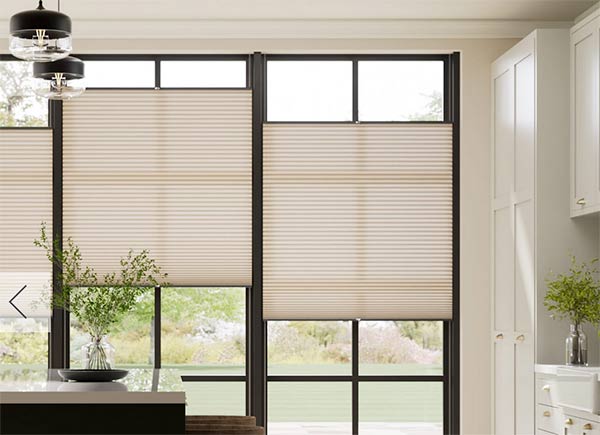
Perfect fit conservatory blinds made to measure
Regardless of which option you go for, your chosen conservatory blind kit should come with all the fittings required.
How do you Fit Blinds to UPVC Without Drilling
Where drilling your UPVC conservatory frame or other frame is not an option then there are such things as “drill free” or “no drill” blinds that can be fitted without the need to drill or screw into anything.
In the majority of cases they use small brackets that are slipped in under the rubber seal that surrounds the frame and the blind then simply clips into these.
There are various variations of this as it depends on the manufacturer but essentially most operate in the same manner. and are easy to fit.
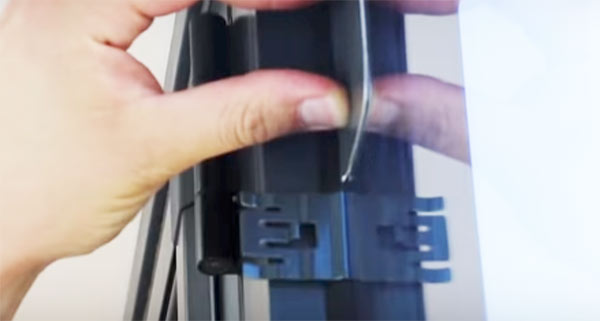
No drill conservatory blind bracket slipped under rubber seal
Am I Allowed to Drill into my PVC Window Frames?
As we have touched on above, this is also quite a common question we get asked. Some window installation and conservatory construction companies will issue you with a guarantee for your windows or conservatory once fitting or construction is completed.
The answer to this question will very much depend on who constructed your conservatory, the terms listed in your contract (if you have one), the guarantees that you have and if they are a member of FENSA (Fenestration Self-Assessment scheme set up by the Glass and Glazing Federation and backed by the government).
On the whole this is quite a "shady" area and due to the levels of competition in the replacement window market, some companies have been known to offer guarantees and warranties that, shall we say, are rather unrealistic just to get the sales in.
Can you think of any other industry that offers up to 10 year’s as a warranty? We certainly can’t! When thinking along these lines it all starts to sound a bit unrealistic.
If you read through the small print of your contract you will probably find that the item with the longest cover-term are the PVC shells themselves and the terms will probably only cover discolouration or manufacturing defects.
As I’m sure you can imagine, in the event of a claim your PVC units will be examined in fine detail and if it is found that they have been drilled this may be used as an ideal excuse to wiggle out of any claims.
Another fact is that due to the competition in this market and the money involved, the chances are that a given window or conservatory company won’t even be around in 10 years time to honour any warranties!
With all this in mind, this is not to say that you are not allowed point-blank to fix to your shell units, just that it’s a wise move to contact the company that fitted your windows or built your conservatory and even any insurance companies that are involved (insurance backed guarantees) and ask them to clarify whether you can. Then get this in writing from all parties involved!
Further help and advice, if you need it, can be obtained by contacting FENSA. Visit their website on the above link.
The ideal alternative to drilling your shell units is to use Perfect Fit blinds or no-drill blinds (mentioned above), more about this is mentioned later in this project.
How to Measure Conservatory Windows for Blinds
When fitting conservatory blinds, and any other blinds for that matter, the entire success of the job depends on the blind fitting perfectly where it’s placed so any measurements need to be 100% accurate.
If you are using a specialist company then their own agent is will be responsible for this and any inaccuracies will be down to him and the company.
However, if you are supplying the measurements then make sure they are absolutely accurate. Any errors in dimensions you supply will be down to you. Check with your supplier exactly what you need to measure and give them.
The measurements you take will depend on how much of each window or door pane or indeed wall you want each blind to cover. When viewing the images below, the inside recess area will be taken from the edges of each bead across the width and height (or drop).
In most cases the outside recess will cover a "wall" or PVC shell unit containing 3 or maybe 4 panes of glass.
If you want the blind to cover just the windowpane or glass itself, measure the inside recess in 3 positions – top, middle and bottom for the height (or drop as it’s known) and the left, middle and right on the width. This is wall to wall, or bead to bead (if dealing with single panes) – write down the dimensions on a piece of paper and take the smallest measurement for both width and drop as the ones to use.
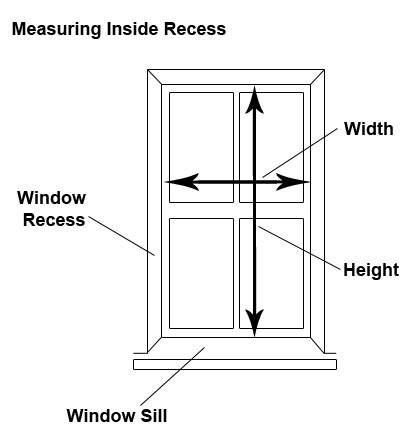
Measuring the inside recess for individual PVCU units with a surrounding wall
If you want the blind to cover the entire window or door, measure the outside recess. This is essentially the inside recess measurements with around 12 – 14cms added to each dimension as this will give you 6 – 7cms either side of the blind. Again, measure in 3 positions across both width and height (drop) – write down the dimensions on a piece of paper.
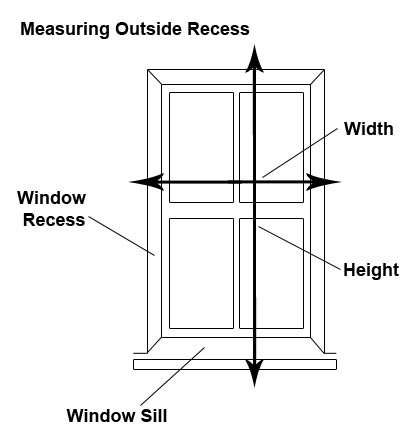
Measuring the outside recess for individual PVCU units with a surrounding wall
Depending on how your conservatory has been constructed you may find that each unit is butted up to each other with no wall space in-between, this is pretty much how most conservatories are constructed, by fixing UPVC units together.
Some conservatories are constructed from brick and block and in this case you will probably have a traditional recess area.
When dealing with just UPVC units the recess area is basically the surrounding shell outside of the glass area and, as mentioned, the inside recess is just the glass area measured from bead to bead.
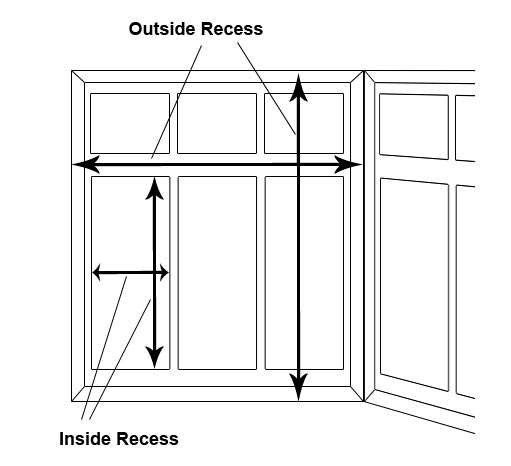
Measuring inside and outside recess where PVCU units are butted together with no surrounding wall space
If you are going for roller blinds you will also have to factor in the width of the roller mechanism and the brackets which will be 38 – 40mm wider than the actual material of the bind. This is not necessarily too important when mounting outside the recess but certainly comes into play when mounting inside a recess.
Types of Conservatory Blinds
There are quite a few different types and styles of conservatory blind available and their fixing and installation can vary slightly depending on manufacturer but in essence the principles of installation are pretty similar when it comes to DIY kits.
There are also numerous different types of conservatory ranging from the Lean-To type to Elizabethan and Victorian styles and each manufacturer may also have a slightly different take on each style but in essence a conservatory is a conservatory and they are all constructed from similar materials and erected in the same manner.
To these ends, most conservatory blinds are based on size and the area of glass they need to cover. Some will span an entire "wall area" whereas the more modern types are made to cover individual panes of glass so that you have the choice as to which panes are covered and which aren’t. In respect to this pretty much all styles and types of blind are universal and can be installed in pretty much any conservatory.
It’s also a good point to note that blinds are also available for roof windows or Velux windows, and not just the walls!
The main styles of conservatory blind can be summarised as follows:
Venetian Conservatory Blinds
There are several types of materials used in the construction of these sorts of blind, typically aluminium, wood and PVC.
Due to the nature of a conservatory, it is subject to vast changes in temperature and PVC and wood are not suitable materials. PVC is often prone to melting and deforming whereas wooden blinds simply cannot cope with the rapid temperature changes, so aluminium is the way to go.
Overall they are a great choice, they can provide good levels of privacy even when open and still allow a decent view outward, they are able to create a great light balance, do not discolour due to sun exposure and offer reasonable levels of heat retention. They are also very reasonably priced.

Venetian conservatory blind
Vertical Conservatory Blinds
A very common choice when it comes to conservatory blinds. They offer a great range of lighting options due to the numerous combinations of draw strings and controls that also provide great levels of privacy.
One drawback is that because of their material construction, they are quite prone to fading over time due to sun exposure but a plus here is that you can purchase replacement verticals very cheaply.
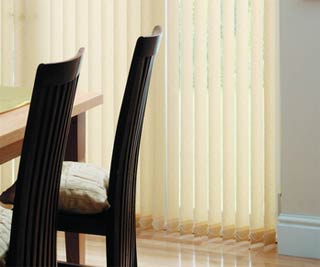
Vertical conservatory blind
Roller Conservatory Blinds
These are also quite a popular choice. They can be installed in several different ways, either one blind spanning a wall or several windows or one blind per pane section with the latter option giving you much more control over light.
They are also quite light in weight so they won’t put too much strain on the fixings or on the PVC itself.
The one major drawback is, similar to the above, they will be prone to fading, but as you will probably only have them part way down or even retracted during summer months, they will fade unevenly and look quite unsightly. Additionally they also attract insects and if you have ever rolled up a fly in a roller blind you will be well aware of the mess they make!
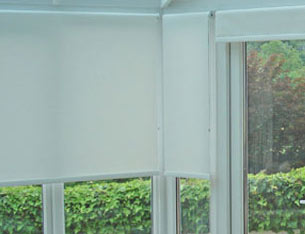
Roller conservatory blind
Roman Conservatory Blinds
These blinds tend to be quite expensive, especially when they are made to your specific measurements. However, it is possible for you to buy the "header" section that includes the controls so that you can make your own.
Again as with the other choices there are drawbacks – When retracted they still have quite a presence over a pane of glass so vision is restricted somewhat and due to this they will be prone to fading over large areas.
If purchased with a blackout lining they will also be very heavy, putting a lot of strain on fixings and also the areas of the PVC frame they are screwed into.
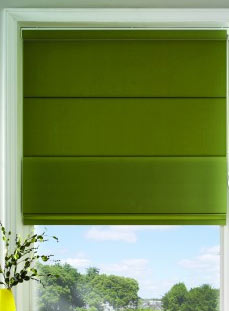
Roman conservatory blind
Perfect Fit Conservatory Blinds
At DIY Doctor we are always on the lookout for great products and great ideas that make DIY and home improvement fun and enjoyable and when we came across the Perfect Fit blind (other variants from other manufacturers available) we were very impressed.
This is possibly the best way we have seen of fitting blinds to plastic frames without the need for the traditional drilling or screwing of the frames themselves avoiding all the hassle of trying to confirm if drilling the frames will invalidate the afore mentioned guarantees etc.
Available in a great range of styles and colours, there is pretty much a Perfect Fit blind that will suit all situations and styles.
Fitting the blind when it arrives is literally done in minutes. Using an ordinary credit card as a measure you simply slide special brackets (usually 4) into the existing window beads.
Your new blind clips straight in and it’s done. No drilling, no screwing, no sticking it really is that easy.
With their Perfect Fit system there are no gaps down the side of the blinds. Strings do not get knotted and pleats do not get tangled together leaving the blind at a ridiculous angle to the window sill. As we said at the top, we have been asked many times for "The easiest way to fit window blinds to PVCu or double glazed frames". This product is the answer.
As said, since its launch, many other manufacturers have now jumped on the band wagon and produced blinds that fit and secure in place in a similar manner.
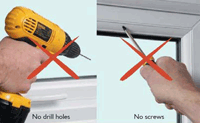
No drilling and no screws
Tools and Products Needed for Fitting Conservatory Blinds
The tools and products needed to fit a conservatory blind will vary depending on what type of blind you are fitting. In most cases the following items will be required:
- Tape measure
- Spirit level
- Pen/pencil
- Drill/driver
- Selection of drill bits
- Chosen blind and fitting kit
- Pair of scissors
- Hacksaw – If you need to cut aluminium roller for roller blind
How to Fit Conservatory Blinds
Fitting methods may vary depending on the manufacturer of your chosen blind, how your conservatory has been constructed, the type of blind you have chosen and what brackets are supplied with your kit but regardless of this the fitting principles are pretty similar across the board.
The one major point to ensure when you are fitting conservatory blinds and any type of blind for that matter is to ensure that it is fixed straight so that the drop of the blind is totally level.
You will also need to decide whether you are going to face fix (fixed to window frame) or top fix (fixed to lintel) the brackets. This may be dictated to you by the type of blind you have or who manufactured it. Check the instructions, they should suggest the best fixing method and also how to assemble your blind.
Fixing Conservatory Blinds to a Solid Surface
If you are top fixing to an inside recess or indeed fixing to an outside recess close to the edge of the opening you may need to drill into a lintel. These are very tough to drill so ensure you have a decent drill and some sharp drill bits.
A full breakdown of this process can be found in our fitting Venetian, Roman and Vertical blinds project.
In brief, the process goes as follows:
- Step 1 – Find the Centre: Measure the width of the window recess and mark. Measure the width of the blind and mark
- Step 2 – Mark Brackets: Place brackets on to the blind carriage, centre the blind on the marks and, using help, level up using a spirit level and mark fixing holes on brackets
- Step 3 – Fix Brackets: Remove the carriage and brackets and put to one side. using a 6mm masonry drill, drill out fixing holes, insert red wall plugs and screw brackets up
- Step 4 – Fix Blind Carriage in Place: Insert blind into brackets and secure in place
- Step 5 – Test: Fully test the blind by unrolling it and then rolling up again. Make sure that it drops straight and true and is equally positioned so that it covers equally all around the window
Fixing and Drilling Conservatory Blinds to UPVC Frames
The idea of drilling into your UPVC frames might sound terrifying but if you take care in doing so, there’s nothing to worry about.
The main thing to avoid is the glass itself as if you can imagine. Drilling into this would be a nightmare as it would shatter and the whole pane would need replacing.
Generally, the glass itself only extends into the frame just past the outside edge of the bead (the black plastic strip running round the outside of the glass) by 10 or 15mm or so. The beading effectively holds the glass in the frame and allows for ease of removing panes if needed.
In the image below you can see a cross section of a UPVC unit. Although this is an opening unit (you will be fixing to a fixed unit) their makeup will be similar.
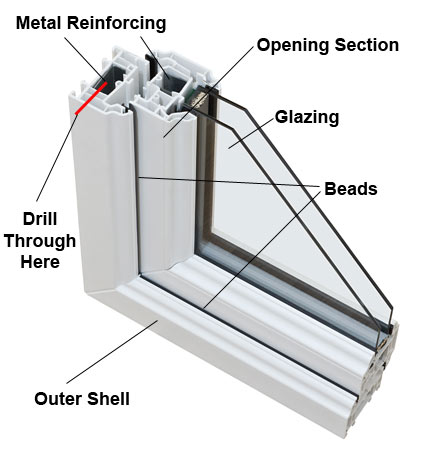
Cross section of UPVC glazed unit – Image courtesy of aspectglassdgu.co.uk
Step 1 – Position and Drill Bracket
You can see in the image above that we have indicated the location to drill and fix into. By fixing here you will not only be securing your blind through three sections of the unit but also into the metal reinforcing section in the centre of the unit, which will provide a very strong mounting.
With the correct position established for your first bracket, position it on the frame and mark the top fixing hole on the frame with a pen or pencil.
Using a 3mm drill bit, drill directly into the mark you have created on the frame. Don’t push the drill, let the drill itself do the work. Forcing the bit through may cause the frame to crack.
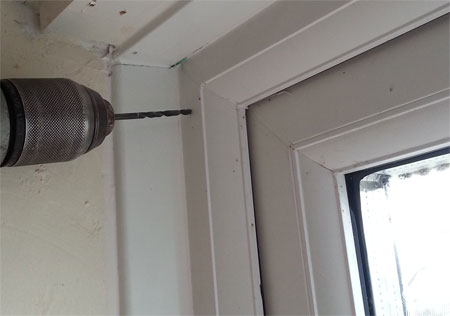
Drilling into a UPVC window unit
Step 2 – Screw Bracket in Place
Now, work through each of the following steps:
- Position the bracket back over the hole and insert a screw and screw it up but not all the way, just pinch tight
- Use a spirit level to level up the bracket and ensure that the side is vertically dead straight and mark the bottom fixing hole
- Remove the bracket, drill the second hole and then put the bracket back, inserting and screwing up both screws tight
A few things to remember – when top fixing:
- Ensure that the blind will drop far enough away from the window to avoid catching on any handles or catches
- Ensure that you use the correct sized screws for the hole you have drilled. Trying to force screws that are too big into a drilled hole could cause the frame to crack or split
Step 3 – Fix Opposite Bracket
Now for the bracket on the opposing side:
- Fit the blind carriage to the first bracket and place the second bracket on the end as it should be. Using a spirit level, place this on top of the first bracket you have just fixed and using the second bracket, position the level on top on the other side, wiggling it around until it’s level and in the correct position for drilling and screwing. Mark the top hole on the frame with a pencil or pen.
- Remove the level, carriage and bracket and as above, drill your hole, put the bracket back in position and screw in a screw. Mark the below hole, move the bracket out the way, drill the second hole and position the bracket back, inserting and screwing up both screws.
Step 4 – Fit Blind Carriage
The final task is to clip your blind in place between the two brackets.
Depending on the type of blind and manufacturer will depend on how this is done so refer to the instructions included with the blind kit.
Once in place open and close the blind to make sure it hangs straight and level and opens and closes correctly. If so then you’re done, good job!
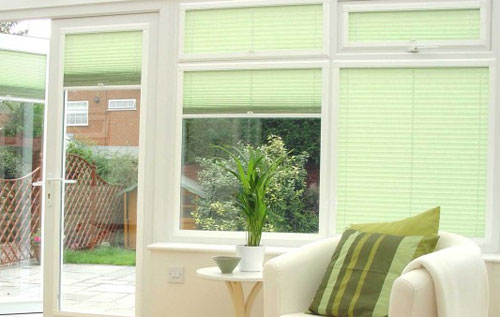
Venetian blinds installed in a conservatory area
Fitting Perfect Fit or No-Drill Blinds to Conservatories
As perfect fit or no drill blinds are by far the easiest to fit and, overall, look the best and due to this they are quite often the preferred choice to go for.
Step 1 – Measure up and Order Blinds:
The overall success and fit of the blinds will depend on the accuracy of how it is measured so this is one of the most important steps.
How your blind is measured will depend on the manufacturer and their fitting method so you will need to refer to their directions and instructions on how this is done. Any mistakes will be down to you so make sure you do it properly.
If you are in any way unsure then get in touch with the company you’re ordering from and they will advise.
Once measured, send the dimensions off and if all is well, in a few days, a nice new shiny blind should arrive on your doorstep.
Step 2 – Unpack Blind and Assemble
Once your blind has arrived, carefully unpack it and lay the components down on a sheet or pece of cardboard to avoid damage and scratching on the floor. Lay out the components to form the blind as it would sit when in position on the window.
Depending on the manufacturer will depend whether it comes in one piece or whether it needs to be assembled.
If it needs assembling, refer to the instruction as to which piece goes where and screw the frame together.
Step 3 – Fit Brackets to Window
Again, depending on the manufacturer and the type of blind, will depend on how many brackets are supplied, it will normally be 4 or 6.
Using a credit card, place this on the glass of the window the blind is being fitted to in the top left hand corner of the window pane so that it abuts the rubber beading. This will set the distance from the top of the window your bracket will be fitted.
Take one of the brackets and butt it up to the base of the card and then push the lip of the bracket into and under the rubber beading. If it’s tough to do, add a little washing up liquid so that it slides in easier and doesn’t damage the rubber seal.
Repeat this for the other remaining brackets.
Step 4 – Fit Blind to Brackets
Once the brackets are in place, take the blind and push it into the frame and on to the brackets.
When the brackets are engaged you should hear them clip into place. Make sure each bracket is fully clipped in and secured.
Once fully secured, test the blind and make sure it opens and closes as it should do.
If you have a conservatory then fitting blinds is a must and not only will it help with privacy, it will also allow you to control the levels of light and to some degree heat. As you can see above, there are several different options to go for and ultimately it’s up to you which way you go.

