If you are needing to fit a plug, repair a length of cable or flex or another simple electrical job, chances are that at some point you will need to strip the end of a length of cable or flex.
If you’ve never done this before, read through the steps below to learn how to do it correctly.
Rules and Regulations for Electrical Work
As with any and all electrical work, the potential dangers and risk of injury are high if you are unfamiliar with what you are doing so to prevent anyone taking on jobs they have no idea how to do the Building Regulations come in to play, particularly Part P when it comes to electrics.
In terms of what you are allowed to do, this is pretty much limited to just changing existing socket and switch faceplates, wiring a plug and other similar basic jobs, anything else should only be carried out by a Part P registered electrician.
Please also check the rules very carefully for ring mains and radial circuits. You are limited in the length of cable you are allowed to use in both circuits and long spurs could make you exceed that limit, increasing the risk of overload.
If this is the case, you are asking the circuit to use much more energy than the circuit is designed for. More energy = more heat and in turn cables can catch fire.
This could both affect the sale of your home and also invalidate your home insurance. Please be absolutely sure you know what you are doing and get all of your work checked by a qualified electrician.
You also need to be aware of the fact that some years ago the traditional cable colours used in the UK were changed to harmonise with those used in Europe. This means you may have 2 different sets of wire colours used in your home. See our wire colours project here for more information.
If you need any additional assistance when it comes to staying safe when working on and around electrics, see our electrical safety project here.
Tools and Materials Needed for Stripping Cable
Stripping wires can be very easy. As with most jobs, it’s easier and safer with the right tools so with this in mind, here is a list of the tools and products needed when stripping cable and flex.
Electricians will often use side cutters for all of the jobs you will see demonstrated below. At this stage you won’t have the ability or touch to do this and the slightest nick in the insulation of a core wire can be lethal. This will, if you are lucky, just trip an MCB or blow a fuse, but could have the potential to start a fire and burn your house down!
- VDE electrical side cutters
- Utility knife (if you don’t have side cutters)
- Pair of wire strippers
- Pair of VDE pliers
- Flex stripping tool – if you have one or can get one, makes it much easier
- Pair of wire strippers – if you don’t have a flex stripping tool
Stripping Wire and Cable
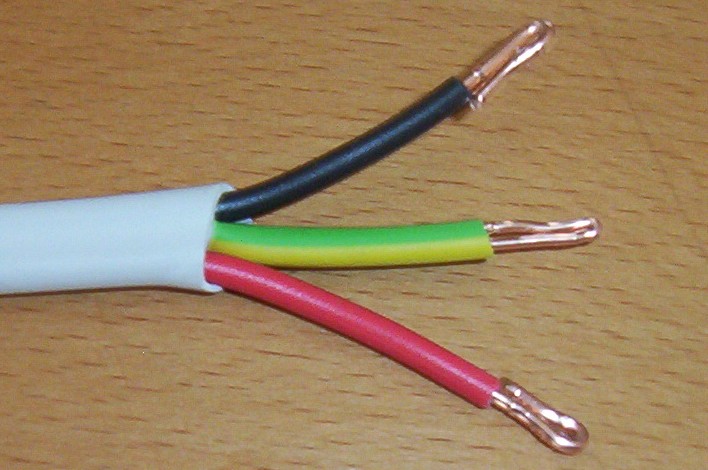
Firstly, we will deal with stripping standard electrical cable. The cable we are using in this example is 2.5mm twin and earth (more on electrical cables can be found in our project here).
We do not underestimate the danger of electricity at any level here at DIY Doctor and strongly suggest that if you have any doubts about what you intend to do… Do not do it!
Note: Make absolutely sure any circuit you are working on is isolated in your consumer unit or fuse box before you attempt to make any connections!
Step 1 – Clip end of Cable Sheath
First the cable is nicked through the outer sheath at the end. Get this nick in the middle and avoid any of the core wires it surrounds..
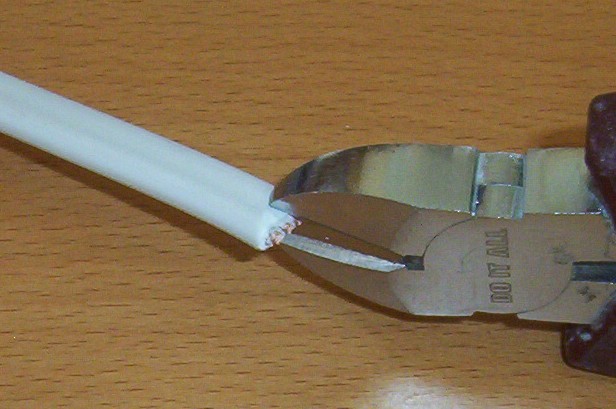
Clipping the main cable sheath end in the middle
Step 2 – Strip Cable Sheath Back
Using your side cutters, pull the nick apart a little and you will see the bare earth wire in the centre. Clamp the wire with the side cutters gently and, holding the end of the cable in your other hand, pull the wire through the insulation, tearing it open.
For those with no experience its best to use pliers for this operation rather than side cutters as shown.
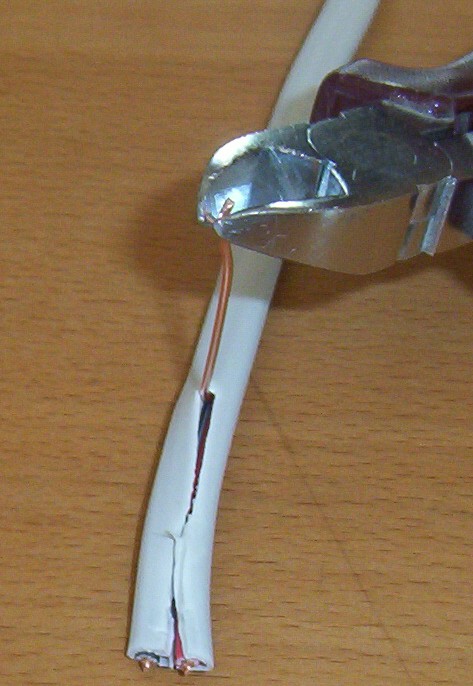
Splitting the cable sheath using the earth wire
Step 3 – Measure Connections
Measure the connections you wish to make, add enough on to turn the wires over (see below) do not skimp on the length. "Stretching" cable to meet connections can mean they will pull out over time, don’t forget your house is moving all the time. It is better to have a little more than you need folded into a socket than too little.
Step 4 – Trim off Sheath
Using pliers or the side cutters, pull the sheath back and snip off the unused excess, having exposed the live and neutral wires.
Before going any further, check for any nicks in the sheathing to the live and neutral cables.
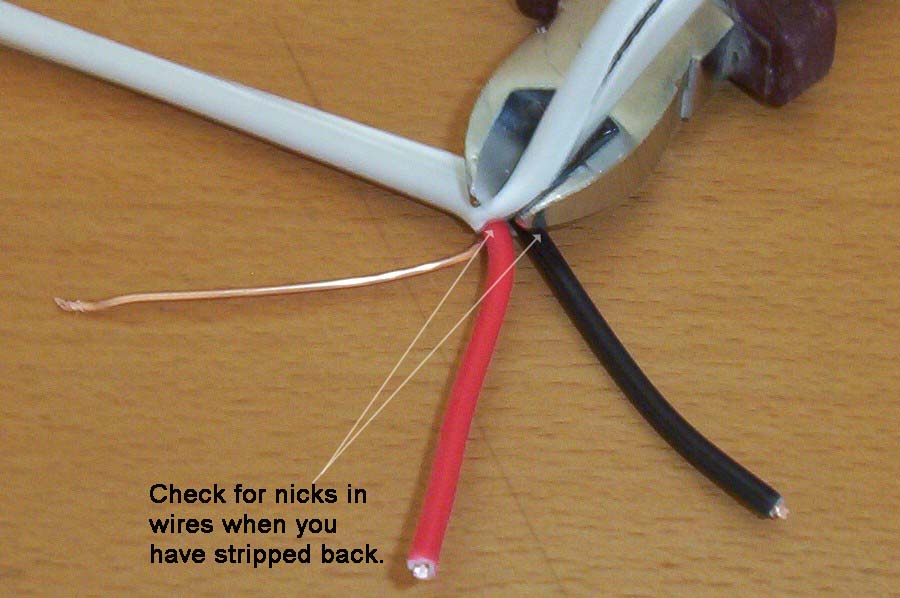
Trim off unwanted cable sheath
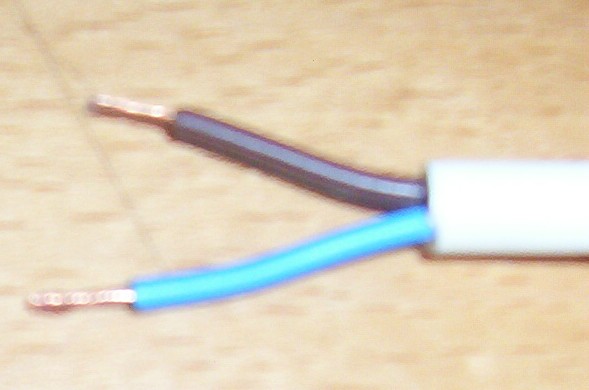
Step 5 – Strip Core Wires
Using a pair of wire strippers, there are quite a few different types but they all perform the same job, strip off the end of each live and neutral core cable.
Most strippers like those in the below image have a measuring gauge that strips the cable depending on where it’s positioned in the jaws. Around 12 – 15mm should be fine.
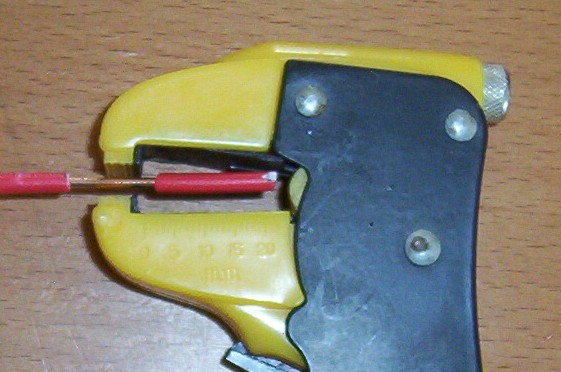
Use a wire stripper to strip wire sheath away
Step 6 – Bend Core Wire Over
Using a pair of pliers, bend the exposed length of core wire back on itself to double it over. This is a good idea as when inserted into a terminal, the terminal screw has a nice surface area to bite down on to and hold the core wire firmly in place prevent it from being pulled out.

Use a pair of pliers to turn the copper cable end over
Step 7 – Connect up
The final job now is to connect up your newly stripped cable, ensuring each core wire is fixed into the correct terminal e.g. live red/brown to live terminal, neutral black/blue to neutral and earth to earth.
Wires stripped and ready to be used
How to Strip Flex
Stripping flex for appliances is not quite as easy as stripping cable, mostly due to the fact that it’s round and not flat, which makes it a little fiddly.
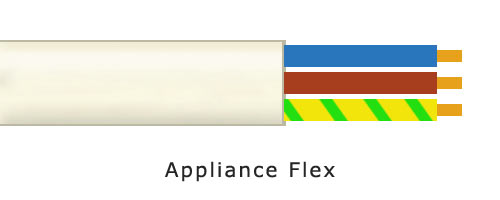
Appliance Flex
To strip appliance flex, the best and easiest tool to use is one similar to the tool in the image below. There are quite a few different variations available but they all do pretty much the same thing.
To strip appliance flex:
- Step 1 – Mark Strip Point: First, measure and mark the length of cable that needs to be stripped on the outer sheath
- Step 2 – Insert Cable: Insert the cable in to the correct hole and position the cut line in the centre of the hole, just below the cutting/stripping blade
- Step 3 – Cut Sheath: Gently press the cutting button down so the blade bites into the sheath. Be very gentle and only do a bit at a time so that you don’t nick the insulation of the core wire. If you do you’ll have to start again. To cut all the way around, gently turn the cable so it runs round the whole blade
- Step 4 – Remove Cut Sheath: Withdraw the cable from the tool and then simply pull the cut sheath off and away
- Step 5 – Strip Inner Cores: Repeat the above process to strip each of the inner core cables. Some tools will have a separate smaller hole for the core cables and some won’t

Using a cutting tool to cut the flex sheath
Appliance flex sheath cut
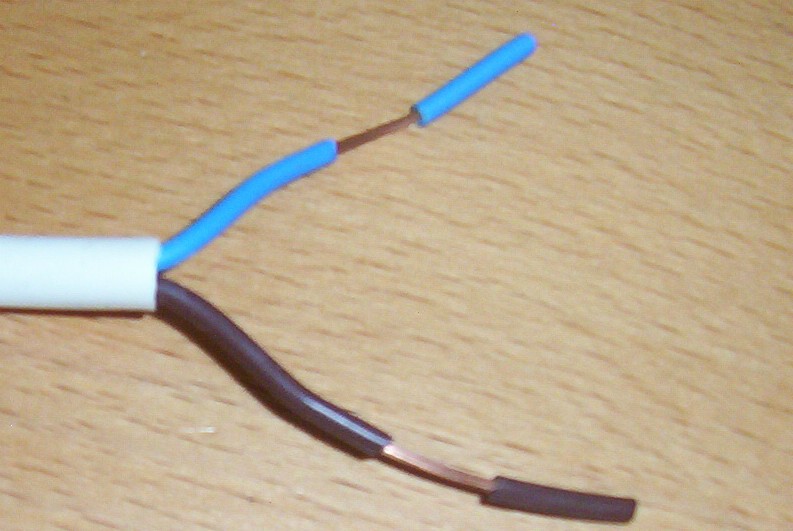
Inner wires stripped using cable stripper
Appliance flex successfully stripped
Again it must be stressed that this, as any other tool must be used very carefully as it is more than possible to nick the inner wires without realising.
The alternative to using this tool is to slice very carefully around the circumference of the outer sheath with a hobby knife. Apply enough pressure (with either the stripper of the blade) to just cut into the sheath. Then bend the sheath a couple of times until it splits and you can see the wires inside. Pull the sheath off.
This particular flex is for a light fitting, most appliance flexes will also have an earth wire.
Again, make sure you have measured the length of wire you need for connection without stretching the wires. Allow for the slight bend in a plug.
If you aren’t lucky enough to have one of the above flex stripping tools you can use the same type of wire strippers as we used to demo stripping standard cable.
Wiring a Plug
As mentioned, in most cases when stripping cable or flex you will be connecting a standard 3-pin plug.
When you buy a new plug there is, 99% of the time a paper instruction plate slid over the plug points. Before you just throw this away have a read. Most people do not realise it, but on good quality plugs this paper actually gives the exact lengths of wire needed to get a perfect connection.
Generally for most plugs a 7mm length of exposed wire is all that is needed to get the correct connection.
Not all plugs are exactly the same so even if you can read this one, do not be tempted to use the measurements for your own plug. Either read the back of yours, or measure it out.
To find out more about correctly wiring a plug see our wiring a plug project here.
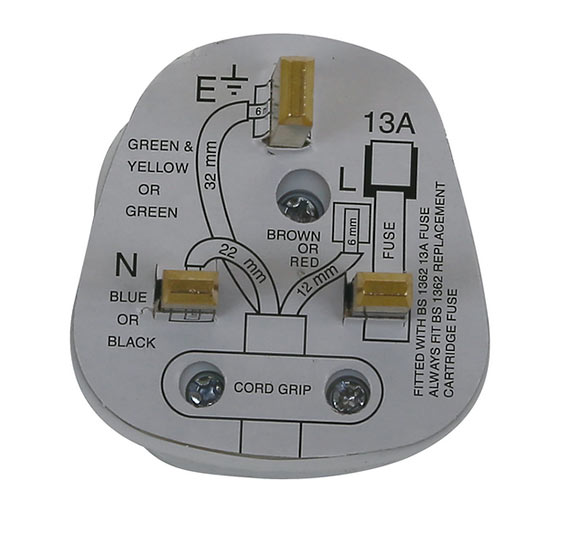
3 pin domestic UK plug
Stripping appliance flex and electrical cable is a fairly easy job, even if you’ve never done it before, however don’t underestimate such jobs as, as we have stated, even a tiny nick in the wrong core wire can spell disaster!