
There are many reasons to change the locks on your home. You may have lost your keys, moved into a new property or want to stop someone else from having access. One of the easiest locks to replace is the commonly known Yale-type lock.
This type of lock is correctly called a night latch. In most cases, you do not need to replace the entire lock. Instead, you can simply change the internal cylinder (also called the barrel). This gives you a new set of keys while keeping the main lock mechanism in place. Find out how below.
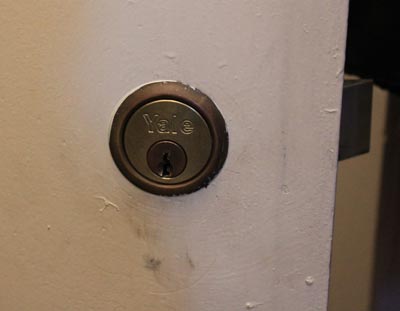
Front view of Yale lock
What is a Cylinder Night Latch (Yale Lock)?
A cylinder night latch, often called a Yale lock in the UK, is a surface-mounted door lock commonly fitted to front doors. It automatically locks when the door closes, helping to secure your home without needing to turn a key each time. This type of lock is widely used on timber entrance doors because it is simple to install, reliable and easy to use.
The lock has two main parts. On the outside of the door is a key-operated cylinder (sometimes called the barrel). On the inside is the night latch body, which contains the latch bolt and locking mechanism. When you turn the key outside or the handle inside, the latch retracts so the door can open.
Many cylinder night latches also include extra safety features. These can include a snib button that holds the latch open temporarily and a deadlocking function that prevents the latch from being forced back with a card or tool. These features add an extra layer of security to standard front door locks.
Because the cylinder can usually be replaced without removing the entire lock, changing a night latch is quick and fairly simple. This makes it a popular choice for homeowners who need to replace keys, improve door security or carry out simple DIY lock repairs.
Advantages and Disadvantages of a Night Latch
Below is a run down on some of the main advantages and disadvantages so you can decide if a night latch is right for your door.
Advantages of a Night Latch
- Automatic locking: The lock engages as soon as the door closes, helping prevent the door being accidentally left unlocked.
- Quick and convenient to use: You can open the door easily from inside using the handle or knob, making it ideal for everyday use.
- Easy to install: Night latches are surface-mounted, meaning they are usually easier to fit than many other types of door locks.
- Simple cylinder replacement: If keys are lost or security needs improving, the cylinder (barrel) can normally be changed without replacing the entire lock.
- Affordable security upgrade: Night latches are generally inexpensive compared to more complex door locking systems.
- Useful built-in features: Many models include a snib button to hold the latch open temporarily and a deadlocking function for extra security.
- Works well with other locks: In the UK, night latches are commonly used together with mortice deadlocks to provide layered front door security.
Disadvantages of a Night Latch
- Can lock you out: Because the latch locks automatically, it is easy to close the door and forget your keys.
- Not always strong enough on its own: A night latch should usually be used with another lock, such as a mortice deadlock, for better security.
- Surface-mounted design: Because the lock sits on the inside face of the door, it can be more visible and sometimes less robust than fully recessed locks.
- Older models may be vulnerable: Basic or older night latches can sometimes be forced or slipped if they do not have a deadlocking feature.
- May require door alignment: For smooth operation, the latch and strike plate must line up correctly when the door closes.
- Limited security on weak doors: If the door frame or door itself is weak, the lock will only be as strong as the material it is fitted to.
For most UK homes, the best approach is to combine a night latch with a mortice deadlock. This setup provides the convenience of automatic locking along with stronger protection against forced entry.
Different Types of Cylinder Night Latch
Each different type of night latch offers slightly different levels of security, convenience and functionality. In order to choose the right lock for you, it’s important to know what these are so you can choose the right lock for you.
Standard Night Latch
A standard night latch is the most basic and commonly fitted type. It automatically locks when the door closes and can be opened from the outside using a key or from the inside using a handle or knob.
These locks are simple, reliable and widely used on timber front doors, but they are usually best paired with a mortice deadlock for improved security.
Deadlocking Night Latch
A deadlocking night latch provides an extra level of protection. When the door closes, the latch automatically deadlocks as it enters the strike plate. This prevents the latch from being pushed back using tools such as a card or similar object.
Because of this added protection, deadlocking night latches are a popular choice for modern home security.
Double Locking Night Latch
A double locking night latch includes an internal locking function that disables the inside handle when activated. This means the door cannot be opened from inside without using the key.
This feature can help improve security when you are away from home or during the night.
Keyless or Auto Deadlocking Night Latch
Some modern night latches include automatic deadlocking or keyless features. These locks automatically secure themselves when the door closes and may include additional safety features such as improved anti-tamper protection.
They are designed to provide greater convenience while maintaining a higher level of security.
What is the Most Secure Type of Night Latch?
Unfortunately, not all night latches offer the same level of security. In the UK, the most secure type is generally considered to be a deadlocking night latch.
Unlike standard night latches, deadlocking models automatically lock the latch into the strike plate when the door closes, making it far harder for intruders to force the door open or slip the latch with a card.
For even greater protection, some high-security night latches feature a double-locking mechanism. This disables the inside handle when activated, so the door cannot be opened from the inside without a key.
Combined with a robust cylinder and anti-snap technology, these locks provide one of the strongest security options for a surface-mounted door lock.
While this is a great solution, it is even most effective when paired with a mortice deadlock or other supplementary lock. This layered approach ensures your front door is both convenient to use and highly resistant to forced entry when all locks are engaged.
Tools and Product for Changing a Lock Barrel or Cylinder Night Latch
In order to complete your job correctly, you will need the following tools and products:
- New cylinder night latch
- Selection of screwdrivers
- Pair of pliers / Hacksaw
Changing or Replacing a Barrel Lock
In the steps below we run through, in simple terms, exactly how to fit a cylinder night latch to a door in your home. As with all products, they vary slightly differently between manufacturer however despite any differences, the process is pretty much the same.
Step 1: Remove the Lock box
On the inside of the door, locate the lock box. This is essentially the main body of the lock. This main body itself is fixed to the back plate which is in turn fixed to the door with two screws above and below the latch.
Unscrew both screws fully and remove them, keeping them safe so you can fix the lock back in place once done.
With the screws removed, gently pull the lock box away from the door and back plate and again, put it to one side.
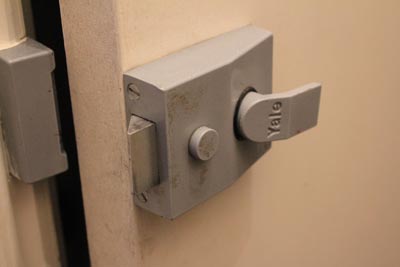
Rear view of the lock box

Fixing screws removed and placed on the lock box

Removing the lock box
Step 2: Access the Back Plate
With the lock box removed and out the way, as said, you will see the back plate fixed to the door. This holds the lock firmly in place on the rear of the door.
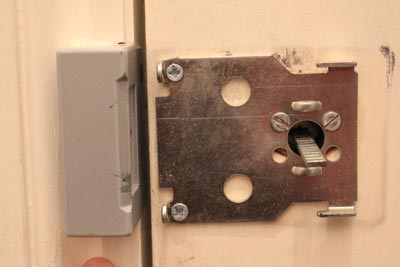
Back plate fixed to the door
Step 3: Remove the Cylinder
With the back plate now exposed you can now see the internals, including the back of the lock barrel.
Find the grooved bar (also known as the shank) sticking through the back plate. Once located, you should then see on either side there are two screws holding the cylinder body to the back plate.
Unscrew both of them and put them in a safe place. With these screws removed you should now be able to pull the barrel away from the door.
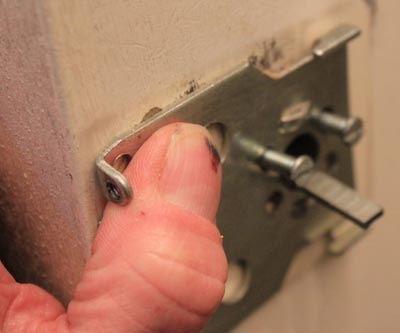
Removing the cylinder fixing screws

Barrel removed from the door
Step 4: Prepare the new Barrel
Before starting this job you will want to have obtained a brand new lock barrel. These can be purchased from pretty much any DIY outlet or store.
As replacement cylinders are a universal fit for any door thickness, the shank will need to be cut to size for your particular door.
To do so, place the new cylinder next to the old one. Match the shank length exactly and mark it. Using a pair of pliers or hacksaw, cut the shank to the correct length, using the guide grooves as a reference.
Once partly cut, bend the shank to snap it cleanly at the correct length.

Match and cut the new shank to size
Step 5: Reassemble Lock
Reassembling your lock is pretty much the reverse of taking it apart to access the cylinder barrel.
With your new lock cylinder prepared and ready to go, slip it back into the door through the front and screw each retaining screw back in place to hold it and then tighten using a screwdriver.
With the the new barrel now in place, put the lock box back in place on the bracket and then screw the two retaining screws in to hold it in position.
With the barrel changed and the lock box back on the bracket, test the lock to make sure all works and if all does, you have now completed your project, good job!
Tip: Always double-check measurements before cutting to ensure a proper fit and smooth operation.
Replacing a night latch cylinder is a simple DIY task, but it pays to work carefully. Take your time and double-check each step to avoid mistakes. An incorrectly fitted lock could leave your door unsecured, creating an easy entry point for intruders.

 DIY Doctor Ltd,
 0845 6342 179


