Chemical and epoxy resin fixings are a modern alternative to traditional screws and bolts. Instead of relying on pressure or expansion, they bond directly to the surrounding material, creating a much stronger, more reliable and longer lasting hold.
When applied correctly, resin anchors form a secure fixing that can support heavy loads without damaging the surface. They are widely used in construction, repairs and DIY projects where strength and long-term stability are essential.
Below, we explain exactly how chemical fixings work, when to use them and step-by-step guidance so you can achieve a professional and long lasting fix.
What are Chemical Resin Fixings?
Chemical resin fixings are a modern method of securely anchoring bolts, rods, or other fittings into masonry, concrete, brick or even timber.
Instead of relying on expansion bolts, which can stress and crack the surrounding material, resin fixings use a strong bonding compound that hardens around the fitting and bonds securely with the surrounding material, creating an exceptionally solid and long-lasting hold.
Chemical resin fixings are highly versatile and can be used for a wide range of jobs, from securing heavy structural supports and steel beams to fixing handrails, gates and safety barriers.
Because they spread the load evenly and reduce the risk of cracking, they are often the preferred choice for conservation work and repairs in historic buildings.
Another key benefit is their resistance to vibration and movement. Unlike some mechanical fixings that can loosen over time, resin-bonded anchors remain firm and reliable, making them a trusted fixing solution for both DIY projects and professional building work.
How Long do Chemical Resins Take to Set?
The setting time for chemical resins depends on the type of resin used, the temperature and the material they are applied to. In most cases, resins begin to harden within a few minutes but may take several hours to fully cure.
For example, fast-setting anchor resins can be ready in as little as 15–30 minutes, while heavier-duty epoxy resins may need 24 hours or more before they reach full strength.
Temperature plays a big role in curing time. In warmer conditions, resins will set much quicker, sometimes within minutes. In colder weather, however, curing can be significantly slower, so it’s important to check the manufacturer’s guidance before starting your project.
Always allow extra time if you’re working in an unheated space or outdoors in the UK climate.
Another factor to consider is the size and depth of the hole or joint. Deep or wide fixings often take longer to cure because the resin needs more time to harden throughout. To avoid failure, never load or stress a fixing until the curing time has fully passed.
When to Use Chemical Fixings and Resin Anchors
Chemical fixings and resin anchors are ideal when you need a strong, reliable fixing in brick, stone or concrete without the risk of cracking the masonry. This makes them perfect for jobs near the edge of a wall or pier, such as hanging a gate, attaching a letterbox, fitting a nameplate or securing a heavy bracket.
When used correctly, resin anchors can support very heavy loads and are far stronger than standard wall plugs and even expansion bolts.
However in order to ensure they’re success, good preparation is absolutely key, so always follow best practice for drilling, cleaning and filling the holes to achieve maximum strength.

Gate hinge chemically fixed
Types of Resin and Chemical Fixings
Resin and chemical fixings come in several forms, each designed for different jobs. The most common are epoxy resins, polyester resins and vinylester resins.
While all work by bonding a threaded bar or fixing stud into masonry, they vary in strength, setting time and suitability for different environments.
Epoxy resinsthese are by far the strongest option. They take longer to cure but provide a permanent, heavy-duty fixing that can handle very high loads. They are often used in structural repairs or when fixing into weak masonry where maximum strength is essential.
Polyester resins are a popular choice for general DIY and light-to-medium duty jobs. They set quickly and are cost-effective, making them ideal for tasks like fitting gates, fences or shelving brackets where ultra-high strength is not required.
Vinylester resins sit between the two. They offer a balance of strength and fast curing, and they perform well in damp or chemical-prone environments. This makes them suitable for outdoor fixings, marine applications or areas exposed to weathering.
Choosing the right type of resin is essential. Always consider the weight of the load, the condition of the masonry, and whether the job is indoors or outdoors. The right fixing will ensure your project is both safe and long-lasting.
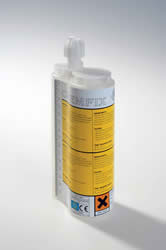
Chemical Resin
Resin Being Applied
Most chemical resins are sold in fast (3–6 minutes), medium (15–30 minutes) or slow-setting (4–6 hours) options. They typically come in three main pack types:
- Single cartridge – pre-mixed: Contains two resins in a sealed bag. Fits a standard skeleton gun. The resins mix automatically in the spiral nozzle, which can be replaced if the resin sets before use.
- Single cartridge – hand mixed: Also fits a standard skeleton gun. The resins must be mixed by hand first, then pushed into an empty cartridge with a pusher plate.
- Dual cartridge – pre-mixed: Holds two resins in twin tubes that mix inside the nozzle. Requires a special gun designed for the specific cartridge size and mix ratio.
What are the Benefits of Using Chemical Resin Fixings?
Chemical resin fixings are becoming the go-to choice for both DIY projects and professional construction because they provide a stronger, longer-lasting hold than traditional screws, plugs or expansion bolts.
By bonding directly with the material around them, they create a secure fixing that is highly resistant to loosening over time.
One of the biggest advantages is that they can be used close to edges without the risk of cracking or splitting the brick, block or stone. This makes them ideal for tasks like securing gate posts, railings or heavy brackets where expansion fixings might otherwise cause damage.
Resin fixings also spread the load evenly across the drilled hole, allowing them to handle heavier weights than mechanical fixings of the same size. This means you can achieve strong, professional-grade results without having to use oversized bolts or supports.
Finally, they are versatile and reliable in a wide range of conditions. Whether fixing into old masonry, repairing timber beams, or working in damp or uneven surfaces, chemical resins adapt to the job and deliver dependable strength where traditional methods may fail.
How to Fix Bars, Studs and Anchors Using the Chemical Fixings
Now that you understand all the benefits and advantages of chemical fixings over more traditional fixing methods and also what types of chemical fixings there are, it’s now time to look at how they are installed.
As there are many different types of chemical resins fixings from many different manufacturers, installation may differ slightly between manufacturers, but most should be close to the following steps.
Step 1: Drill a Hole
Choose the right size stud or dowel for the job. Studs usually come in 8mm, 10mm and 12mm sizes, while dowels for reinforcement or joining are available in strong plated steel or epoxy-glass, ranging from 6mm to 25mm in diameter.
Use a masonry drill bit that is slightly larger than the stud. As a rule, allow at least 4mm extra — for example, an 8mm stud needs a 12mm drill bit. This ensures enough space for the resin to bond securely around the stud and create a strong fixing.
Step 2: Clean the Hole of Dust and Debris
Before adding any resin, make sure the hole is completely clear. Dust and loose material can weaken the bond and reduce the fixing strength.
You can use a purpose-made cleaning brush, blow air into the hole with a tube or compressor, or simply use an old vacuum cleaner to remove all debris. Always wear a dust mask and eye protection when cleaning.
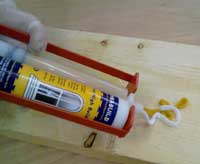
Injecting Resin Using Skeleton Gun
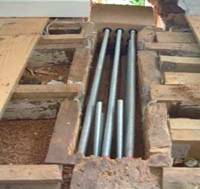
Floor Boards Removed
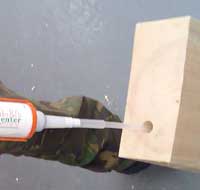
Step 3: Inject Resin Using the Applicator Gun
Fit the applicator gun with the correct extension tube so it reaches the bottom of the hole. Starting at the base of the hole, slowly inject the resin while pulling the tube out, ensuring the hole fills evenly without air pockets.
To avoid waste, mark the tube with tape before starting. Stop injecting when the tape reaches the hole opening, leaving space for the stud or bar to displace excess resin.
Different types of applicator guns are available depending on the resin used. Standard 300cc and 400cc skeleton guns are common and compatible with many resin anchor products.
Pure Epoxy – it mixes in the nozzle – ideal for anchoring bolts and bars
Polyester Anchor Resin – faster than Epoxies, ideal for rapid anchor setting
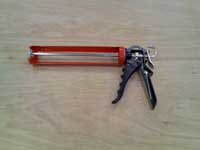
Skeleton Applicator Gun
Step 4: Protect the Threaded Stud
Wrap the section of the stud that will take the nut with electrical tape to prevent resin from clogging the threads.
Wearing gloves, slowly rotate the stud as you push it into the resin-filled hole for a secure fit.
For larger projects, complete resin fixing kits are available to simplify the process.
Step 5: Allow Resin to Cure
After inserting the anchor bolt, stud or threaded bar into the resin-filled hole, leave it to cure for the time specified by the manufacturer on the resin container.
Once fully set and rock solid, you can securely attach your gate, bracket or other fittings by tightening the bolts.
For securing heavy or awkward objects to stone or masonry, standard screws may not provide enough strength. In these cases, chemical fixings and resin anchors offer a reliable, long-lasting solution for both DIY’ers and trade pro’s alike.