Having fitted a kitchen worktop you may discover that the joints you have are not the tidiest bit of carpentry you have ever seen. Even using a worktop jig does not make the process easy for the DIY’er.
It takes a very skilled carpenter to produce invisible joints and we always suggest working out exactly the length of worktop you need and, if you plan to fit it yourself, to order a little extra to practice joints on.
Even if you order the cheapest possible worktop it is worth spending a day following our mitering a worktop project and wasting some timber to get it right.
Obviously, the smaller the joint the easier it will be to fill and hide. Please have a look at these projects to give you the best possible chance to achieve a nice and tidy joint:
- How to join a kitchen worktop and mitering worktops
- How to use a kitchen work top jig for mitering wortops
Both these projects will require a little practice, but are well worth a read before you start, as if you get this part right, then there will be much less work later down the line when it comes to filling the joints.
Worktop Adhesives
There are proprietary adhesives made for joining work tops. These adhesives come in a range of colours which can be mixed and matched to suit the worktop colour you have. If you have a reasonably tight join it is possible to use other adhesive products to mitre the worktop.
The reason that the professionals do this is because the adhesive specifically designed for worktops can go off very quickly and due to this are the devil to clean up. A practiced craftsman will have a tight joint and a PVA glue will be a sufficient adhesive in this case. They will then apply the colour fill to make the joint look seamless.
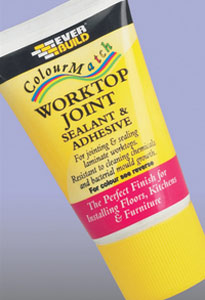
Colour Match worktop joint
How to fill Mitered Worktop Joints in Wooden Worktops
Sometimes the joints are a little wider than one would hope and the adhesive does not quite fill the joint when the worktop sections are clamped together after cutting with a worktop jig.
The adhesive can be mixed with some fine filler and the joint filled from the surface as you can see in the image below. The filler will change the colour of the adhesive and make it slightly lighter so always mix a little and leave to dry for an hour or so before you assume the colour is correct.
Some manufacturers will caution against mixing their worktop fillers and adhesives. You should always follow the manufactures guidelines to ensure that you are okay to do this.
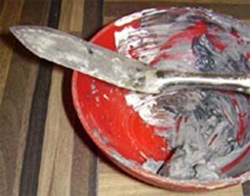
Mix colours with filler
Time spent on worktop joints can make or break the finish of a kitchen. Quite often the kitchen worktop itself is the focal point of the kitchen and it is certainly the most used area. Getting it right is not hard, but it does require patience and practice.
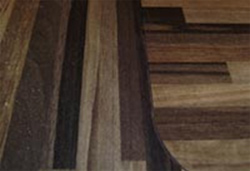
A very neat and disguised worktop joint – Can you see where the joint is?
Filling Gaps between the Worktop and the Wall
Another common area where you might find unwanted gaps is where the worktop meets the wall. There are a number of potential solutions to this problem and which to use will depend of the situation and your taste:
- Scribe the worktop so that it "fits" an uneven wall or surface: You can find out more about how to do this at our Scribing Timber Project. You need to be aware of the problem before the worktop is fixed and it is also another fairly skilled job to scribe timber successfully, so often it is too late to take this approach
- Tiling the wall: In some cases the wall might not be totally flat and then the worktop will not fit snugly against the whole length of the wall. Up to gaps of around 10 or possibly 20 mm it is possible for a skilled tiller to disguise a gap by varying the thickness of the tile adhesive. In some cases you can also use tile backer boards. Using smaller tiles will make this approach and make the job much easier. This does take some skill and practice to achieve a finish that you will not notice
- Fixing some coving or corner moulding: If you use some tile corner moulding (just like coving) it is possible to hide gaps very easily, even if this might be a little time consuming
On the whole, filling gaps in worktops is all about covering up errors, and the bigger the error the harder it is to cover the problem. The errors may not be yours as the walls may well have been built out of square and are not at all flat. This is why we recommend that you plan the project from the start and then practice on the areas that require a little more skill. This way the gaps you have to fill will be much smaller, and you will save hours of work at the end of the project.
Filling Gaps in Granite and Stone Worktops
Typically the worktop has been cut to size in the workshop and will be brought to site to be assembled. The joints are fixed with a coloured epoxy resin. Either side of the joint should be masked to stop any resin getting onto the surface of the worktop, and then the resin should be mixed with the hardener.
This will cure quickly once mixed so ensure that you are ready to apply it to the join. Push the resin into the joint using a filling knife working it in and ensuring that there are no gaps. Once the joint is totally filled you can remove the masking tape, leaving you a neat joint.
Seaming a Granite Worktop
Granite is a very heavy, very expensive material. For these reasons granite worktops will often have more joints, or seams, than wooden worktops.
Smaller units are more easily and more safely transported and laid. While this can save time and money, it becomes more important that you know exactly what you are doing when joining the worktop
A joint in granite worktops, often called a seam or seaming a granite worktop, is only as good as the cut that has been made for it. Only absolute top quality diamond blades should be used and the top should always be placed in a jig so the cut is made as a perfectly straight line and perhaps even more importantly, perfectly plumb. It is impossible…..And we mean impossible……to get a perfect seam in a granite worktop through cutting by hand.
Once cut, seams are often made these days with strong, 2-part adhesives using an accelerator to both clean up the surfaces and produce a rapid bond. Once seamed in this way the joints are almost as strong as the granite itself.
It is fairly obvious that the thinner the material used as an adhesive in the joint, the closer the two halves can get to each other and the less noticeable the joint will be.
Most of the two-part adhesives are pretty much instant so it is vital that both halves of the piece are lined up perfectly before the seam is pushed together.
Laying one edge along a straight batten can achieve this although some pros use a proprietary jig with a screw type arrangement called a “Turnbuckle” to slowly tighten the two parts into alignment and, once there, to keep them tightly clamped for the 20 seconds or so it takes for the adhesive to cure and set.
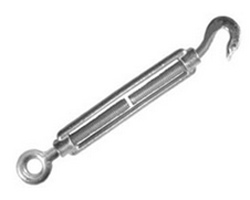
Turnbuckles can be used to tighten Granite seams and clamp them while adhesive sets
The worktop parts must be laid perfectly flat before they are tightened and clamped together. It is also possible, if the worktop halves are small enough, to use sash clamps to tighten the seam. Sash clamps, or sash cramps, can be bought, or hired and are often the best way to get a perfect, tight joint.
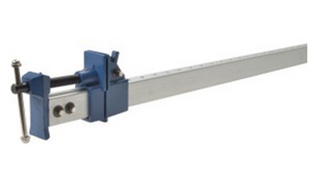
Sash clamps or cramps can tighten granite worktop joints and seams