• Skip to primary navigation
  • Skip to main content
  • Skip to primary sidebar
  • Skip to footer
DIY Doctor

Main navigation

      • Project Type A - E
      • All Projects
      • Brick, Block, Masonry and Concrete
      • Damp, Condensation, Rot and Woodworm
      • Doors, Windows and Conservatories
      • Electrical
      • Project Type F - G
      • Fencing, Decking, Paving and Patios
      • Floors, Walls, Ceilings and Lofts
      • Garages, Sheds and Outbuildings
      • Gardening and Landscaping
      • General Building, Self Build and Renovation
      • Project Type G - J
      • General Repairs and Cleaning
      • Green Living and Eco DIY
      • Ground, Foundations and Drainage
      • Heating, Central Heating and Boilers
      • Joinery and Carpentry
      • Project Type M - P
      • Materials, Fixings and Fixing
      • Painting, Decorating and Finishing
      • Planning Regs, Project Management and Safety
      • Plastering, Plasterboard and Rendering
      • Plumbing
      • Project Type R - T
      • Roofing and Gutters
      • Tiling and Tiles
      • Tools, Appliances and Access
      • Useful Tips
      • DIY Tips
      • Find a Tradesman
      • Contract Download
      • Working With Tradesmen - Ultimate Guide
      • Home Improver Protection
      • Price Doctor
      • About DIY Doctor
      • What we do
      • Trade Shows and Exhibitions
      • Master Classes
      • Book Store
      • Contact Us
      • Feedback
      • DIY Competitions

Home > DIY How To Projects and Tutorial Guides > How to Use a Worktop Jig and Mitre Worktops

How to Use a Worktop Jig and Mitre Worktops

Find out how to use a worktop mitre jig to cut kitchen worktop mitres. To fit your kitchen worktop and achieve tight joints you will need to know how to use a worktop jig. This project covers cutting kitchen worktops, but there is no substitute for practice.

TwitterFacebookPin ItBuffer

Don't want to do this job yourself? Let us help you find a tradesman local to you

Project Page Menu
  • How to Tutorial
  • Video
  • Find Tradesmen
  • Help

Using a mitre jig to cut kitchen worktops takes practice. Do not for one moment think you can fit your very first kitchen and get invisible joints in your worktops without a little practice. Order a length of cheap worktop and practice.

Worktop jigs can be bought from the tools section on the right hand side of this page or you can hire them from a local hire shop. They are made to fit various worktop widths and depths. The cutting itself is done with a router to get a very accurate, very clean cut.

There are two cuts to make with every mitred joint. The female cut is the cut which is made in towards the centre of the worktop from the front edge of the worktop. The male cut protrudes from the front edge.

Worktop jigs are made to be dual purpose for both cuts by simply turning them over or turning them round. The instructions for each cut are always placed on the face you need to be using and each hole or slot is marked for its appropriate use.

Worktop jig in place

Worktop mitre jig

Its up to you which cut you make first, the male or female but for some reason most kitchen fitters cut the female joint first. Maybe its because we are all gentlemen following the Ladies First rule!

Lay the worktop down on a bench and clamp it securely. It is important it does not move a single mm during the cutting process. The joint you are going to cut needs to overhang the surface you are securing to. The image above shows a jig (made transparent) over a worktop ready for the female cut. Push the jig pins into the holes marked Front. This is shown as two red dots on the diagram.

The jig is then pushed up to the front edge of the worktop. The pins ensure the cutting slot is the correct distance back from the edge for the cut. Many jigs will accommodate different widths of worktop. The most common width is 600mm so if you have a jig for more than one width, a pin or pins must be placed in the 600mm hole.This is shown by the right hand red dot.

It is essential to have a perfect right angled cut on your worktop before you place the jig. The pins now allow the jig to be placed in the correct position for the cut. Clamp the jig into place making sure the clamps are not in the way of the router when you start cutting.

Router cutting worktop mitre joint

Router cutting worktop mitre joint

Set your router up with the correct guide and cutting blade. The guide is usually 30mm . We suggest a half inch router of minimum 1600W.

The guide bush sits into the slot in the jig and you start your cut with the bush pressed against the edge of the jig slot which is furthest away from the centre of the worktop.

On many jigs this edge is marked "Rough cut". On a 40mm thick worktop you should make a minimum of 4 passes with the router which means setting your router to a depth of 10mm maximum. Try to take too much off in one pass and the blade will stick and burn.

Cut worktop

Worktop joint cut using router

When you have cut through the worktop on a rough cut, your final pass should be made with the guide or bush pressed against the edge nearest the worktop. This is the clean cut edge and this pass will take the final few mm off to give you a neat cut.

Start your cuts at the front edge of the worktop, i.e. the left hand side.

You are now ready to turn the jig over, or round, to make the male cut. Use the pins as marked on the jig and follow the same procedure.

Route out for clamps

Route out for clamps

Once both halves of the joint are made you can now choose to clamp the joints together if you wish. If the joint sits onto the top of a unit many fitters prefer to lay the worktop in two halves, pushing the joint together using adhesive and then screwing it tight up through the unit below. It is possible however to clamp the joint tight before placing the worktop or, if the area under the joint is clear, eg for a washing machine, the joint can be clamped in situ. We do not however recommend an unsupported joint.

The worktop must be placed and clamped face side down to use the router to cut out the butterfly shaped holes for the worktop clamps. Clean the workbench properly first. The instructions for the clamp slots are on the jig. Once again make sure both the worktop and the jig are clamped tightly in position and do not try and cut out too much at a time. Trying to save 2 minutes could cost you a brand new worktop or router blade.
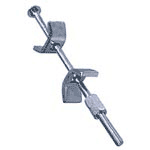
Worktop bolts or clamps

Worktop bolts or clamps

All project content written and produced by Mike Edwards, founder of DIY Doctor and industry expert in building technology.

TwitterFacebookPin ItBuffer

Video

Back to the Top

Find a Reliable Local Tradesman

Back to the Top
Don't fancy doing this project yourself? We work with the industries best to ensure that we recommend only reliable and trustworthy tradesmen.
Let DIY Doctor help you find a tradesman

Find a tradesman now!


More Help

Back to the Top
Related Projects That May Help You:
  • Types of Hammers and Their Uses
  • How to Fill Mitred Worktop Joints
  • Fitting Wooden Worktops
  • How to Join a Kitchen Worktop – Mitering a Worktop
  • Mitre Joints: How to make the Perfect Joint
Give us Some Feedback!

We love feedback on our DIY tutorials it helps us to make them the best they possibly can be so if you have any comments you would like to share with us, click the button below and let us know.

Primary Sidebar

Master Basic DIY - By DIY Doctor

Our Book - Master Basic DIY

Grab your copy now for all the DIY help you need right at your finger tips!

Buy it Here!

Signup for our Newsletter

Keep up to date with our DIY projects, tips and latest deals

Sign Me Up!

Our Sponsors

Find out about advertising on DIY Doctor

Advertisments

Other Similar Projects
  • How To Fill And Disguise Worktop Joints
  • How To Fit Wooden Worktops
  • Hammers - All You Need To Know About The Different Types Of Hammer And What They Are Used For
  • How To Mitre A Worktop
  • How To Cut A Mitre Joint

Footer

DIY Doctor company logo

Here at DIY Doctor, we offer completely free DIY and construction help and advice to any and all, from professional tradesmen, exactly as they would do it.

We have hundreds of DIY project tutorials covering all aspects of building and DIY that provide step by step instructions on how to complete your given task.

If you need a little help then we also have an active question and answer forum and a find a trademan service and much more.

Site Menu

  • DIY Doctor Ltd,
    The Workshop,
    Newbury Works, Somerset,
    BA3 5RX

  • 0845 6342 179

  • Contact Us

  • Company Number: 05863375
  • VAT Number: 811134774

Other Stuff

  • About DIY Doctor
  • Contact DIY Doctor
  • Media and Press
  • DIY Projects
  • UK DIY Forum
  • DIY Doctor Suppliers
  • DIY Webinars

DIY Doctor Social Channels

  • Advertise
  • Competitions
  • Terms and Conditions
  • Privacy Policy
  • Cookie Information
  • NHIC
  • Sitemap

DIY Doctor are members of:

© DIY Doctor Ltd 2025 All Rights Reserved