You can fit a gas hob yourself, and it is a very satisfying job, if you take the time to do it right. You are not allowed to connect the hob to the gas unless you are Gas Safe registered, and it is worth engaging with your chosen engineer before you start so that you are familiar all the rules.
Before we get to the actual process of physically fitting the hob, which we cover in detail below, we will quickly explain where you can and can’t put it. As you can understand it is not allowed to be too close anything that could be a fire risk.
Gas Hob Regulations for Positioning
All gas hobs should come with detailed instructions about where they can be fitted and the safe distances that units, plugs and anything else, must be from the fitted hob. Read and follow these as they will be up to date and specific to your appliance. That said there are some general rules that you should follow:
Ventilation
Any gas hob needs to be fitted into a room with adequate ventilation, just in case there is a gas leak – a very unlikely event but potentially catastrophic. If there is not a door or window to the outside in the kitchen a gas hob should not be used.
There are guidelines for “internal” kitchens, where a gas hob is fitted. This can occur when, for example, a conservatory has been built over the external wall, making the kitchen internal.
These rules are relatively complex, so best addressed by a Gas Safe engineer so we will not cover them here. Here is a technical bulletin from Gas Safe if you want to know more.
Positioning the Hob
There are some simple guidelines to follow when it comes to where you shouldn’t place your gas hob:
- Under a window – windows should be at least 500mm away from the hob
- By a door – 500mm minimum distance
- Up against a wall (to the side)
- At the end of a worktop
Essentially this is all common sense; you want it away from any draughts that might blow out the flame leaving gas flowing into your kitchen.
You should ensure it is away from anything that might knock it or catch alight being near it. Which brings us to your “Hot Zone”.
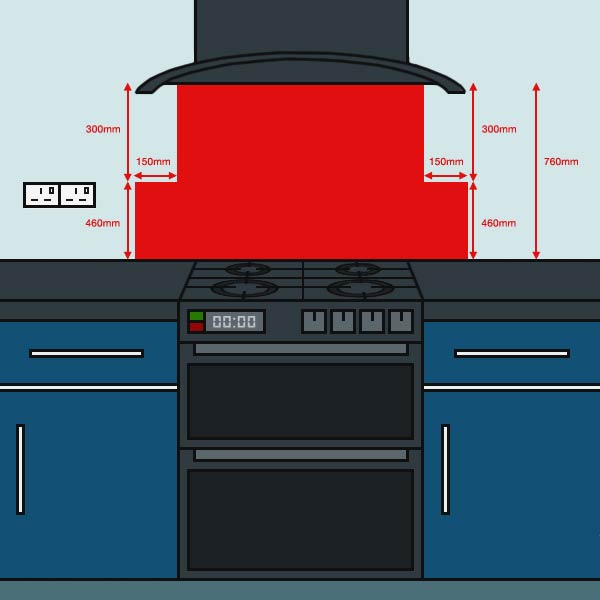
Cooker and Hob Hot Zones
The Hot Zone applies for electric cookers and hobs as much as it does for gas appliances.
There is a hot zone immediately above the cooker or hob where there should be nothing fixed, including extractor hood, for 760mm. Either side there is a zone of 150mm where there should be nothing fixed up to a height of 460mm. Extending to the rear, if fitted into a worktop you should leave 50mm.
Nothing should be fitted in this “Hot Zone”. This includes any plugs, kitchen units or anything else that could burn or melt.
This is easily understood from this diagram below.
Gas and Electricity Supplies for your Hob
For a gas hob you will need a gas supply – obviously! This must not be more than 1.5m away from the intended location of the appliance.
Not so obviously, you will almost certainly need to have an electricity supply for your gas appliance. This also should be within 1.5m of your planned location.
Make sure that you have the correct rated supply for the appliance you are using and many will require a 32A fused spur – we have more information on this in our project about installing an electric oven. That said, many gas appliances only need a 13A feed, but check the instruction of your chosen appliance.
Can I Fit a Gas Hob Myself?
In short, yes, you can fit a gas hob into a worktop or similar yourself, however, this does not include connecting it up. Only a competant person with the correct testing equipment is allowed to do that!
A very common misconception is that if there is an existing gas fitting that just requires “connecting to” then you are allowed to do this, this is not true.
Don’t assume that just because the gas hob or the connection hose is brand new that it can’t possibly leak. Defects can occur during manufacture and also things can get damaged during storage and transport.
With the above in mind, any gas appliance needs to be connected up by a “competent person” e.g. a Gas Safe engineer that will perform a gas pressure test. The test in question tests the gas pressure before and after connecting up to ensure they are the same and if not, may indicate the presance of a leak.
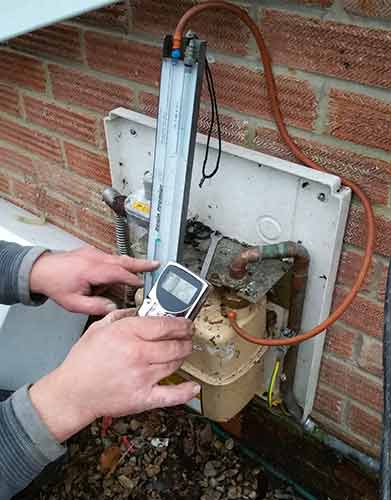
Carrying out a gas pressure test
What is the Standard Hob Size?
There is no official standard size hob, and the number of rings can vary from 2 to 5 typically with will further affect the overall size of the hob.
A very common size is 600mm wide by 500mm deep. The size of the hole you will need to cut into your worktop will be smaller than the overall hob size.
Now you are ready to fit your new hob, although it is wise to have a good read of the appliance instructions before you start so that you are familiar with the measurements for your particular gas hob.
Most retailers are careful to provide lots of information so that you get the right size hob for the space you have in your kitchen.
Fitting a Gas Hob Yourself
Fitting a gas hob into a worktop is not dissimilar to fitting a kitchen sink (see the related project list at the base of this page).
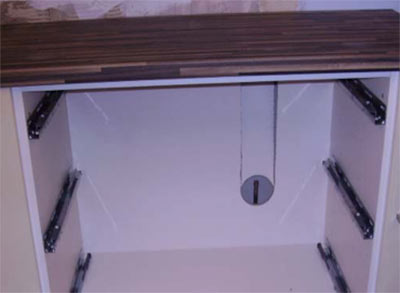
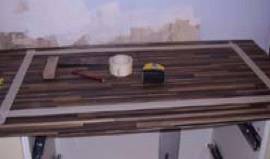
Gas hob base unit ready for installing gas hob
It must be noted here that although a DIY enthusiast, or even a carpenter is allowed to fit a gas hob into a worktop or base unit, they are not allowed to connect it to the gas. Please see our project on gas safety and DIY installations.
Gas pipe ready for connecting gas hob
You can see from the above image that the gas fitter has already brought the supply to the rear of the hob unit and we have cut out the back of the unit ready for connection to the hob later.
The hob is sitting in a drawer unit so the cut out will not be seen when the drawers are replaced.
The cut out is wedge shaped so, with a little help from some adhesive, it can simply be dropped back into the slot where it will stay.
A gas hob is cut into a worktop and sits over a kitchen base unit like the one in the image above. Before it is cut you need to measure the hob itself, or use the manufacturers fitting instructions and/or template to make sure you know the exact opening size to cut.
If there are no instructions the usual size of the hole is 25mm less (all round) than the actual size of the hob.
Measure gas hob accurately
Having measured the hob the correct cut out size must be transferred to the worktop. Mark this with a pencil then use some masking tape to form a clear edge to cut to.
Tape out the area to be cut out so you have accurate lines to follow
Pencil marks are hard to follow when there is a lot of fine sawdust about. Additionally, don’t forget to wear a dust mask!
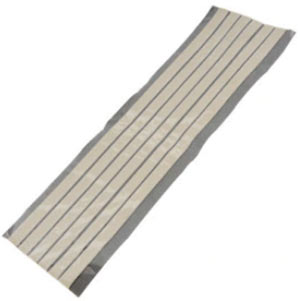
Sealing strips for underside of hob
Drill a 25mm hole inside the cut out area (more than one can be drilled if it makes life easier for you) and use a jig saw to cut out the hole required for the hob.
When the hole is made its time to fit some clips to hold the gas hob in place. These clips should come with your hob.
In most cases the clips themselves will be specific to the manufacturer of your hob, they are not all teh same. However it is possible to get universal brackets that should be compatible with pretty much all different types of hobs.
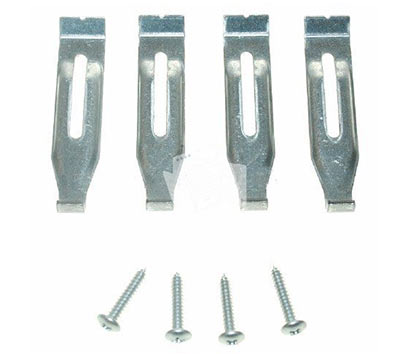
Clips or brackets to hold hob in place
The clips are fitted to the underside of the hob and tightened onto the worktop to hold the hob firm. The hob should also sit on some sealing strips to keep the joint between the underside of the hob and the top of the worktop, clean and waterproof.
Drop the hob down onto the sealing strips and tighten the clips. It’s now time to call the gas fitter; you can find a local fitter here.
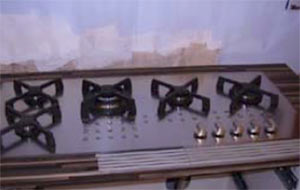
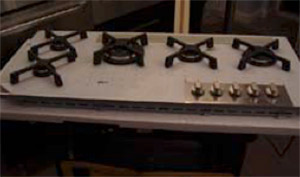
Gas hob successfully fitted in place