Closing a Fireplace
A fireplace, which is not used anymore, can be successfully closed to allow more wall space…
Step 1 – Adding an Air Brick and Caping off the Chimney
The insertion of an air-brick is required in the closing of the fireplace to allow air to circulate between the room and the top of the chimney, via the flue and fireplace. This will stop moisture collecting in the soot and smoke deposits within them and forming damp areas.
It is also necessary to cap the chimney with a ventilated cowl, which will allow air in and out, but not water. Builders merchants will advise on the type of cowl required for this.
First measure the opening in square metres and multiply by 60. This will tell you how many bricks you will need. (An average fireplace will measure approx 400mm x 550mm or 0.4m x 0.55m…. Equalling 0.22 sq. m. x 60 = 13 bricks) you will need one 9 inch x 3 inch air- brick. Common bricks can be used for building, as they are the cheapest.
Sand and cement is obviously needed and this should be mixed at 4 sand to 1 cement for building the brickwork. The same mortar can be used for the render to cover the bricks with later, but you will have to wet it down a little to apply it.
Step 2 – Inserting Frame Cramps to Tie in Brickwork
For an average fireplace you will also need 2 “frame cramps” which are normally fixed to a door or window frame and built into the brickwork joints. These 2 however, will be plugged and screwed to the inside of the fireplace and be built into brickwork you are building. (See diagram below)
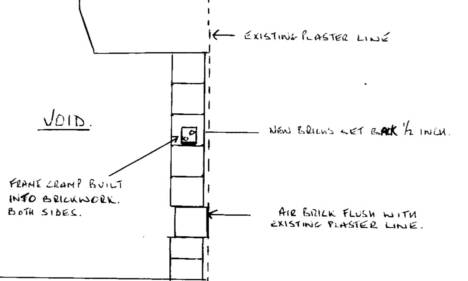
Fire Place bricked up showing new bricks added and also position of air brick
Step 3 – Laying Brickwork into Fireplace Opening
The brickwork can now be built into the opening; it should be set back half an inch from the existing face of the plasterwork surrounding the fireplace. The air-brick however should be built out a little so that its face is flush with the existing plaster. You can check this by placing a spirit level across the opening. It should touch both sides of the fireplace, and the air-brick.
The air-brick should be in the middle of the new brickwork and as low as you can get it without any of it being masked by the new skirting board.
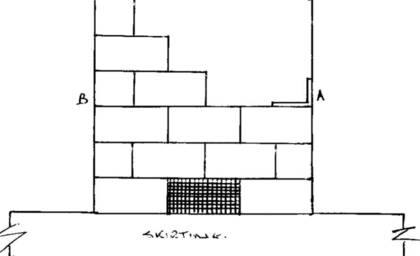
A & B represent the positions of the frame cramps
Step 4 – Applying Render to Your Bricked up Fireplace
When the brickwork is built, “rake” out the joints by about 10mm. This will give a good key for the render you will apply when the brickwork is firm enough to withstand the pressure of applying it.
To render, spread the sand and cement as evenly as you can over the brickwork; preferably using a plasterers trowel, but it is possible to use the back of the trowel you used to lay the bricks with. When you think you have enough on, use the spirit level, laid across the opening as before, and “dragged” upward. This will pull off all render that is “proud” of the existing plasterwork.
You may have to apply a bit more to any depressions, but by repeating the process you will finish with a rendered section, which is flush with the existing plaster. The air-brick of course will already be at this level.
If you would like further help and advice on how to plaster check out our project on skim coat plastering.
Step 5 – Rub the Rendered Surface out Until Smooth
You must now use a wooden or plastic “float” to rub over this surface. Do not do this immediately after you have finished the render. Allow the render to dry out for a while. This is ready to “rub in” when you can move the float on the surface of the render without the render moving, but all pin-holes fill up with the deposits of render left on the trowel. Rub in a circular motion, with steady, not firm, pressure and you will be left with a nice flat surface, which should be 2 or 3mm below the level of the existing plaster.
This new surface must now be “scratched”. Use a nail and put light scratches all over it. This is to give a good key for the final coat of plaster called “skim”.
Step 6 – Plastering and Finishing Your Closed Fireplace
When you are buying skim, most merchants will know what you mean, but its real name is multi purpose top coat plaster. This must be mixed to a very creamy consistency (runny custard) and applied using a plasterer’s trowel.
When you have covered the area, leave for a minute or two and trowel up again. Repeat this 2 or 3 times (more if necessary) and the trowel marks will disappear, as the plaster gets harder. Timing is the essence of this type of plastering and you will not have time to go shopping when this stuff is on the wall.
Your surface is now complete and you can fix the skirting boards in place.
Finally you will need a grill to cover the air-brick. These can be found at Builders merchants and diy stores. They are either plastic or brass effect and can be screwed or glued in place.
Don’t forget you now need to cap the top of the pot or flue.
Quick Check Steps for Blocking up a Fireplace
- Measure the opening and calculate how many bricks you need
- Cap off the top of the chimney stack with a ventilated cowl or ventilated cap
- Lay bricks into opening, rembering to insert an air brick as low as possible (but not be blocked by skirting) so that it protrudes out a little and is flush with the face of existing surfaces to either side. Also remember to add your frame cramps to tie in brickwork to existing surfaces and support new brickwork
- Once new brickwork has dried, apply render to the surface ensuring that it is about 3mm below the flush face of existing surfaces to leave room for skim coat plaster
- Once the render covering has dried, apply your skim coat plaster to finish and produce a nice smooth surface
Opening a Fireplace
In most situations the above operations will be done in reverse. It is unlikely that any structural alteration will have been done to your fireplace when it was bricked up, but you must still proceed with caution.
Step 1 – Do not Enlarge the Fireplace Opening From it’s Original Dimensions
Do not attempt to make the opening any larger than it was originally. Fire openings are quite an exact science. Altering their shape and size will affect the efficiency of the fire and possibly lead to a “blowback” of smoke etc.
Determine the centre of the section to be removed and make a hole at floor level, this hole can then be widened and raised until you meet the sides and top of the original opening.
Step 2 – Clean up the Opening
Clean off any jagged bits of brick and plaster etc and remove all debris from inside the opening. You should be able to reach up at least an arms length without obstruction. Do not attempt to look up until you have done this arm test.
Step 3 – Check the Chimney Stack is not Capped
It is at this stage you will need to check the builders have not capped off the chimney. Call in a Corgi registered plumber to test the flue. Please do not assume that because it looks clear it is suitable for a fire that has any kind of exhaust fumes. At worst, your flue may have to be lined.
A flue for an open fire should be a minimum of 185mm square or 200mm diameter and if you intend to burn bituminous coal then a diameter of 225mm is required. Acceptable linings for different fires are quoted in the building regulations.

Building Regulations Guide book
Step 4 – Repair any Damage to Area Around Your Fireplace Opening and Prepare Hearth
You can now make good any areas of brickwork and plaster that have been damaged. This should be done using lime mortar, which is less susceptible to cracking in the heat. The mix for this will be 4 parts soft sand, 2 parts lime and 1 part cement. All of the materials mentioned in these help sheets are available from builders merchants.
The area you are making good needs to be free from soot and any flaking material. A fireplace hearth is usually made in 3 sections. A constructional hearth forms part of the floor (ie finishes at floor level) it should be of a non combustible material 125mm deep and extend no less that 500mm from the front of the chimney breast. If your floor is already concrete then this will suffice.
A surface hearth is usually placed on top of a constructional hearth and should be of a non combustible material (paving slabs, tiles etc) no less than 48mm thick and extend no less than 300mm from the front of the fire. The back hearth is then laid up to the level of the top hearth and should be placed in the fire opening. It is mixed from 4 parts of sharp to 1 part cement.
Corners can be reinstated by tacking a piece of timber to the face of the existing wall and rendering up to it. The timber can be removed the following day leaving a straight edge. If top coat plaster (skim) is required to the surface, some scratch marks should be placed in the render to give a key, i.e. allow a stronger bond between the two surfaces. (see closing a fireplace).
Step 5 – Insert Concrete Lintel Above Throat Lintel With a new Opening
It is as well to position a concrete construction lintel above the throat lintel if constructing a new opening. The throat lintel is designed to direct the gasses into the flue. A usual throat size is about 12 inches wide (300mm) and 4 inches deep (100mm) for a fire of about 16 inches (400mm) wide. Larger throats tend to take heat away from the room as they draw more quickly. Adjustable vent regulators can be fitted to regulate the draw through the flue. These can be removed for sweeping the chimney.
Step 6 – Fitting a new Fireback
Fitting a new fireback should only be done with a proprietary back, available from fireplace companies, made to British Standards. This should be fitted in two or more parts to allow for expansion and jointed with either fire cement or lime mortar which is available from builders merchants in pre mixed bags.
The filling behind a fire back should be done with either 4 parts broken brick rubble to 1 part lime to 2 parts sand or, for greater insulation, 6 parts Vermiculite to 1 part cement. Vermiculite particles are available from builders merchants and can, indeed should be, used to line a new flue if one has been inserted. To allow for a little expansion behind the fireback its a good idea, before backfilling the lower section, to place a piece of cardboard (thickness of a cereal packet) against the fireback. This will burn off quickly to leave a space for expansion.
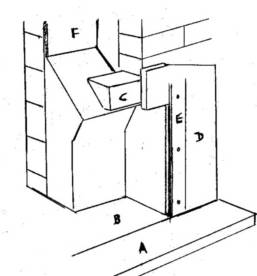
Cross section of a fire place and hearth area
It is assumed that a construction hearth is already in place. Please see notes:
- A: Top hearth formed as you wish, generally stone slabs, quarry tiles or bricks. See above for regulations
- B: Concrete base or back hearth
- C: Throat lintel, this will be an integral part of the existing fireplace.
- D: Plaster/render (containing lime)
- E: Timber tacked on to form straight edge to D & C if necessary
- F: Flue – Must be checked by corgi-registered fitter
Note: A construction lintel is usually found, (and should be placed with new work) above the throat lintel.
Step 7 – Forming the Hearth for Your Fireplace Opening
If a hearth is required this can be formed in front of the opening either by paving slabs, or a bed of sharp sand and cement with quarry tiles laid over.
The bed for the slabs or quarry tiles should be 4 parts sharp sand and 1 part cement. The gap between the back edge of your new hearth and the back of the fireplace opening can be filled with either concrete or the same mix of sharp sand and cement.
Please check for any cowl or cap that is on top of your existing chimney. If it is, it must now be removed.
Please choose your fire surround before constructing your hearth as it could determine the width of your hearth.
Step 8 – Quick Check Steps for Opening up a Fireplace
- Work out the area that needs to be removed for the opening – NOTE: Do not enlarge the opening any more than it’s original dimensions
- Once determined, make a hole in the centre at floor level and then widen and raise until you find the edges of the original opening
- Clean off any jagged brickwork or plaster from around the edges
- Check the chimney is not capped off, consult with a Corgi registered tradesman and get it un-capped if so
- If your Corgi registered tradesman confirms that you will need a flue installed, get one fitted
- Repair any damage to edges of brickwork or plaster, use a lime based mortar if you can. Also prepare your constructional hearth at floor level
- If it is a new opening, insert a concrete lintel above the throat lintel
- Install your new fireback
- Form your new hearth on top of your constructional hearth in front of your new fireplace. Addiotnally, before you do so check this with the size of your new fire surround as this may determine the width of your hearth