The concealed cabinet hinge is in most cases the go-to hinge to use when fitting kitchen cabinet doors or fitted bathroom cabinet doors. As the name suggests, the concealed cabinet hinge is fitted to the rear of a cabinet door and to the inside of the cabinet making it invisible from the outside for a clean and professional finish.
Fitting a concealed cabinet hinge is a slightly different process to fitting a standard hinge in that it needs to fitted slightly offset from the edge of the door and front edge of the cabinet carcass, so accurate measuring and marking is a must if the cabinet door is to fit correctly.
In the majority of cases if you have purchased flat-pack kitchen or bathroom units the doors will come pre-drilled for the hinges so you won’t need to worry about cutting them yourself, however if you’re making the doors yourself then you will
To find out how to both accurately measure and fit concealed cabinet door hinges, read on below.
Parts of a Concealed Cabinet Hinge
Before explaining exactly how to measure and fit a concealed cabinet hinge to a kitchen or bathroom cupboard it’s important to fully understand each different part of the hinge and what it’s called so that when we refer to a particular part you’ll know exactly what we mean: The parts that make up a concealed cabinet hinge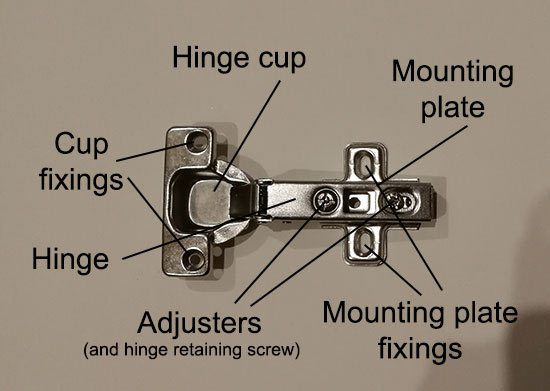
- 1 – Hinge cup: The hinge cup is the part of a concealed hing that is fixed to the cabinet door. A 10-12mm recess is cut into the rear of the door for the cup to sit in
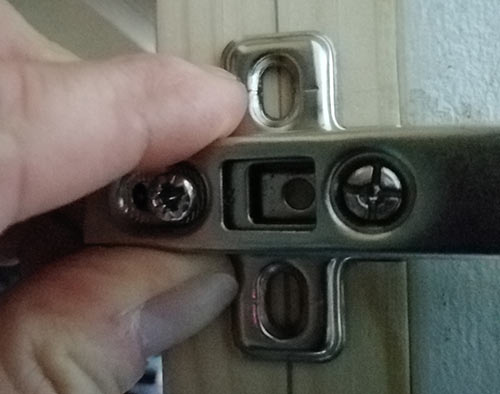
- 2 – Mounting plate: The mounting plate is fixed to the cabinet framework or carcass. The hinge then slides on or clips on the mounting plate holding the door in place
- 3 – Mounting plate fixings: The mounting plate is screwed to the cabinet framework or carcass through the fixing holes. The holes are elongated slightly allowing for upward and downward adjustment
- 4 – Adjusters: The adjusters are used to allow the door to be adjusted left and right and in and out
- 5 – Hinge: The hinge section as you may guess pivots allowing the door to open and close. It also attaches the hinge cup to the mounting plate
- 6 – Cup fixings: The hinge cup is screwed and secured to the door through the cup fixings
Different Types of Concealed Hinge and how They are Measured
There are quite a few different designs and styles of concealed cabinet hinge around today. Some feature different types of hinge arrangement and screw fixings, some have much bulkier and heavier to cope with over-sized and heavy doors, some have soft-closing mechanism’s built into them, some open much wider (170° as opposed to 93° or 110°), some are for integrated appliances and many other variations.
Aside form the above the only differences that you need to be aware of is the size of the cup. The most common size of cup used on pretty much all kitchen cabinets is 35mm. The 35mm refers to the diameter of the cup itself when measured. Measuring the width or diameter of the cup on a concealed cabinet door hinge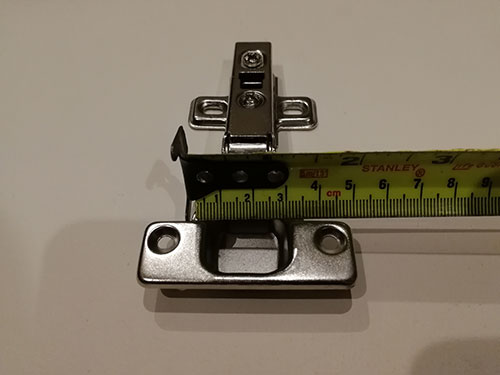
The other commonly used size of concealed hinge is 26mm. These hinges are a fair bit smaller than the 35mm hinges so are commonly used on the smaller more light weight cupboards and units normally found in bathrooms.
As mentioned there are a few other sizes of concealed hinge including 40mm, but these tend to be for more heavy weight specialist applications.
How Many Concealed Hinges Should you use on Each Door?
Another important point to be aware of when hanging cupboard doors using concealed hinges is; how many hinges should you use? The answer to this is that it depends on the size and weight of the door itself.
Use the tables below to work out how many hinges you will need to install to the cabinet door you are fitting to ensure it opens and closes correctly and more importantly doesn’t sag.
If you don’t use the correct number of hinges then over time the weight of the door will cause them to sag and bend causing the door to drop.
26mm Concealed Cabinet Door Hinges
| Door Weight | |||||
|---|---|---|---|---|---|
Door Height | 2kg – 3.5kg | 3.51kg – 5.5kg | 5.51kg – 7kg | ||
| Up to 900mm | 2 | 3 | 3 | ||
| 901mm – 1600mm | 3 | 4 | 4 | ||
| 1601mm – 2000mm | 4 | 4 | 5 | ||
| 2001mm – 2400mm | 5 | 5 | 5 | ||
35 – 40mm Concealed Cabinet Door Hinges
| Door Weight | |||||
|---|---|---|---|---|---|
Door Height | 4kg – 6kg | 6.01kg – 10kg | 10.01kg – 15kg | 15.01kg – 20kg | |
| Up to 900mm | 2 | 3 | 4 | 5 | |
| 901mm – 1600mm | 3 | 4 | 4 | 5 | |
| 1601mm – 2000mm | 4 | 4 | 5 | 5 | |
| 2001mm – 2400mm | 5 | 5 | 5 | 5 | |
The above is a guide based on using standard 35mm euro concealed hinges, the type that are used on pretty much all kitchen cabinets and units.
However, if you are thinking of hanging particularly heavy doors e.g. 10kg plus you should consider using specialist heavy duty concealed hinges.
Additionally it is not advised to hang particularly heavy doors using only 26mm concealed hinges. Anything really over 5kg’s should be hung using 35mm hinges instead.
Fitting new Concealed Hinges or Replacing Existing
If you are fitting new concealed hinges to a new cupboard door blank and nothing has yet been cut or fitted then the type and size of concealed hinge you decide to use is up to you.
When choosing new concealed hinges always go for the best quality you can afford. Cheap hinges will certainly do a job but the metal tends to be quite thin so they twist and flex easily causing them to drop under the weight of the door.
Better quality hinges are generally stronger and hold their shape much longer than their cheaper counterparts.
If you are simply replacing one concealed hinge with a new one then it’s always best to swap like-for-like.
To ensure you get the correct hinge it’s often easier to remove an existing one so that you have something to compare your would-be replacements to. This way you will then get an exact match. Although they’re both 35mm concealed hinges designs can vary so use an existing hinge to get an exact match
Is the Cabinet Door Fitted Internally or Externally (Overlay or Inset)?
There are several different ways that a cabinet door can be fitted to a unit and although this doesn’t necessarily make any difference to the type of concealed hinge you use it does make a difference to the way it is positioned and mounted on the inside of the cabinet.
Types of Cabinet Doors
- Fully inset: With a full inset door it is mounted within the front edge of the cabinet. This is often the case when an integrated appliance has been removed and the space has been turned back into a cupboard
Inset cabinet door
- Partially inset: With a partially inset cupboard door, the inner part of the door itself fills the space between the sides of the cabinet and the outside partially covers the front face

Partial inset cabinet door
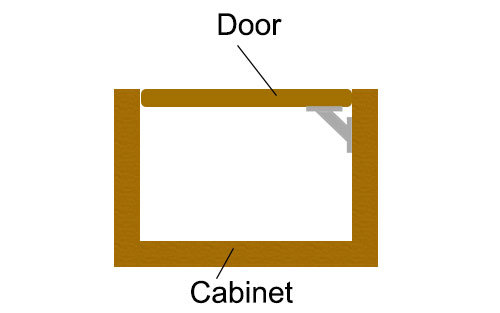
- Overlay: With an overlay door, the entire door is wider than the gap it is covering so overlays it

Overlay cabinet door
With each different type of door there are a few points to be aware of – With a fully inset door you will need to raise the mounting plate off of the inner face of the cabinet to allow for the offset of the cup and the overhanging edge of the door.
If the cup recess is set at the standard 22mm or so in from the edge of the door the mounting plate will need to be raised around 8mm off of the inner side of the unit. A thin 8mm piece of door stop is ideal for this.
It can later be stained or painted to match the colour of the cabinet. Concealed hinge mounting plate raised off of cabinet carcass for fully inset door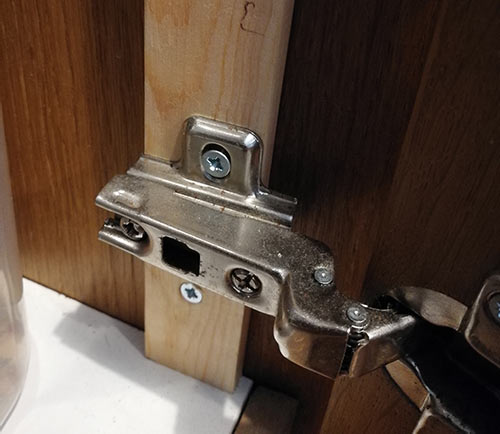
One final point is that with a partially inset door you will in most cases have to add the depth of the inset to the normal 36mm recess for the mounting plate (more on this below).
For example if the recess on the door is 10mm then the mounting plate will need to sit 46mm back form the edge of the cabinet as opposed to the 36mm.
This will ensure the sits totally square once closed.
Tools and Materials Needed for Fitting Concealed Hinges
To successfully fit a concealed hinge to a cabinet and door you will need the following tools and materials:
- Required amount of concealed hinges of the correct size (normally 35mm)
- 1x sharp pencil and rubber
- 1x pack of 8x12mm or 8x18mm depending on the thickness of the door you’re fitting
- 1x box of 8x30mm screws or larger if the cabinet your fixing to allows this
- Drill/driver
- Small 2mm pilot drill
- Correct sized forstner bit of the size hinges you’re fitting (normally 35mm)
- Tape measure
- Carpenters square
- Spirit level or straight edge
How to fit Concealed Cabinet Hinges
As you should now know what type of door you have and what type of concealed hinge to use it’s now time to get them fitted.
Measure and Mark Hinge Cup Positions on Cabinet Door
Using a tape measure, measure and mark with a pencil around 85mm – 100mm down from the top of door on the hinge edge and the same up form the bottom.
If you need to use more hinges divide the space between the top and bottom marks equally depending on how many hinges you are adding e.g. if you are using 5 hinges, divide the space by 3 for your further 3 hinges.
Next, measure and mark with a pencil in 22mm from the edge of the door above and below each mark you have made and then join the marks together. Measure and mark 2 points at 22mm in from the door edge and join them to define hinge cup position
Using a carpenters square, mark a line using a pencil from the door edge across the line created in the above step. The point that they cross is exactly where you need to drill out the hinge cup recess. Concealed hinge cup recess drilling point marked on door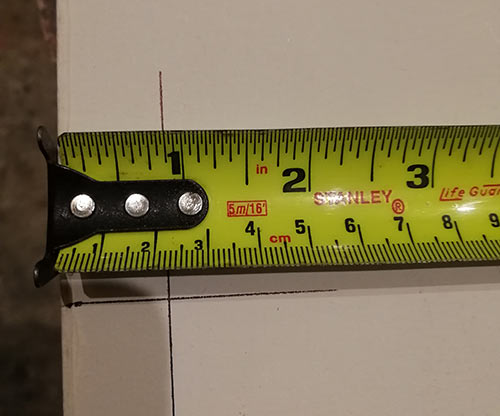
To test that your mark is accurate and in the correct place position the hinge so that the edge of the mounting plate is flush with line drawn in the above step. You should have around 4-5mm between the cup and edge of the cabinet door. Position hinge on line and check distance from edge of cup to the edge of the cabinet door
Drill out Hinge cup Recesses
To drill out the recess for each cup you will need to use a special drill bit known as a Forstner bit. As we are working with a 35mm concealed hinge you will need a 35mm forstner bit.
Insert the 35mm forstner bit into your drill and then position the point of the guide directly onto the point that the two lines cross. Forstner bit guide point positioned on drilling point on cabinet doors
Once positioned accurately drill the recess down to a depth of 11-12mm. Stop periodically and test fit the hinge cup to make sure all is well.
Don’t get too carried away when drilling, especially when you get to around the 12mm depth mark. In most cases the cabinet door you will be using will only be around 18mm thick so that doesn’t leave much room for mistakes! Concealed hinge cup recess drilled out using 35mm forstner drill bit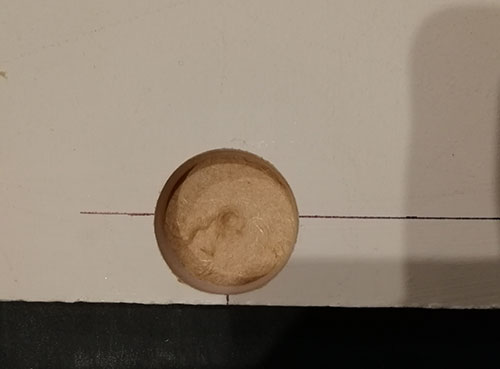
Once drilled out fit the cup in place and check it fits. If all is well square up the cup fixing plate with the edge of the cabinet door (accurately or the hinge cup won’t be square), mark through each fixing hole then drill out a pilot hole (find out how to drill pilot holes in our project here) and screw the hinge cup in place using two 8x12mm screws (or 8x18mm if door in over 20mm thick). Concealed hinge cup fitted to recess and screwed in place
Measure and Mark Mounting Plate Fixings
The next task is to measure and mark the positions using a pencil of each mounting plate on the inside of the cupboard or unit you are fixing your door to.
Firstly, measure and mark the same distance down from the top of the inside of your cabinet that you previously marked on the door for the top hinge, normally this is around 85-100mm.
In the case of this example the top of the door was to overlay the cabinet framework at the top by 50mm so we measured down from the 50mm overlay mark and not just down from the top of the cabinet. If you are featuring overhangs, gaps or similar remember to factor these in also. Top mounting plate fixing position marked on cabinet framework
Repeat the same for the bottom and also for any other hinges, again remembering to measure from the correct point.
Next, measure in and mark with a pencil two points above and below the mark made in the above step and join them together then, using a carpenters square, extend the horizontal mark made above until it hits the vertical line.
This then defines the exact position for the mounting plate. First mounting plate position accurately marked on cabinet frame
The mounting plate itself should be positioned so that the vertical line is dead centre to the fixing holes while the horizontal line should be dead centre to the mounting plate itself.
Concealed hinge mounting plate lined up with fixing position lines on cabinet
Once positioned accurately mark screw holes, drill a pilot hole and screw it in place. Repeat for any remaining hinges.
Fit Cabinet Door to Unit or Framework
Once the mounting plates are fixed you can then fit the door in place. Open out the hinge on the door so it is horizontally level with the door.
Move the door into place and slide the hinge of the cup onto the mounting plate. If you are using clip-on hinges, gently wiggle the hinges down on to teh mounting plate until they clip in place.
If you are using slide-on hinges, first ensure the retaining screw on the mounting plate is loose enough to allow the hinge to slide on and then slide the hinge onto the plate until it slips into place. Retaining screw that secures the concealed hinge to the mounting plate
Push it all the way back as far as it will go (it can be adjusted later if needed) and then screw the retaining screw up to hold it securely.
As you are sliding it in place ensure all the others also line up with their respective mounting plates. If the door you are using is particularly heavy it’s a good idea to get some help fitting it to avoid any disasters.
Once the door is fitted in place gently open and close it and check the fit. If anything is binding then you will need to make some adjustments. As we have mentioned, concealed hinges have the added bonus of allowing some slight horizontal and vertical adjustment. Hinge fitted to mounting plate and secured in place using retaining screw
If you do need to make any position adjustments to you hinge see our project here that covers how to adjust concealed hinges and kitchen cupboard doors for full details.
Once adjusted suitably to allow the door to open and close without touching or binding on any surrounding surfaces you’re pretty much done, good job!
If the door you have just fitted is a finished door e.g. doesn’t need painting, the final job to do is to now rub off any remaining pencil marks using a rubber. If it’s being painted don’t worry, the paint will hide any remaining marks. Cupboard doors fitted using concealed hinges
Fitting a concealed cabinet hinge may at first seem like a tricky job but as long as you accurately measure and mark out the position of the hinge cup on the door and the mounting plate on the cupboard you are fitting the door to you’ll soon be fitting them like the pros!