The Cupboard Design or Plans
This cupboard has been designed with a number of features that allow you to fully access all parts of the cupboard from both the end and the side so that there are no dark corners that you can never get to. The doors to your under stairs storage are designed to open and fold back on themselves, wrapping around the cupboard so that when they are open they are not in the way. Please have a look at the video (at the bottom of the page) for more details.
The doors are double hinged so that they fully open and can be folded away to allow complete access to the cupboard
The design is a flexible one so that you can alter dimensions to suit your under stair space or you can follow these instructions and you will have made a clever storage space under your stairs in around 5 hours, and cost less than £100.
Click here to download the plans and materials list
Step by Step Instructions to Building your Under Stair Cupboards
In these instructions we will not include dimensions and measurements as this will depend on the angle of your stairs and the size of the under stair cupboard that you have decided to make.
Follow these below steps to make your cupboard:
- Run a batten (the under stair batten) along the underside of the stair case from the position of the outer (main) upright down the outer edge of the underside of the stairs to the floor. This should be glued and fixed with the appropriate fixings
- Fix your outer (main) upright for the other corner of the cupboard from floor to ceiling. You will need to use a sliding bevel to cut the top of the upright at the correct angle so that it meets the stairs.
- If you are going to use the optional upright (we haven’t in the video), this should be fitted now and glued and screwed on to the wall. You will have to stop this up right above the skirting board so that it rest on the skirting or scribe round the skirting. Fix the two struts (or sometimes called the sole plate) on to the floor with glue and then screw. (Please look at our Fixing to Masonry project for more information about how to do this)
- Put up the inner and wall uprights to complete the frame of the cupboard. Use a sliding bevel to ensure that you get the correct angle on the underside of the stairs. The wall upright needs to be screwed and glued
- Insert the shelf struts between the wall and inner uprights. These should be screwed into place. We have made the shelves 250mm apart with the first one being only 200mm from the floor as this is ideal for a shoe rack, but you can decide for yourself the number of shelves you need for the shelving unit and how far apart that you need them based on what you intend to store in your under stair cupboard
- Fit the shelf long members. On the wall side these can be screwed and glued on to the wall, with the non-stair end resting on the shelf cross strut. On the open side, the long members should be fixed with screws to the shelf cross struts on one end and the under stair batten at the other. To get a good fit it is worth using a sliding bevel to cut the end of this member to the correct angle
- Fix the outer wall of the cupboard. This should be cut to size and attached to the cupboard frame, fixing on to the outer (main) upright and the inner upright. This should be screwed and glued in place along both uprights, the strut and the under stair batten. A useful skill to ensure a tidy finish is to countersink your screws – learn more at our drilling pilot holes and counter sinking project
- It is now time to make the double doors that open at the front of the cupboard. These are made in two parts that need to be able to fold back and around the outer wall that you have just attached. This means that the width of the large panel must be larger than the width of the section of the cupboard that doesn’t have the shelves
- Cut the door panels to size ensuring that they are a good fit into the opening. It will be necessary to fix battens to the back of the door, particularly if you are using MDF, as this will strengthen the door, allow you attach the hinges and door furniture and act as a guide to ensure that the door close correctly on to the internal shelving. Gaps will be required so that the battens fit between the shelves
- Hang the doors (one panel at a time) with the hinges at a distance of 1/3 and 2/3 of the height of the door. Ensure that a batten is fixed on the inside of the doors. If you have an uneven stone floor you will need to ensure that the doors fully open by trimming a little off the bottom of the door. To complete the door, locate the position of the handle – you can fix it now, although you will have to remove it for painting
- Beyond the end of the small door panel, there will be another section of cupboard panelling that will need to be fitted. Fix this to the under stair batten and any shelving long members that it covers. It might be necessary to fix a short strut (or sole plate) to the floor and then screw this panel to it, as we have done. If preferred you can make your door open right into the corner; we haven’t done this as we prefer not to leave a point on the door which can easily be damaged or do damage
- Make the end cupboard plinth. This hides the cross strut which goes along the floor from the wall to the main outer upright and completes the cupboard below the end door so that the end door doesn’t catch on the skirting board. This needs to be cut to size and scribed around the skirting if necessary. Fix it with glue and screws. This plinth is not necessary if you have used the Optional Upright, described above, as this will move the hinges out beyond the wall and clear of the skirting board. Learn how to scribe in our project on Scribing Timber
- Fit the end door. This can be hung on the wall as we have done, although it will need to be scribed to follow the line of the wall if this is not perfectly straight. If you have use an optional upright this can be used as a door frame which will make things easier, although you will lose some space. Cut the door to size and hang it with hinges 1/3 and 2/3 of the way up the door. Make sure that there is a timber batten on the inside of each hinge to screw into. The top batten can be used for fixing hooks inside the cupboard
- Fix any hooks that you require onto the outside of the cupboard. As this cupboard is recessed from the outside of the stair line, it means that there is still a little space for hanging coats so hooks are a useful addition to the cupboard design. Make sure that a batten is attached behind the hooks, on the inside of the cupboard, particularly if using MDF so that the hooks have the strength to support whatever is required
- Paint your cupboard. Remove the furniture – hooks and handles – and then paint the cupboard in the colour required. Learn more about the art of painting MDF successfully on the MDF painting project. Once you have completed painting and it has dried you can reattach the hooks and handles and you are finished!
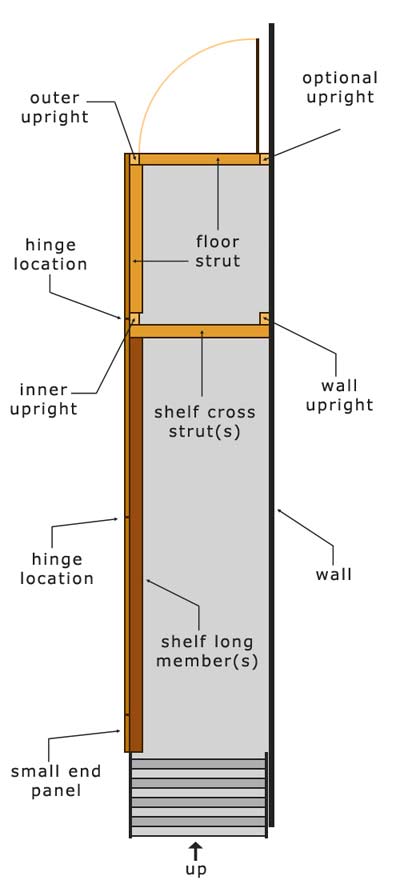
Plan view of the under stair cupboard
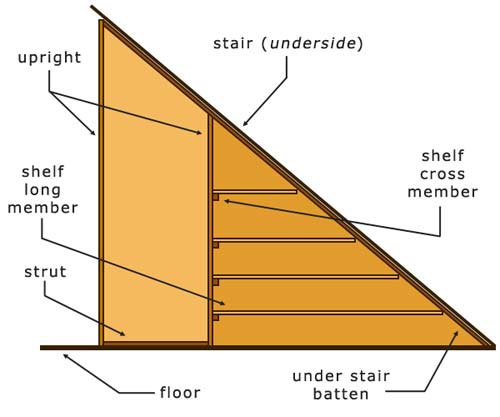
Side view of the under floor cupboard showing the cupboard frame
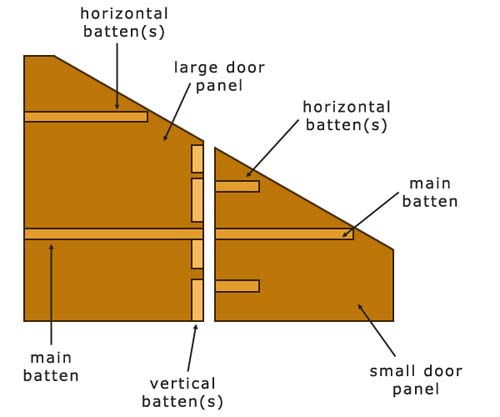
The plan for the folding door from the front of the under stair cupboard
Tools and Materials Required for Your Under Stair Cupboard
You will need the following tools to make your cupboard:
- Tape measure
- Sliding bevel
- Carpenters pencil
- Hand saw – 880
- Screw driver
- Drill driver (cordless)
- Sealant gun
- Spirit level
- Workbench or workmate/ Saw stall
- Conuter sink bits
- Drill bit 3mm x75mm
- Carpenters Square/ Studhawk
- A touch of genius!
To build this cupboard you will need the following materials from the builders merchant:
- 2 sheets of 12mm MDF (2.44m x 1.22m)
- 10.2m of 50mm x 25mm planed timber
- 3m of 50mm x 50mm planed timber
- 4 x 150mm Tee hinges & 2 x 300mm Tee hinges
- 2 spring cupboard clasps
- 2 cupboard knobs + associated screws
From the DIY Store or online:
- 1 tube of Gripfll
- 1 x box 25mm No. 8 Screws
- 1 x box 37mm No 8 Screws
- 20 x 65mm No 8 Screws
- 20 Red Wallplugs
To finish and paint your cupboard you will need the following equipment and tools:
- 1 tube decorators caulk
- MDF primer/undercoat
- Brushes – 2”
- White spirit (if you chose an oil based paint)
- Sandpaper
- Paint of your choice
The cost will be about £80.00 and you will need to plan for around 5 hours in labour to get the cupboard built.
Building an under stair cupboard is a very satisfying project for any DIY enthusiast. It is not too difficult and in a relatively short time you will have a cupboard that you can really be proud of.
The more advanced carpenter will be able to see how they can take our basic design an modify it to suit their needs and tastes, however if you like our design we are preparing detailed cupboard designs that we will be able to email to you so you can see in even more detail how we managed to make this under stair cupboard and how you can follow the same instructions – like IKEA, but much more satisfying!
Complete this form now to get your detailed copy of our cupboard plans, and join our newsletter for free:
To download your copy of the under stairs cupboard plane, simply click here and grab them and get building!