• Skip to primary navigation
  • Skip to main content
  • Skip to primary sidebar
  • Skip to footer
DIY Doctor

Main navigation

      • Project Type A - E
      • All Projects
      • Brick, Block, Masonry and Concrete
      • Damp, Condensation, Rot and Woodworm
      • Doors, Windows and Conservatories
      • Electrical
      • Project Type F - G
      • Fencing, Decking, Paving and Patios
      • Floors, Walls, Ceilings and Lofts
      • Garages, Sheds and Outbuildings
      • Gardening and Landscaping
      • General Building, Self Build and Renovation
      • Project Type G - J
      • General Repairs and Cleaning
      • Green Living and Eco DIY
      • Ground, Foundations and Drainage
      • Heating, Central Heating and Boilers
      • Joinery and Carpentry
      • Project Type M - P
      • Materials, Fixings and Fixing
      • Painting, Decorating and Finishing
      • Planning Regs, Project Management and Safety
      • Plastering, Plasterboard and Rendering
      • Plumbing
      • Project Type R - T
      • Roofing and Gutters
      • Tiling and Tiles
      • Tools, Appliances and Access
      • Useful Tips
      • DIY Tips
      • Find a Tradesman
      • Contract Download
      • Working With Tradesmen - Ultimate Guide
      • Home Improver Protection
      • Price Doctor
      • About DIY Doctor
      • What we do
      • Trade Shows and Exhibitions
      • Master Classes
      • Book Store
      • Contact Us
      • Feedback
      • DIY Competitions

Home > DIY How To Projects and Tutorial Guides > How to Fit a Close Coupled Toilet and Toilet Seat

How to Fit a Close Coupled Toilet and Toilet Seat

In this project you will learn how to fit a close coupled toilet and toilet seat. We focus on fitting a close coupled toilet and take you through the process step by step. This project includes fitting a loo or toilet seat (to any type of toilet).

TwitterFacebookPin ItBuffer

Don't want to do this job yourself? Let us help you find a tradesman local to you

Project Page Menu
  • How to Tutorial
  • Video
  • Find Tradesmen
  • Help
Standard lavatory cistern

Standard lavatory cistern

There are many different styles of cisterns available on the market and on this page we will give you a simple guide of how to install your own. Low-level cisterns are mounted on the wall just above the pan, and connected to the pan with a flush pipe. Other types include high-level cisterns, which are more old-fashioned, and concealed cisterns, which are designed to be hidden behind paneling.

However the most popular are still close-coupled cisterns that sit directly on top of the pan. A standard cistern has a siphon flush mechanism operated by a ball valve and float, with a handle on the front. However, flush mechanisms do vary between designs, so always read the manufacturer’s assembly instructions.

How to Install a Close-Coupled WC

Here are some instructions for fitting a freestanding cistern with a push-button flush. This type of toilet cistern has a valve-operated flush.

  1. Follow the manufacturer’s instructions to assemble the flush mechanism. Make sure you include the rubber sealing rings where necessary.
  2. Step 1: Assemble the flush mechanism

  3. Place the flush valve mechanism into the cistern; slide the bottom threaded section through the hole in the base. Check that the rubber washer is securely on the mechanism, inside the cistern. Screw on the back nut securely, but make sure not to over tighten.
  4. Step 2: Place the flush valve mechanism into the cistern

  5. Insert the push-button assembly through the hole in the cistern lid, and fit the nut.
  6. Step 3: Insert the push button assembly

    Step 3: Insert the push button assembly

  7. Insert the assembled inlet valve into the cistern. Make sure that the rubber washer is in place on the assembly, inside the cistern, and then lock it into position using the nut supplied. Tighten by hand and then give a further half turn using an adjustable spanner or small wrench. Do not over tighten.
  8. Step 4: Insert the inlet valve assembly

    Step 4: Insert the inlet valve assembly

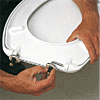
  9. Place the large rubber gasket into the flush entrance of the pan.
  10. Step 5: Place the gasket into the flush entrance

    Step 5: Place the gasket into the flush entrance

  11. Insert the long fixing bolts through the holes in the cistern, using the rubber and large metal washers supplied.
  12. Step 6: Insert the fixing bolts through the holes

    Step 6: Insert the fixing bolts through the holes

  13. When lifting the cistern onto the pan, make sure the long connecting bolts fit into the provided holes in the pan. Make sure that the threaded section of the flush mechanism goes through the rubber gasket on the flush entrance of the pan.
  14. Step 7: Lift the cistern onto the pan

    Step 7: Lift the cistern onto the pan

  15. Fit washers to the connecting bolts, and tighten the wing nuts. Fit securely but don’t over tighten.
  16. Step 8: Fit the washers to the connecting bolts

    Step 8: Fit the washers to the connecting bolts

  17. Check there are no pipes or cables beneath the fixing points, then position the WC and slide the pan outlet into the flexible connector attached to the soil pipe. A little silicone grease will ease it on. Drill pilot holes into the floor at the fixing points. If it’s a solid floor you will need to drill the holes with a hammer action drill and plug them.
  18. Step 9: Check there are no pipes or cables beneath the fixing points

    Step 9: Check there are no pipes or cables beneath the fixing points

  19. Push plastic protective inserts through the holes in the base of the pan and screw the retaining screws through and into the floor. If the cistern has fixing holes in the back, fix to the wall by drilling and plugging; remember to add rubber washers before tightening the nuts.
  20. Step 10: Push plastic protective inserts through the holes in the base

    Step 10: Push plastic protective inserts through the holes in the base

  21. Connect the supply pipe for the cold water feed using a push-fit tap connector.
  22. Step 11: Connect the supply pipe

    Step 11: Connect the supply pipe

Fitting the Seat

The lavatory seat and lid are fitted together, with a hinge to allow them to be raised and lowered. You can purchase new toilet seats and other accessories from the tool store below.

  1. Fit the hinge assembly to the seat following the manufacturer’s instructions.
  2. Step 1: Fit the hinge assembly

    Step 1: Fit the hinge assembly

  3. Connect the seat to the pan by securing through the holes at the back using the screws supplied. Adjust so that it sits in the correct position.
  4. Step 2: Connect the seat to the pan

    Step 2: Connect the seat to the pan

All project content written and produced by Mike Edwards, founder of DIY Doctor and industry expert in building technology.

TwitterFacebookPin ItBuffer

Video

Back to the Top

Apologies, but we don't seem to have a video for this project yet, but we will do our best to get one up soon

Find a Reliable Local Tradesman

Back to the Top
Don't fancy doing this project yourself? We work with the industries best to ensure that we recommend only reliable and trustworthy tradesmen.
Let DIY Doctor help you find a tradesman

Find a tradesman now!


More Help

Back to the Top
Related Projects That May Help You:
  • Changing a Low Level Toilet for a Close Coupled Toilet
  • How to Fix a Toilet That Won’t Flush
  • How to Unblock a Drain
  • Stopping Condensation on Toilet Cisterns
Give us Some Feedback!

We love feedback on our DIY tutorials it helps us to make them the best they possibly can be so if you have any comments you would like to share with us, click the button below and let us know.

Primary Sidebar

Master Basic DIY - By DIY Doctor

Our Book - Master Basic DIY

Grab your copy now for all the DIY help you need right at your finger tips!

Buy it Here!

Signup for our Newsletter

Keep up to date with our DIY projects, tips and latest deals

Sign Me Up!

Our Sponsors

Find out about advertising on DIY Doctor

Advertisments

Other Similar Projects
  • How To Change Your Toilet And Fit A New One
  • How To Deal With Condensation On Toilet Cisterns
  • How To Fix A Toilet That Wont Flush
  • How To Unblock A Toilet, Sink Or Drain

Footer

DIY Doctor company logo

Here at DIY Doctor, we offer completely free DIY and construction help and advice to any and all, from professional tradesmen, exactly as they would do it.

We have hundreds of DIY project tutorials covering all aspects of building and DIY that provide step by step instructions on how to complete your given task.

If you need a little help then we also have an active question and answer forum and a find a trademan service and much more.

Site Menu

  • DIY Doctor Ltd,
    The Workshop,
    Newbury Works, Somerset,
    BA3 5RX

  • 0845 6342 179

  • Contact Us

  • Company Number: 05863375
  • VAT Number: 811134774

Other Stuff

  • About DIY Doctor
  • Contact DIY Doctor
  • Media and Press
  • DIY Projects
  • UK DIY Forum
  • DIY Doctor Suppliers
  • DIY Webinars

DIY Doctor Social Channels

  • Advertise
  • Competitions
  • Terms and Conditions
  • Privacy Policy
  • Cookie Information
  • NHIC
  • Sitemap

DIY Doctor are members of:

© DIY Doctor Ltd 2025 All Rights Reserved