If you have your own home or even live in a rented property, chances are at some point you are going to have to deal with a blocked toilet, sink, drain or the likes, especially with todays volume of supposed disposable wipes and lack of knowledge of what you should actually put down a drain!
Although the prospect of unblocking anything such as this is not a nice one, it’s got to be done so with this in mind, in this guide we look at how this should be done.
Why do Drains, Sinks, Toilets etc Become Blocked?
Blocked drains, sinks, and toilets are a common household issue, often caused by a buildup of everyday waste. Here follows a run down of the most common reasons for blockages.
Common Causes of Blocked Drains
Outdoor drains can become clogged with leaves, mud, and debris, especially during autumn when falling leaves are washed into gutters.
Over time, grease, food scraps, and soap scum can also accumulate in kitchen pipes, leading to slow drainage and eventual blockages.
Why Do Sinks Get Blocked?
Today there is a distinct knowledge gap around what should actually be put down a drain.
In kitchens, cooking oil and fat are major blockage culprits and should NEVER be put down any type of drain.
When poured down the sink, they cool and harden inside the pipes, gradually forming a solid blockage. Food particles, coffee grounds, and soap residue also contribute to this and before you know it, the entire drain is blocked!
Bathroom sinks often get blocked due to a mix of hair, soap, and toothpaste, which stick together and restrict water flow. Over time, this buildup can lead to complete obstruction.
Toilet Blockages and What Causes Them
Toilets are designed to handle only human waste and toilet paper. However, many people flush items like baby wipes, sanitary products, cotton pads, and even kitchen roll, which do not break down easily and can cause serious blockages. These items also should NEVER end up anywhere near a drain.
Hard water areas in the UK also face issues with limescale buildup inside toilet pipes, reducing water flow and making blockages more likely. Regular maintenance can help prevent this.
Preventing Drain, Sink, and Toilet Blockages
- Dispose of fats, oils, and grease in the bin instead of pouring them down the sink.
- Use drain strainers to catch food particles and hair before they enter the pipes.
- Avoid flushing anything other than toilet paper down the toilet.
- Regularly clean drains with boiling water or a mild baking soda and vinegar solution.
By taking these simple steps, you can keep your drains clear and avoid costly plumbing repairs.
How to Unblock Sinks, Drains, Toilets and the Likes
Unblocking drains including toilets, showers etc. can be a relatively easy, but still a very dirty job!
The key here, as with 99% of jobs in the building and DIY world, is to have the right tool for the job, it will make everything much easier.
Whilst doing such a job, it’s essential to wear a very good pair of rubber gloves. We will not get started on the volumes of diseases toilets and waste pipes can harbour, but trust us when we say, they are numerous and you do not want any of them, period!

Rubber Gloves
Unblocking Sinks, Baths and Shower Trays
We will start with often the easiest blockage issue to sort, unblocking a sink, bath or shower tray.
Loosening a Blockage
The first thing to do is to try and loosen any blockages. Even if this does not fully remove the blockage, it may start to loosen it and help any other methods you use to work more effectively.
Firstly, mix one third of a cup of vinegar and one third cup of baking soda or half a cup of baking soda and half a cup of salt together and pour down the blocked drain. Leave the first mix for an hour or so and the second mix for 20 minutes or so to get to work and then pour down a litre or so of boiling water.
This may be enough to remove the blockage, if not, it may weaken it a bit.
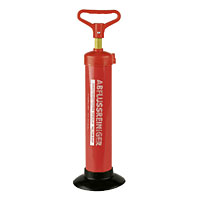
Using a Standard Plunger
Next up is the standard sink plunger that most should be familiar with.
An ordinary plunger can be used by placing it over the offending plug hole, making sure that the edges form a seal around the plug and then it is pushing up and down by pushing down and then pulling up the handle.
By doing so, this creates two forces, one up and one down: compression as you push down and suction as you release.
The idea here is that the blockage is dislodged and then breaks up allowing it to flow down the drain. Some of the plungers available for this that we would recommend are below.
Periodically it’s also a good idea to stop and then run the tap or shower fast to fire some water down the drain toi aid with flushing and also help to use to create additional compression.
Hand Operated Plunger
Using a Power Plunger
For an easier method of unblocking sinks, bath and shower drains you can now use a newer tool known as a power plunger.
This tool (below) tool is simply operared by a "pumped up" mechanism, which is activated by by pumping the handle at the end.
To create teh pressure the end of the plunger is placed over the plug hole and once the handle has been pulled up and down and enough pressure is created in the tank, the trigger is pulled and all the compressed air is released, forcing the blockage down the pipe or breaking it into bits.
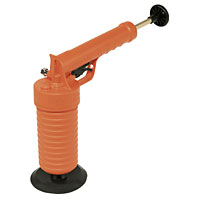
Power Plunger
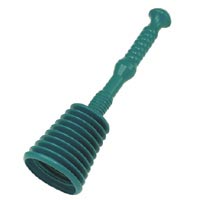
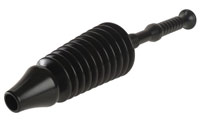
Using a Water Injection Plunger
Our personal favourite at DIY Doctor is the one below, the water injection plunger.
Firstly, put some water in the sink, basin, bath or shower tray and stand the pump in it.
Next, pull up on the handle to fill it with water and then place the plunger end over the blocked plug hole and then push down hard, then pull up again etc etc.
By doing so, the water is pushed at great force through the blockage, and then by sucking up again, the forces explained in the first example with the plunger are put into operation.
If your blockage is within a couple of meters of the plug hole, this extremely effective tool will be sure to clear it.
Water Injection Plunger
Using a Corkscrew Cable
Finally, for sinks, basins, baths and showers, there is the corkscrew cable.
This tool, although effective will only obviously be able to deal with a blockage within the length of the actual cable itself, so within a meter or so of the plug hole.
To use it, the flexible wire is simply pushed into the drain pipe and then wiggled about to break up the blockage, and wound back in. Very simple, very effective.
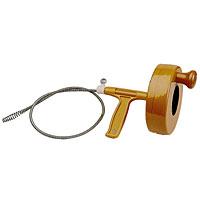
Corkscrew Cable
Unblocking Toilets
The next on the list to deal with in terms of unblocking is the humble toilet. This is where the job can start to get a little trickier, depending on where the blockage is.
1. Wait and See
If the water in the bowl is draining very slowly, but not rising, leave it for a while.
In some cases, minor blockages can dissolve or dislodge on their own without intervention and will simply break up and flow away in time.
2. Use a Plunger
For more major blockages, a toilet plunger is the most effective tool to go for so if the above doesn’t work, this is next up.
Ensure there is enough water in the bowl to cover the plunger’s rubber cup (add some if necessary), then place it over the hole and push down firmly.
Use a strong, steady pumping motion to create the forces mentioned above, suction and compression and dislodge the clog.
After a few attempts, flush to see if the blockage has cleared. If not, repeat the above steps.
However, for blockages which appear to be further down it may be necessary to open the manhole to inspect and clear (see below for more info).
Toilet Plunger
3. Try Hot Water and Washing-Up Liquid
If plunging doesn’t work, this is worth a try.
Pour a generous amount of washing-up liquid into the toilet, followed by a bucket of hot (not boiling) water.
The soap helps break down grease and waste, making it easier for the blockage to move. Let it sit for 10–15 minutes before flushing.
4. Use a Toilet Auger or Drain Snake
For stubborn blockages, a toilet auger (also called a plumber’s snake) can reach deeper into the pipes.
Insert the flexible wire into the toilet and twist the handle to break up or pull out the obstruction.
5. Baking Soda and Vinegar Method
For a natural solution, pour one cup of baking soda into the toilet bowl, followed by two cups of white vinegar.
The mixture will fizz and help break down waste. Wait 30 minutes, then flush with hot water.
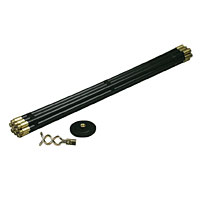
Using Drain Rods to Unblock a Toilet
For stubborn or deep blockages, drain rods can help clear the pipes effectively.
Start by locating the nearest manhole linked to your bathroom’s soil and vent pipe (SVP). It may not be the closest one, so further checks may be needed.
Manholes fall into two categories: surface water drains (which handle rainwater) and foul water drains (which collect waste from sinks, baths, showers, and toilets). Foul water manholes usually have a strong odour, making them easy to identify.
If the blockage allows some water to seep through, you can trace the flow by adding a small amount of dye to the toilet and checking which manhole it reaches.

Drain Dye
Once you’ve identified the correct manhole, you can use drain rods to clear the blockage by rodding back towards the house.
Drain rods are typically one metre long and screw together to extend as needed. They are flexible, allowing easy navigation through the pipe.
Insert the rods into the drain and push them along the pipe until you feel resistance—this indicates the blockage. Gently prod and twist to break it up.
As you screw the rods together, make absolutely sure that you screw each one firmly to the next so that the joint is tight!!
Drain Rod
Drain rods come with different attachments to help clear blockages. Start with just the rod itself, prodding gently to break up common obstructions like toilet paper or nappies. If needed, use a worm screw (included in most sets) to latch onto and remove stubborn debris.
If the blockage is deep or too soft to detect, attach a rubber plunger. Push and pull the rods in a plunging motion to create pressure, helping to dislodge the blockage.
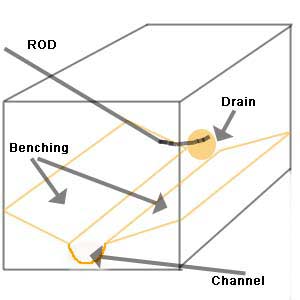
Cross section of drain when viewed through a manhole cover
The diagram above depicts a typical manhole. Manholes are typically brick-built (modern versions use precast concrete rings) and feature a sloped benching floor leading to a half-pipe channel that directs waste flow.
When opening a manhole, carefully lift the manhole cover as they can be very heavy. If the drain is flooded, the entry point may be hidden under water. Use a rod to probe around until you locate the pipe.
Safety Warning: Some manholes are deep and have built-in iron steps for access. However, entering a manhole is extremely dangerous due to potentially overpowering gases. Never go down without someone supervising from above. Even professionals have suffered fatal accidents from toxic fumes.
Clearing a Blocked Soil and Vent Pipe
Sometimes, a blockage is unreachable from the toilet or manhole, meaning it may be inside the soil and vent pipe (SVP).
Many SVPs have access plates, however, open these carefully to avoid spills. Some are boxed in, making access difficult and potentially disruptive.
If you suspect the blockage is in your SVP and can’t clear it yourself, it’s best to call a plumber. These blockages can be messy, and handling them without experience may cause more problems.
Important Tips for Using Drain Rods
Drain rods screw together clockwise, and as you work, they naturally twist in your hands. Always turn them deliberately in a clockwise direction while pushing to prevent them from loosening and coming apart.
If the rods unscrew and detach inside the pipe, they can worsen the blockage, making the situation much harder to fix and ultimately needing you to call the professionals in!
Dealing with a blocked sink, bath, basin, shower, toilet or drain can be an absolute nightmare, however if you have the correct tools for the job and work methodically, it’s certainly something that can be overcome.