How can I change my old low level toilet to a new close coupled toilet without having a 50mm gap behind the cistern with nothing to fix it to. This is a question we have had hundreds and hundreds of times here at DIY Doctor and essentially there are two possible answers, build a frame or move the pipework.
To find out which option is best, read on below.
The Problem With Changing Low Level Toilets to Close Coupled
If you haven’t done much plumbing work before then you may think that a toilet is just a toilet but unfortunately this isn’t the case.
The reason a low level toilet does not often exchange easily for a close coupled unit is because 99% of the time a low level unit has a waste outlet which goes down into the floor.
If your low level unit goes into the floor, in pretty much all cases the floor outlet is always too far away from the wall to allow an easy exchange with a close coupled unit as the cistern of a close coupled unit needs to be screwed to a wall of a solid surface.
If the cistern isn’t solidly mounted and it’s allowed to move then it can very easily leak from the joint between the cistern and the toilet pan.
With low level cisterns, the cistern itself is connected to the toilet pan via a pipe that goes into the back of the pan and this pipe can be any length within reason so it was never that much of a consideration where the waste outlet was installed in the floor.
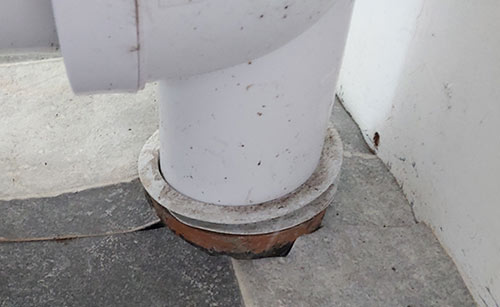
Low level toilet floor waste outlet away from wall
Solutions to Changing Low Level for Close Coupled
When it comes to a solution, as we have mentioned there are 2; You can either dig up the floor or wall and move the waste pipe backwards towards the wall so a close coupled unit can drop straight in or install the toilet where it is and build a solid frame behind the cistern to provide it with full support.
The framework itself can be finished anyway you choose but in most cases the best way is to clad it with ply wood and then either plaster and paint it or you can also tile it.
One point to be aware of though is that if you have pipework or other features running behind this boxing it’s a good idea to provide some sort of easy access to it.
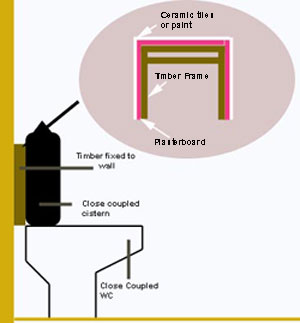
Boxing framework built to support low level toilet cistern
Despite the above, if the low level unit you have has a waste outlet which goes directly through the wall or turns at a right angle out of the back of the toilet to go right or left away from the toilet, then you should have no problem replacing it with a close coupled toilet.
You either move all of the outgoing pipework in your bathroom wall or floor, or you make a simple box which goes on the wall behind the new close coupled cistern. The new cistern is then fixed to this box which can be tiled or painted depending on what mood you are in!
What are Low Level and Close Coupled Toilets
As we have been discussing the different types of toilet above and the problems they produce when changing like-for-like, at this point it’s probably a good idea to familiarise ourselves with each type.
Low Level Toilet
The low level toilet was a refinement of the Victorian high-tank toilet which, as you may guess, featured a high tank set up on the wall (you may have seen these older toilets in some older establishments). The reason for this was that it was found that toilets flushed much better when gravity helped the water enter the bowl.
The principle of this idea was taken and developed and resulted in the cistern being lowered down the wall and positioned just above the rear of the toilet and what was the “high level toilet” had now become the “low level toilet”.
In terms of how a low level toilet works, the cistern is fixed to the wall and features the flush valve and inlet valve. Water is allowed in to the cistern via the inlet valve which shuts off when full. When the toilet is flushed, water from the cistern flows out and down a pipe connected to its base and then into the toilet bowl washing the waste away.
The length of the pipe isn’t fixed so this allows for a fair bit of flexibility in terms of the toilet and waste outlet position.
Although the low level toilet was the toilet of choice for many years, it’s one major drawback was that it uses a lot of water making it not terribly eco-friendly and efficient.
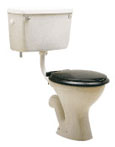
Low level toilet
Close Coupled Toilet
The close coupled toilet is a further refinement of the low level toilet and was developed mainly to solve the water efficiency issues today makes the low level toilet a no-go, unless there’s a very good reason to use one.
Again as the name suggests, the close coupled toilet has the cistern connected on to the top of the toilet pan, unlike the low level where it’s connected via a pipe.
Today the close couple toilet is the most common toilet featured in UK homes as it is much more efficient with its use of water, however many would argue the point that it’s better.

Close Coupled toilet
How to Change a Low Level Toilet for a Close Coupled Toilet
If you still have a low level toilet in your home you might want to consider changing it for a close coupled toilet. In the long run this will certainly help you save on your water bill and it will also be kinder to the environment.
As the most straightforward way to tackle this job is to build a frame and box it in and then mount the cistern to the frame if your waste outlet pipe is not in the correct place, this guide is geared around this solution.
1. Remove the old Low Level Toilet
Before we can do anything the first job is to get rid of the old toilet so firstly turn off the water running to the water supply for the cistern. If there is an isolation valve you can do it here, if no then you will need to turn of your water at the main stopcock.
If you don’t have an isolation valve on your toilet now is a good time to get one installed as it’ll save you a lot of time in the future if you need to remove this toilet again. Find out how to install an isolation valve in our project here.
Once the water supply is isolated, remove this form the cistern. Flush the toilet a few times to empty as much as you can from the cistern.
Unscrew the toilet cistern from the wall and wiggle it so the pipe comes out of the back of the toilet pan. Put everything to one side
Next, unscrew the 2 or so screws that should be holding the toilet to the floor and then pick the toilet up and move it out the way. Be careful when moving it as it’s still full of water.
With everything moved have a good clean up. Sometimes low level toilets are mounted on a cement base. Leave this here for the minute as your new toilet may fit on it. If not you’ll have to remove it using a hammer and bolster
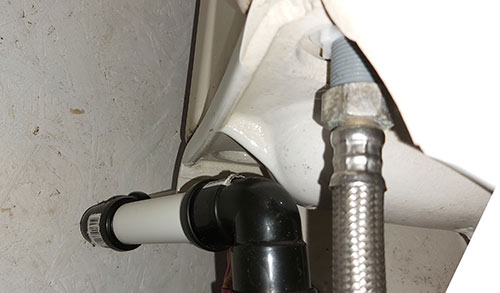
Disconnect water supply from old low level toilet
Position new Toilet in Place and Measure up
To find out exactly where the boxing framework needs to be built and what needs to be done to the floor to ensure the new toilet sits flat and level.
Position the new toilet pan up to the main waste outlet in the floor ensuring that you have the pan connector also connected. Insert the pan connector into the main drain outlet and move the toilet until it’s sitting nicely.
If there is a concrete pad in place and the new toilet sits nicely on it that’s great. Position it on the pad and use a spirit level to check the level across the pan and from front to back and ensure these are both dead level.
If the new toilet does not sit nicely on the pad then you will need to chisel it away. Once removed and all is cleaned up, pop the new toilet back in place and position it as it will eventually sit, with pan connector all connected up.
As above, use a spirit level to get the new toilet pan level. If you’re working on anything other than a concrete floor your floor should be level but if not and the concrete floor you’re working with isn’t, use spacers or shims to get the pan totally level and then make a note of the areas that need to be built up.
Once the new toilet pan is leveled, position the cistern in place where it should sit on the back of the toilet and loosely screw it up (using the cistern through bolts supplied). Once in place get the cistern level also.
Now everything is in place you can get some accurate measurements for your framework. Measure from the wall or surface behind the cistern out to the rear of the cistern at it’s centre and this will tell you exactly how deep the boxing needs to be.
With the lid placed on the cistern, use a spirit level to mark the total height of the cistern by laying it on the cistern lid and extending it back until it touches the wall. Mark the underside and then measure from the mark down to the floor. This is the total height of your boxing.
If you’re working in a narrow space the you’ll probably want to make your boxing full width of the space but if not you can make it as wide as you want but most stick to just a little wider than the cistern itself so take this measurement also.
The final measurements that need to be taken, if needed, are those to get the toilet itself level if the floor is out of level. Measure around the toilet until you find the biggest gap between the toilet base and floor and this will tell you how deep your new concrete pad will need to be.
Before moving the toilet and cistern away take note of the position of the water supply for the cistern. It is likely that this will need extending to reach the toilets new position.
To do this you can use PVC pipe connected with Pushfit connector (find out how to use Pushfit plumbing here) and a flexible tap connector to reach the new location. This will allow a fair bit of flexiblility.
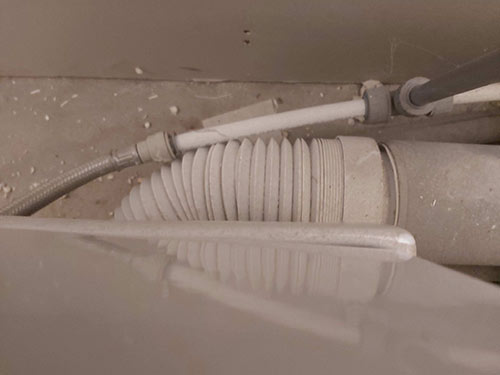
New water supply fixed in place
2. Get New Toilet Level
You will only need to do this step if you need to level your new toilet. If you don’t then move on to the next step.
The best way to get a toilet level that’s sitting on a solid concrete floor is to lay it on a bed of cement.
Mix up some cement (See our mixing cement project here for help) and lay a bed at the point your new toilet is going to sit and then position your toilet in place with the pan connector in place and fitted.
Using a spirit level, level the toilet up both from front to back and side to side and then cut off any excess cement from around the base so the new cement pad is the size of the base of the toilet and then remove the toilet.
Smooth over the top of the pad and check it’s level with a spirit level and then leave it to cure.
3. Construct Framework and Box in
Once any cement had fully dried it’s time to construct the framework for the boxing.
This is a fairly straight forwrad task and basically involves building a timber frame. Ideally you should use 2 x 1 inch timber or 2 x 2 inch timber however you can use larger if you want to.
How you build your frame is totally up to you but in general it’s easier to build out from the back first towards the toilet.
When measuring and cutting, remember to take into account the thickness of the board you are going to use to board over the framework.
For example if you build your frame work to the exact depth out from the wall and then fix board to the front of it, it’s now going to be too deep as it will extend past the edge of the framework.
If you’re going to clad it with 3mm ply wood (ideally you’ll want to use 9mm ply) then you may just get away with it, however it’s still going to push the cistern forward slightly which can lead to leaks with close coupled cisterns, so remember to deduct the thickness of your cladding material from any maximum measurements.
Once you have build the frame and it’s firmly fixed you can then clad it. As we have said above the best material to do this with is 9mm ply wood and this will give a very solid and sturdy finish, however you can use slightly thinner ply wood and also MDF
If you opt for MDF just make sure that you have sealed and painted it correctly. If MDF is exposed to water and moisture too much it will blow and be useless.
Cut your chosen cladding to size and test fit and then final fit. Once in place you can then finish it. Most find it easier to paint it but you can also tile it for a more complete finish.
One point to remember is that if you have pipes and more importantly valves or even a stopcock you’ll want to allow quick access to these so make any screws accessible or better still you can hinge the top and allow it to be opened. It can then be secured using a catch or concealed catch of some kind.
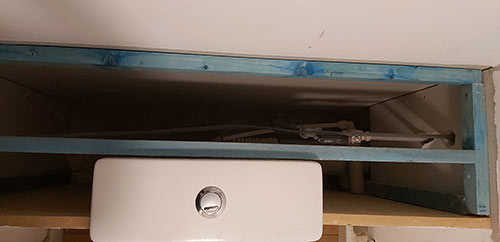
Framework for close coupled toilet
4. Fix Toilet and Cistern in Place
Once all the framework for your boxing in is fixed in place, cladded and painted then the next task is to get the toilet and cistern installed.
Ensure the pan connector is installed on the waste outlet and slide it into the main waste pipe. Make sure it’s sitting securely in the drain. Position the toilet correctly on its concrete pad and mark the fixing holes. Remove the toilet, drill out the holes and insert wall plug, put the toilet back and screw it to the floor using the fixings provided. Make sure it’s level.
Next, place the large doughnut washer in it’s recess on the back of the pan and then put the cistern in place. Screw it up using the through bolts, making sure the rubber bungs are in place in the base of the cistern to prevent leaks. Again check it’s level and adjust if not.
Finally screw the cistern to the boxing in framework through the holes in the rear.
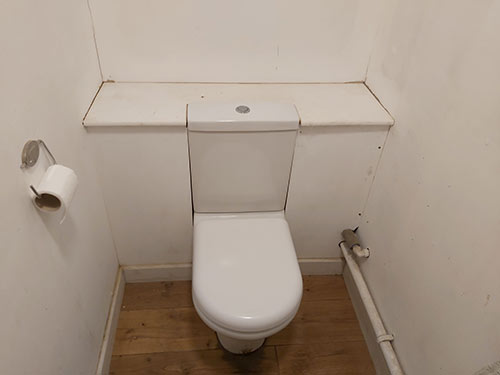
Toilet and cistern fixed in place and secured to boxing framework
5. Turn on Water and Test
With the new close could toilet and cistern now fixed in place in your boxing in framework the final job to do now is to reconnect the water supply to the cistern.
Screw the tap connector to the inlet valve on the base of the cistern until it’s finger tight and then pinch it up using the correct sized spanner or adjustable wrench.
Once connected up turn the water back on and check for any leaks.
As soon as the cistern is full flush the toilet and make sure all is working as it should be and if so, good work!
Replacing and old low level toilet with a new close coupled cistern may seem like a very daunting task to begin with if you’ve never undertaken such a job but if you work methodically and take your time it’s one that anyone can do.

