Flooding in your home can cause severe damage, affecting carpets, furniture, and even the structure itself, including walls, floors (timber or concrete), and bricks. Proper handling in the event of a flood is crucial to prevent long-term issues.
It’s also worthy to note that there are numerous different types of floods and not all are mass-scale natural disasters that devastate entire areas, some are as simple as a burst pipe or leaking washing machine, so not all of the below pointers are going to be relevant so please bear this in mind.
Follow these steps to effectively deal with flood damage and protect your home from lasting harm.
What Are the Main Types of Flooding?
In the UK, flooding can happen in several ways, often with little warning. Understanding the main types of flooding can help you prepare, respond quickly and protect your home and community from serious water damage.
River Flooding (Fluvial)
This occurs when rivers or streams overflow due to heavy or prolonged rainfall or melting snow. When water levels rise above the riverbanks, it spills onto nearby land. River flooding is common near natural watercourses and often affects low-lying rural areas and towns close to rivers.
Surface Water Flooding (Pluvial)
This type of flooding happens when rain falls too quickly for the ground or drains to absorb. It’s common in urban areas where hard surfaces like roads and pavements prevent water from soaking away. Surface water flooding can cause localised but severe damage, even far from rivers or coastlines.
Groundwater Flooding
Groundwater flooding happens when the water table rises above ground level, often after prolonged periods of rain. It usually affects areas with a high water table or porous soil and it can take weeks or months to clear, making it especially disruptive for homes and businesses.
Coastal Flooding
Coastal flooding is caused by high tides, strong winds or storm surges pushing seawater inland. It mostly affects seaside towns and low-lying coastal regions. As sea levels continue to rise, coastal flooding is becoming a growing concern for many parts of the UK.
Sewer Flooding
This occurs when the sewer system becomes overwhelmed by heavy rain or blocked pipes, causing foul water to back up into streets, gardens or homes. It’s often linked with surface water flooding and can pose serious health risks due to contaminated water.
Do Insurance Companies Cover Flooding?
Yes, most UK home insurance policies do cover flooding, but the type and level of cover can vary depending on your provider and where you live.
Flooding is usually included under the buildings insurance part of your policy, which covers structural damage to walls, floors and foundations. If you also have contents insurance, it should cover damage to your belongings such as furniture, carpets and electronics.
However, not all flooding is treated the same. Insurers usually distinguish between different sources of flooding, such as heavy rain, rising groundwater, burst pipes or sewage backups. It’s important to check the policy wording carefully to understand what’s included and whether there are any exclusions or conditions.
If you live in a known high-risk flood area, your insurance might come with a higher premium, a larger excess (the amount you pay towards a claim), or even limited cover. In these cases, the Flood Re scheme may help. This government-backed programme works with insurers to make flood cover more affordable for UK homeowners in high-risk areas.
To avoid problems when making a claim, make sure you:
- Know what your policy does and doesn’t cover
- Keep evidence of your belongings (photos, receipts, valuations)
- Notify your insurer immediately after a flood event
What are the Main Signs Before a Flood?
Floods can happen quickly, but there are often warning signs that give you time to prepare and protect your home. Recognising these early signs can make a big difference in minimising damage and staying safe.
If you live in an area prone to flooding then you should be familiar with the tell-tale signs of an impending flood and if so, it’s time to get prepared.
Heavy and Persistent Rainfall
One of the clearest signs that flooding might occur is prolonged, intense rainfall. If it’s been raining heavily for several hours or days, especially during winter or early spring, there’s a higher risk of rivers, streams, and drains becoming overwhelmed.
Rising Water Levels
If you live near a river, stream, or coastal area, keep an eye on water levels. A fast or unusual rise in the waterline is a strong indicator of potential flooding. You can also monitor nearby flood gauges or use the UK Government’s flood warning service for real-time updates.
Drains Backing Up or Overflowing
Water backing up from street drains or gurgling noises in sinks, toilets, or plugholes can be an early warning of localised flooding. Blocked drainage systems can cause water to flow back into homes and streets.
Flood Alerts and Warnings
The Environment Agency issues flood alerts and flood warnings for at-risk areas in England, Scotland, and Wales. Signing up for free text or email alerts can help you act early. A flood alert means to be prepared, while a flood warning means you need to take action immediately.
Saturated Ground and Pooled Surface Water
If the ground is already saturated and puddles are forming in places where water doesn’t normally collect, this could be an early sign that the land can no longer absorb water, increasing the risk of surface water flooding.
What to Do Before a Flood – Preparation Guide
If you live in a flood-prone area and a warning has been issued, acting early can protect your home, belongings and loved ones. Below is a simple checklist to help reduce flood damage and stay safe. Only carry out these steps if it’s safe to do so.
- Move vehicles to higher ground to avoid water damage.
- Know your local evacuation plan and where nearby shelters are.
- Create a family evacuation plan including meeting points and contact info.
- Relocate pets to a safe place where they’ll be secure and cared for.
- Store valuables and documents in waterproof bags and move them upstairs or offsite.
- Raise furniture to higher levels or place on blocks to avoid water damage.
- Clear drains and gutters to help water flow away from your property.
- Pack essentials such as warm clothes, bottled water, food, medication and torches.
- Ensure clear exit routes in and out of your home, free from obstructions.
- Stay informed through local radio, weather apps, news websites, and social media.
- Charge mobile phones and power banks in case of power cuts.
- Be ready to leave quickly if conditions worsen.
- Keep insurance documents and utility contact info close at hand.
- Contact your local council for updates on emergency plans or flood support.
- If renting, notify your landlord immediately so they can take action.
- Use sandbags or flood barriers to block doors, air bricks, and low openings.
- Consider self-activating flood bags for long-term protection, these expand on contact with water and store flat when dry.
Planning ahead gives you the best chance of staying safe and minimising damage. Don’t wait until water arrives—prepare as early as possible.
What to Do First in the Event of a Flood?
If your home is at risk of flooding or has already been affected, acting fast can protect lives and reduce damage. The steps below cover the most important actions to take immediately. Follow them carefully and only if it’s safe to do so.
- 1. Prioritise Safety: Move yourself, your family and pets to higher ground straight away. If emergency services advise evacuation, do so without delay.
- 2. Turn Off Utilities: If floodwater hasn’t yet entered your home and it’s safe, switch off the gas, electricity and water at the mains. If water is already present, avoid touching any electrical equipment and call your utility providers for help.
- 3. Call Emergency Services: If you’re in danger or trapped, dial 999. You can also call Floodline on 0345 988 1188 for real-time advice and local flood support.
- 4. Stay Out of Floodwater: Floodwater can be dangerous, contaminated with sewage, chemicals or possibly electrified. Avoid wading through it unless absolutely necessary, and only if it’s been confirmed safe.
- 5. Notify Your Insurance Provider: Once you’re safe, contact your home insurance company as soon as possible. Report the flood and begin the claims process.
- 6. Record the Damage: When safe to re-enter, take clear photos and videos of all damage, both inside and out. Mark the water level on walls and don’t move anything until documented. This will help with any insurance claims and restoration planning.
Responding quickly in the first hours of a flood is crucial. Always put the safety of your family and yourself first, then begin protecting your home and documenting the damage for recovery.
Who to Contact After You’ve Been Flooded?
Dealing with a flood in your home can be overwhelming, but knowing who to contact first can make recovery quicker and safer. Here’s a clear step-by-step guide for UK homeowners on who to call after a flood.
Emergency Services – 999
If there’s an immediate risk to life or safety, such as rising water, structural damage, or live electricity, call 999 straight away. Fire and Rescue teams can help evacuate people and make the area safe.
Your Home Insurance Provider
Contact your insurer as soon as it’s safe. Most home insurance policies in the UK cover flood damage. They’ll explain how to make a claim, arrange for an assessor to inspect your home, and start the process of replacing damaged belongings. Take clear photos of all damage before cleaning or throwing anything away.
Your Landlord
If you live in a rented property then as soon as you have spoken to the emergency services, you should then call your landlord to inform them of what’s happened, as in most cases it will be them who holds the buildings insurance and they will need to inform their insurers and relevant people.
Local Council or Authority
Your local council may offer emergency housing, clean-up services or welfare support. Visit your council’s website or call their emergency helpline for help with temporary accommodation or environmental health advice, especially if sewage is involved.
Utility Providers
Flooding can damage gas, electricity and water supplies. Contact your utility companies to report any issues or shutoffs. If you smell gas, call the National Gas Emergency Service on 0800 111 999. Never switch electrics back on until checked by a qualified electrician.
Floodline – 0345 988 1188
Call Floodline, operated by the Environment Agency, for live flood updates and guidance. They’re available 24/7. You can also sign up for free flood alerts at gov.uk.
Entering Your Property After a Flood
After a flood, it’s natural to want to rescue belongings and start cleaning. But entering your home too soon can be dangerous. Only return once emergency services have confirmed it’s safe and all utilities, electricity, gas and water, have been switched off at the source.
Follow these essential steps before and during re-entry:
- Wait for Approval: Only enter once emergency services have declared the property safe.
- Check Utilities: Confirm with utility companies that power, gas and water are fully shut off.
- Ask for Help: If possible, ask the fire service to remove standing water, only if the flooding source is fixed.
- Dress Safely: Wear protective clothing like waterproof boots and old clothes to avoid contamination.
- Mark the Flood Level: Use a marker or tape to show how high the water reached on interior walls.
- Take Photos and Videos: Document all visible damage inside and out. This will be vital for insurance claims.
- Protect What’s Left: Move any salvageable items to an upper floor or dry area to avoid further damage.
- Rescue Essentials: Secure important documents (e.g., passports, property deeds), valuables, clothing and hygiene items.
- Don’t Drink Tap Water: Wait for official confirmation that the supply is safe—floods can contaminate water with sewage or chemicals.
Taking careful, documented steps when re-entering your home helps protect your safety, speeds up insurance claims, and ensures nothing important is missed.
What to Do After a Flood – Repairing Damage
Once you’re safe, the utilities are off and your insurer is informed, it’s time to start flood recovery. Cleaning, drying, and repairing your home is a big task, but following the right steps helps avoid long-term damage.
- Clear Air Bricks & Drains: Rinse out debris with clean water. If sewage is present, disinfect all affected surfaces thoroughly, this may need repeating.
- Dry Out the Property: Use large fans and hire dehumidifiers. Close windows and doors in damp areas. Keep them running until moisture levels drop below 60%.
- Track Progress: Measure how much water your dehumidifier collects. Less water each day means drying is working, unfortunately this process can take weeks.
- Disinfect Surfaces: Clean all walls and floors with a sterilising solution to remove bacteria and viruses left by floodwater or sewage.
- Check for Hidden Damp: Use a damp meter to test wood and walls. Aim for below 18% in timber and 2% in masonry. Be aware of false readings from salts, see our guide on efflorescence.
- Don’t Redecorate Too Soon: Only redecorate when walls and floors are fully dry. If not, speak to a specialist before sealing damp with tanking products.
- Replastering Walls: Use a sand and cement render with salt-inhibitor and waterproof additive like Renderproof. All damp plaster must be removed first. Learn more here in our damp plater project.
- Alternative to Replastering: For older properties, consider plastic membrane systems. These create a dry surface, add insulation, and prevent future damp problems. Use a salt neutraliser before applying.
- Protect Woodwork: Once dry, treat timber with a fungicide and wood preserver. Check for dry rot with test sticks—if positive, treat right away. More about dry rot.
- Repair Damaged Timber: Don’t always replace – damaged beams or joists can be cut and repaired using timber resin splice kits. See how in our repairing structural joists project.
- Prevent Mould: Keep humidity under 60%. Use a damp meter or hygrometer regularly to check.
- Timber Floor Recovery: Lift boards to clean beneath and clear air bricks. Run dehumidifiers with some boards removed, but cover vents to target the space effectively.
- Monitor Condensation: After repairs, use condensation strips on cold walls, they’ll change colour if moisture builds up again.
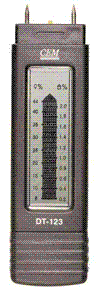
Damp meters check moisture in walls and floors

Hygrometers show humidity in the air

Mesh Membranes – fast drying surfaces for plaster or boarding

Air Gap Membranes – seal salty or damp walls before finishing
Restoring your home after a flood takes time and care. Following each step properly helps protect your property and health and ensures your repair work lasts.
Dealing with a major flood is incredibly stressful, but by following the steps above, you can take control, reduce damage, and speed up recovery. Stay safe, stay informed and use our guide to make the clean-up process as smooth as possible.