Damp and structural timber are a bad mix. Whether it’s floor joists, roof trusses, door or window frames, prolonged moisture can lead to serious problems.
This guide explains the key threats: how wet rot starts, the deeper damage caused by dry rot and how wood-boring insects like woodworm can weaken your home’s timber. Learn how to spot the signs and take action before it’s too late.
How Do Structural Timbers Become Damaged?
Structural timbers in your home, such as joists, beams, rafters and lintels, can become damaged over time due to a mix of moisture, poor ventilation and pests. These timbers are essential for supporting your property, so any damage can quickly become a serious issue if not dealt with properly.
The most common cause of timber damage is damp. When wood is exposed to long-term moisture from leaks, rising damp, condensation or flooding, it creates the perfect environment for decay. Damp timber can soften, warp, or rot, weakening its ability to bear loads. If left untreated, this leads to structural failure.
Wet rot thrives in consistently damp wood, breaking down the fibres and causing the timber to become spongy or crumbly. Dry rot, which is more aggressive, can spread rapidly through walls and floors, even affecting nearby dry timber. Both can go unnoticed behind walls or under floors until the damage is severe.
Insect attack is another major risk. Wood-boring beetles like woodworm lay eggs inside damp or untreated timber. The larvae then tunnel through the wood, weakening it from within. Over time, this can seriously compromise structural integrity, especially in older or poorly ventilated homes.
Timber damage often starts small, a minor leak or poor airflow, but escalates without early intervention. Regular inspections, especially in lofts, basements, and under floorboards, are key to catching problems early. If you suspect damage, it’s always best to get advice from a qualified surveyor or timber specialist.
What is the Process of Structural Timber Repair?
Repairing damaged structural timber is a step-by-step process that focuses on restoring the strength and stability of a building. Whether you’re dealing with rot, insect attack or general wear and tear, the goal is always the same: make the structure safe and sound again without unnecessary replacement.
1. Identify the cause: Before any repair work begins, it’s essential to find and fix the source of damage, usually damp, leaks, poor ventilation or insect infestation. If this isn’t resolved, any repair will be temporary. A full damp or timber survey by a qualified specialist is often recommended.
2. Assess the damage: Next, the affected timber is inspected to understand how deep or widespread the issue is. In some cases, only a small section needs repair. In others, large spans or connecting elements may be compromised and require structural support during work.
3. Remove or treat affected areas: If timber is rotten or infested, the damaged sections are either cut away or treated with specialist solutions like fungicides or insecticides. Sound wood is left in place if it’s still structurally safe. Dry rot and woodworm, for example, need thorough chemical treatment to prevent return.
4. Reinforce or replace: Once treated, new timber can be spliced in to replace what was removed. A method known as timber resin splicing is often used, allowing damaged joists or beams to be partly retained. New sections are bonded using high-strength resin and steel rods, creating a solid, lasting repair.
5. Finishing and protection: After structural repairs are completed, the area is re-sealed and protected. Timbers may be treated with preservatives, and ventilation may be improved to prevent future problems. Plastering or boarding can then be redone as needed, but only once moisture levels are fully under control.
What are the Main Types of Timber Damage?
Most timber damage inside a home is caused by damp. The three main types are wet rot, dry rot, and insect attack.
When timber reaches a moisture content of over 18%, often due to leaks, condensation, or rising damp, it becomes vulnerable. At this level, nearly one-fifth of the timber is holding water, which creates ideal conditions for decay and infestation.
To prevent serious damage, inspect timber regularly, especially around roof spaces, floor joists, windows and door frames. Tackling moisture early is the key to avoiding costly structural problems.
Wet Rot
Wet rot occurs when timber absorbs excess moisture, typically over 18%, often due to leaks or poor ventilation. This damp environment allows fungi, mainly Coniophora Puteana and Poria Vaillantii, to grow. These fungi break down the wood, making it soft, spongy and weak.
The first sign is often a bouncy or springy floor, especially on ground levels. Wet rot commonly affects floor joists, skirting boards, window sills and roof timbers.
- Unprotected timber exposed to leaking roofs or water ingress
- Poor ventilation causing condensation, especially in floor voids and roof spaces
- Leaking pipes, washing machine hoses, or waste outlets soaking nearby timber
- Rising damp spreading into floor slabs, skirtings, and unpainted timber surfaces
For detailed advice on how to spot, treat, and prevent wet rot, visit our Wet Rot and Dry Rot Identification Guide.
Dry Rot
Dry rot, caused by the fungus Serpula Lacrymans, starts in damp timber and spreads aggressively. It feeds on moisture in the wood, weakening it from the inside out.
Unlike wet rot, dry rot can travel across plaster, brick, and masonry to reach new timber. If left untreated, it can spread rapidly and cause severe structural damage throughout a property.
Dry rot often forms due to the same damp issues that cause wet rot, such as leaks, poor ventilation or rising damp, but its spores spread through the air and form thread-like strands (called hyphae) that resemble dense cobwebs.
Common signs of dry rot include:
- Large mushroom-like growths on timber
- Deep, square-shaped cracks and timber “cubing”
- Orange or rust-coloured spore dust near affected areas
- Thick, cobweb-style strands running across surfaces
To learn more about spotting and treating dry rot, visit our full Dry Rot Guide.
Insect Attack
Damp timber attracts wood-boring insects like woodworm, especially species such as the Death Watch Beetle (Xestobium Rufovillosum) and woodboring weevils (Pentarthrum Huttoni and Euophryum Confine).
These insects prefer moist wood and often target areas already affected by fungal growth. Their activity is usually localised but can still weaken timber significantly if left untreated.
Infestations can begin even before the timber is used in construction, in the growing tree or in timber yards where damp, poorly ventilated conditions allow moisture to build up.
Common signs of woodworm include tiny round exit holes, usually between 1mm and 1.5mm wide, left by emerging beetles.
For detailed advice on how to spot and treat woodworm, visit our full Woodworm Guide.
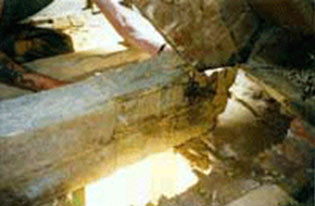
Joist damaged by damp – Wet timber invites problems from fungi and insects
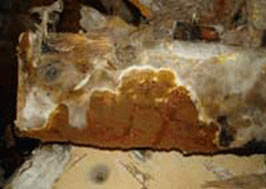
Damage to brick caused by dry rot soaking up moisture as it travels across
What Different Methods are There for Structural Timber Repair?
There are several effective methods used to repair structural timber, depending on the extent of the damage and the location of the timber.
In many cases, repair is more cost-effective and less disruptive than full replacement, especially in older UK homes where access and preservation are key concerns.
Despite the various different methods, the main 3 repair methods are:
- Timber splicing and resin repair
- Timber reinforcement
- Protective treatments (used in conjunction with the above)
In some cases, plastic membrane systems or cavity drain membranes are used alongside repairs to isolate timber from damp masonry. These systems are ideal for basement conversions or properties prone to rising damp.
Each method should be carefully chosen based on expert assessment. DIY solutions may be suitable for minor issues, but when structural repairs are needed, always consult a qualified damp or timber specialist to ensure the long-term safety of your home. Additionally, there is also plenty of help over at the visit the PCA (Property Care Association) website.
You may also want to check out the following projects we have:
- Roof and tile repair
- chimney and flashing repair
- Condensation causes and repair
- Damp proof course repair and replacement
How to Repair Structural Timbers
After looking at all the potential ways that structural timbers can become damaged and what can cause that damage, it’s now time to take a good look at exactly how to repair the damage that results.
Repairing Joist Ends
Joist ends often suffer from damp as they sit close to support walls, where they can easily absorb moisture from wet soil, leaks or humid conditions.
Common causes include broken roof tiles, blocked gutters, or water running over wall tops. Wall plates nearby may also be affected.
Without proper ventilation, trapped moisture can’t escape, leading to fungal decay over time. So, any repair must also address airflow also. Check air bricks or vents to improve ventilation (see our guide to air bricks and vents).
One of the simplest ways to fix damaged joist ends is by using joist repair plates. These metal ‘L’ shaped brackets come in pairs with screws and clear fitting instructions.
They allow you to securely remove damaged sections and then use a new, solid piece of timber to extend the joist back onto its original support, restoring strength without needing a full replacement.
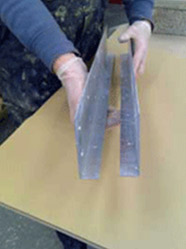
A pair of joist repair plates
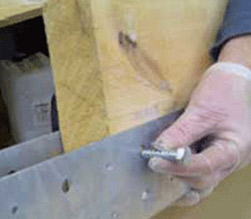
Joist repair plates are bolted to the sides of damaged joists
Joist repair plates fixed to timbers
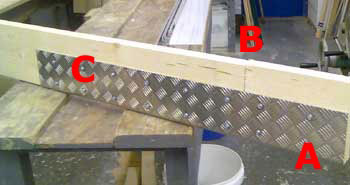
Treating Joist Ends
Before fitting a joist repair plate, apply a high-quality timber treatment to the cut joist end (A) and its support area. This helps protect against any future rot and fungal damage and a repeat of this issue.
Place a strip of damp-proof course (DPC) plastic beneath the joist to stop moisture rising from the wall into the timber. For best results, use pre-treated timber to add extra protection from the start.
How to Position, Fix and Align Joist Plates
To repair a joist end, first support the floor or ceiling above using Acrow props—just as you would when creating an opening in a load-bearing wall.
Next, cut away the damaged section and replace it with a new timber piece (A above). Position a joist repair plate on each side of the joist, ensuring the end of the plate rests on the support, not the timber.
Secure the plates to the timber using bolts. For strength, the plate extending along the original joist (C above) should be at least twice the length of the new replacement section (A above), creating a solid and lasting repair.
Repairing Carrier and Support Beams
Carrier or support beams are larger than standard joists, so typical joist repair plates usually won’t work. In older UK homes or barn conversions, these beams are often solid timber rather than modern steel RSJs, and may require conservation-friendly repairs.
If the beam is larger than 250mm x 50mm (10 x 2 inches), a Timber-Resin Splice is usually the best repair method. These kits include a replacement timber section (D above), high-tensile zinc-plated steel rods (E above), and structural resin.
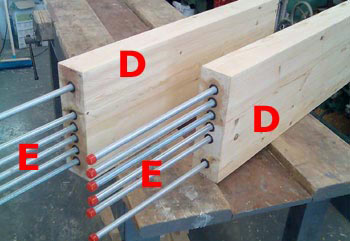
Using resin-bonded rods to strengthen timber beams
Start by supporting the load above to relieve pressure on the beam. Cut away the damaged timber until only solid, unaffected wood remains. Then cut a slot into the top of the existing beam, slightly longer than the bars in the new splice piece.
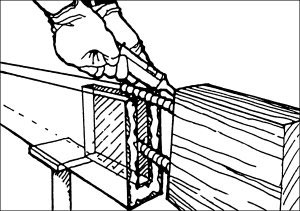
Slot in existing beam for inserting high-tensile rods
Insert the new splice timber, with the metal rods fitting neatly into the slot. Pour in the resin provided to securely bond the rods. Once cured, the splice becomes part of the original beam and can be supported again as normal, retaining much or all of the original features.
Treating Carrier Beams and Wall Plates
Carrier beams and wall plates often sit on brick or blockwork, making them vulnerable to rising moisture, fungal growth and wood-boring insect attack.
To prevent decay in these areas, all contact timbers must be treated thoroughly with a high-quality wood preservative such as Cuprinol 5 Star or Everbuild Lumberjack. Follow the manufacturer’s instructions carefully to ensure full protection.
For new installations, always use pre-treated timber. Applying extra coats of wood treatment on-site as this adds an extra layer of defence against damp and insect damage.
Ensuring Proper Airflow to Prevent Damp
Air bricks are essential for ventilating roof spaces and suspended floors, helping to prevent damp and moisture build-up in your home that can cause most or all of the above issues.
For effective airflow, install at least one air brick every 2.25 metres along external walls. Make sure the ground level outside is well below the bricks to avoid blocking ventilation.
Keep all air bricks free from obstructions like soil, paving or tarmac to maintain proper airflow and reduce the risk of damp issues.
The though of having to repair a roof timber due to rot or damage can be extremely daunting, with effectively the weight of the roof of your home that could potentially come crashing down, however today there are a great many modern products and techniques that can be used to make such tasks much more manageable and also, cost effective.