Dealing with garden waste can be frustrating and time-consuming, especially with long queues at the tip on weekends. Many local councils now charge for garden waste collection, adding extra costs to your maintenance routine.
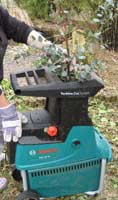
Investing in a garden shredder or chipper is a smart solution to this as it saves time, reduces disposal costs, and efficiently handles waste from trees, grasses, or bamboo like the ones shown in the photo. Transform garden rubbish into useful mulch or compost with ease!
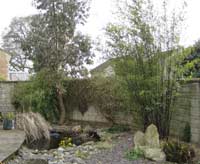
Garden shredder or chipper can be useful in a garden like this
What is a Garden Chipper Shredder?
A garden chipper shredder is a machine designed to break down garden waste into smaller, more manageable pieces. It typically features a powerful motor or sometimes a petrol engine and uses a combination of blades and hammers to shred, chop, or grind any material that’s fed into it.
Depending on the type of chipper/shredder you have, it will feature either one or both of the below features:
- Chipper: This part handles tougher materials like branches, breaking them into small wood chips.
- Shredder: The shredder focuses on softer materials, such as leaves and twigs, reducing them to fine mulch.
By converting yard waste into mulch or wood chips, a chipper shredder helps with waste management and produces materials that can nourish your garden when used as compost or can be also used as a decorative covering around plants and other areas.
As with many things, especially power tools, you do get what you pay for in terms of capability and also features.
Generally, the smaller, cheaper chippers/shredders are only really any good for dealing with small items such as leaves, small twigs and the likes, whereas the larger more industrial shredders can deal with much larger items, even some medium sized branches.
With this in mind, if you are looking to buy a shredder, always go for the version that can cope with the material you are looking to chip or shred.
Different Types of Garden Chippers and Shredders
So that you know exactly what type of garden chipper/shredder will fulfil your needs, it’s essential to look at all the different types, here follows the most common varieties:
Electric Garden Chippers and Shredders
Electric models are perfect for smaller gardens or light-duty tasks. They are compact, easy to use, and quieter than gas-powered alternatives, making them ideal for residential areas.
In terms of what jobs this version can handle, it suits homeowners with small to medium-sized gardens looking for a low-maintenance, eco-friendly option
Key Features:
- Powered by electricity, requiring a nearby power outlet.
- Best suited for branches up to 1.5 inches in diameter and soft materials like leaves.
- Lightweight and easy to store, often equipped with wheels for portability.
Petrol-Powered Garden Chippers and Shredders
Petrol-powered chippers and shredders are built for much more heavy-duty tasks and larger gardens. These robust machines can handle substantially thicker branches and tougher garden debris.
As for what these machines are most suited to, they’re best for larger properties or frequent use, especially where dealing with thicker branches and high volumes of garden waste is common.
Key Features:
- Operates on gasoline, offering greater power and mobility.
- Handles branches up to 3 inches in diameter, as well as tough, woody materials.
- Typically larger and noisier than electric models.
Combination Chipper Shredders
Combination chipper shredders offer the best of both worlds by allowing the user to process both hard and soft garden waste easily and efficiently.
These suit gardeners who need a versatile tool for a variety of garden waste. Again, there are several different grades, some smaller for infrequent, lighter use and others more heavy-duty for regular, more industrial use.
Key Features:
- Includes separate chutes for chipping branches and shredding leaves or softer materials.
- Versatile, capable of producing both wood chips and fine mulch.
- Available in both electric and petrol-powered versions.
Drum (or Silent) Shredders
Drum shredders, often referred to as “silent shredders” (although they are not quite silent), are designed for quieter operation, making them ideal for noise-sensitive areas.
These are ideal for general gardening use, especially in and around built-up areas.
Key Features:
- Uses a rotating drum mechanism to crush rather than chop materials.
- Quiet operation compared to traditional blade-based shredders.
- Best for woody branches but less effective for soft, leafy waste.
Impact (or Rapid) Shredders
Impact shredders are high-speed machines that use extremely sharp blades to cut through materials quickly and easily. They are great for processing soft and leafy garden waste.
These machines tend to ne on the cheaper end of the spectrum and are ideally suited to small gardens with lots of leafy or soft green waste.
Key Features:
- Lightweight and efficient for smaller jobs.
- Handles leaves, hedge trimmings, and thin branches with ease.
- Requires frequent blade maintenance to ensure consistent performance.
What can You Shred in a Garden Shredder?
When it come to what you can actually shed in a chipper or shredder, again it depends on its size and capability, but generally you can work with the following materials:
- Branches and Twigs: Depending on the size and capabilities of the machine you are using
- Leaves and Foliage: All machines should be able to cope with these items
- Hedge Trimmings: Again, most machines should be able to cope with these, but depends on the size of branches in the mix
- Vegetable Garden Waste: Should be fine for all machines
- Soft Garden Waste: Again, most machines should cope with this
What to Avoid Shredding
While garden shredders are highly efficient, there are some materials you should avoid putting into the machine:
- Stones or Dirt: These can damage the blades.
- Plastic, Metal, or Non-Organic Materials: Only organic garden waste should go into a shredder.
- Treated Wood or Diseased Plants: These can harm the environment or spread diseases when composted.
Benefits of a Chipper/Shredder?
Owning a garden chipper shredder comes with several practical advantages for both time and cost saving:
- Time Savings: Breaking down branches and leaves manually can take hours. A chipper shredder makes the process quick and efficient.
- Eco-Friendly Disposal: Rather than burning or bagging up waste, you can recycle it into nutrient-rich mulch for your garden.
- Cost Efficiency: If you pay for yard waste removal, a chipper shredder can save you money by reducing the volume of waste significantly.
- Improved Garden Health: Mulch retains soil moisture, prevents weed growth, and enhances soil nutrients over time.
How to Choose the Right Chipper Shredder
When shopping for a garden chipper shredder, you will need to consider the following key factors:
- Power Source: Choose between electric and petrol-powered models. Electric models are quieter and suitable for small to medium-sized gardens, while petrol-powered options are better for larger yards and larger, more substantial materials.
- Capacity: Check the maximum branch size the machine can handle. Some larger models can handle branches up to 3 inches in diameter.
- Portability: Look for a model with wheels and a lightweight frame for easier manoeuvring.
- Safety Features: Ensure it includes features like a hopper lock, overload protection, and a push stick to prevent accidents.
Parts of a Garden Chipper/Shredder
In order to understand how to use a chipper shredder effectively it’s essential that you know which part of your machine is being referred to, so here follows a detailed list of all the core components:
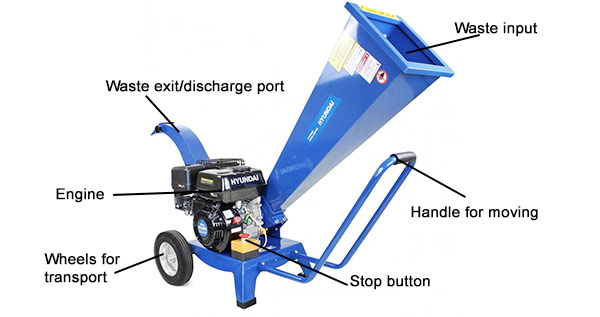
Parts of a mid-range garden chipper/shredder
- Waste input: The waste to be shredded is pushed in here to be shredded by the rotating blades at the base
- Waste exit/discharge port: All shredded waste is then blown out of discharge port
- Engine: Either petrol or electric, this is what powers the machine
- Wheels for transport: Due to their size and weight (even smaller versions), wheels are often featured to allow easy transport
- Handle for moving: This makes moving and positioning the machine easy and hassle free
- Stop button: Due to their potential danger, all shredders feature a large, easily accessible stop button
Step-by-Step Guide to Using a Garden Chipper Shredder
As we have now looked at the different types of shredders, what can be processed using these tools and any other important aspects it’s now time to go through the steps involved in actually using them.
Step 1: Prepare Your Work Area
The very first job to do is to setup your work area.
Start by choosing a safe location work. It should be flat and free of obstructions away from pets, kids and any high foot traffic. Set the machine up here according to the manufacturers instructions.
Next, clear the surroundings of any obstacles, tools, or debris that may get in the way.
Finally, gather your materials and then organize your garden waste into separate piles of branches, twigs, and leaves for easier processing.
Once all sorted, if your machine doesn’t have a waste catchment box, setup a bag (dumpy bag is ideal) under the discharge port to catch all the waste, this makes clean-up much easier.
Step 2: Inspect and Set Up the Machine
Due o the danger that these machines pose, safety is of paramount importance, so next check the machine and all of your equipment over thoroughly.
If you haven’t done so yet, read the manual that came with the machine and familiarize yourself with the manufacturer’s instructions for your specific model and any features it may have.
Once again, inspect the machine and ensure the blades are sharp, the hopper/feed shute is secure, and all parts are properly assembled and ready for use.
Now, power up your machine. For electric models, plug into a suitable outdoor socket (this must be RCD protected!).
For petrol-powered shredders, check the fuel level and oil levels before starting and then fire it up, ensuing it’s running smoothly.
Step 3: Wear Safety Gear
As we have already mentioned, but need to again due to the potential dangers, these machines can be very dangerous, even lethal if not used correctly, so the correct protective gear must be worn at all times, no exceptions! These include:
- Safety Goggles: Shield your eyes from flying debris.
- Ear Protection: Reduce noise exposure, especially with gas-powered models.
- Gloves: Wear sturdy, non-slip gloves for safe handling.
- Decent Work Boots: Ensure your feet are fully covered to avoid accidents.
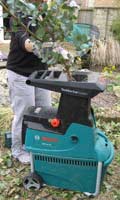
Step 4: Start Shredding
Once everything is set, you’re ready to start shredding!/p>
As we have covered above, high-quality models handle wood and leaves with ease, while cheaper ones may clog on leaves, requiring frequent clearing.
Although clearing blockages is simple, it’s time-consuming as the machine needs to be fully shut down and the the motor’s safety housing must be removed. A safety cut-out switch prevents the motor from running when the cover is off.
Never put your hands into the shredder
Once the material has been inserted, the shredder’s motor automatically pulls it into the blades, chopping and shredding as it goes.
Leaves and waste are munched up with powerful chippers
For safety, most models include a large STOP switch to quickly halt the machine if needed, such as when clothing gets caught on a branch.
Avoid and overloading and feed materials steadily to prevent clogs or to put too much strain on the motor.
To stay safe, ALWAYS use a push stick to safely guide smaller pieces into the hopper.
Feed end into the shredder and the motor does the rest
Keep working slowly and carefully, repeating the above steps until you have cleared all the waste material.
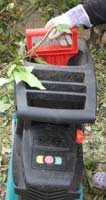
Step 5: Collect the Shredded Material
As we have commented above, most garden chipper shredders come with an output and possibly a waste collection box, but if not, use a suitable garden waste sack or dumpy bag.
Once you’re done, the processed material can be used immediately as mulch or added to your compost pile.
If you are using a separate collection bag, empty the bag regularly to avoid overfilling.
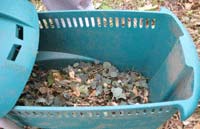
Shredder waste baskets keep the job tidy
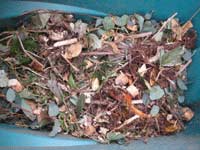
Finely chopped wood chips are easy to dispose of
Step 6: Clean and Store Your Shredder
To keep your shredder in tip top condition, once you are done, clean and store the machine properly.
Turn off and unplug it as soon as you’re done, before you do anything else, especially clean it!
Remove any and all debris by using a brush or cloth to clean the hopper, blades, and chute. Avoid using water unless the manual specifies it.
Once cleaned correctly, store in a dry place, ensuring it’s secure and weatherproof to reduce the risks of rust and damage.
If you’ve never used such a machine before, using a garden chipper shredder doesn’t have to be intimidating. By following these step-by-step instructions, you’ll save time, reduce garden waste, and create valuable mulch or compost for your garden quickly and easily.