How to build a shed base for your garden shed is a very popular question to diydoctor and in all honesty there are a number of ways to do it.
We have chosen a standard construction method which allows for a damp proof membrane under the slab to stop damp rising up through it. The slab itself is designed to be above ground and is 6 inches thick.
For small sheds this could be dug into the ground removing the need for any brickwork around the edges. This is more of a cosmetic finish to the base, just to tidy it up.
A basic run down of the process is to dig the hole 300mm wider and longer than your shed floor, 100mm deep (providing the ground underneath is solid) and pour the concrete onto a damp proof membrane you have laid inside the base of the hole.
However you build your shed base you need to make sure the ground is level over the area of the entire base.
Check Ground to Ensure it’s Firm Enough for a Shed Base
For the above ground method, you first need to decide if your ground is firm enough to lay a slab without a hardcore sub-base. To do this get a 50mm x 50mm post and without sharpening the end try and drive it into the ground. This should be hard to do beyond 150mm deep.
If the ground is firm enough and the peg is difficult to drive into the ground then carry on with the instructions below.
If the peg goes in too easily then remove 4 inches of soil for an area of ground which is 500mm wider and longer than the floor of your shed and fill this with scalpings.
Scalpings are crushed stone aggregate and available from aggregate and builders merchants. They are a little more expensive than broken brick hardcore but much much easier to lay and compact.
It is necessary to compact the scalpings before adding the concrete so that they are as tightly packed as possible. If not then over time they could move and slump, removing the support for the concrete and causing it to crack as there is no support from below.
If it is necessary to compact scalpings for your base, then a machine called a "whacker plate" or "vibrating plate" can be hired from your local tool hire shop.
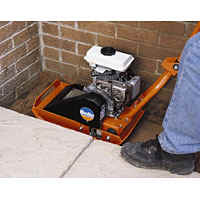
Vibrating plate of Whacker Plate Macine
Preparing Timber Formwork for Concrete
Now we have a base area ready. It should, in all cases, be 300mm longer and wider than your shed floor and as level as possible. Using the diagram below follow the instructions for an above ground base.
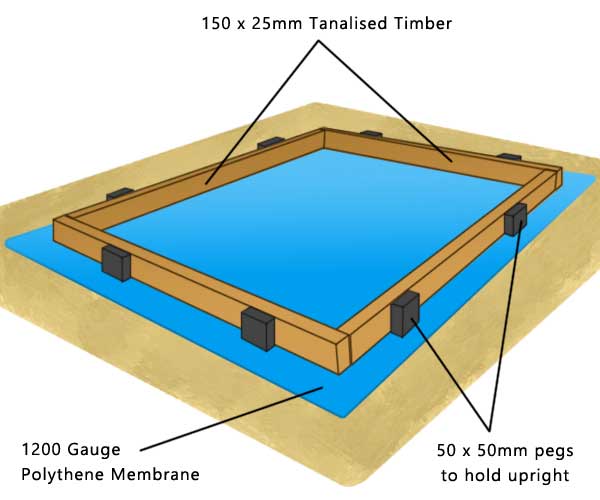
Dimensions and layout for a shed base
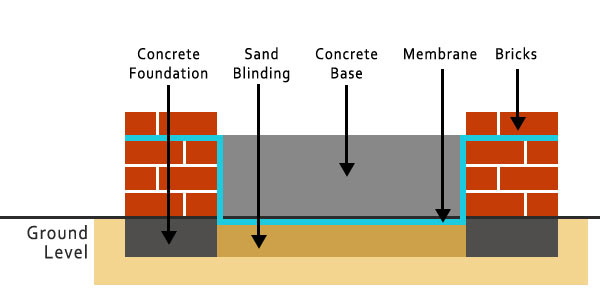
Cross section of shed base
In the diagram above, the damp proof membrane, which should be at least 1000 gauge polythene, is shown going under the formwork (frame) for the base. This is only done so you can see where it goes in relation to the construction. Its actual position is inside the frame.
Using 150mm x 25mm sawn and treated timber, cut the four sides of the formwork for your base. This timber should be 300mm longer than your base and 300mm wider.
Lay the timber out where you want the base and using a heavy "lump" hammer bang in some 50mm x 50mm posts along the line of the timber. These posts will obviously hold the timber on its edge, but more importantly are for stopping the timber bowing out as you place the concrete. The posts should be no more than 900mm apart.
When the posts are banged in you need to use a spirit level to make sure the top of the formwork is level. When it is, fix the boards to the posts using small nails (40mm).
There is no need to use large nails or screws as the concrete will hold the boards in place. If any of the posts stick up above the boards, cut them off using a sharp saw. You will realise the benefit of this when you come to level and "tamp" the concrete.
To make sure the angles of your formwork are at 90 degrees, measure from corner to corner across both diagonals – the measurements should be identical. If they are not then you will need to repeat the above to get them square.
With a level and square frame in place you can now lay 25mm of soft building sand in the bottom. This is to stop the polythene damp proof membrane getting punctured. Next, lay the polythene inside the frame (on top of the sand) and fold as tightly as possible into the corners.
Rather than buy timber to form the shuttering or formwork for your shed base it’s always possible to nip down to your local tool hire shop and hire some metal shuttering lengths called Road Forms.
Road Forms are, as the name would suggest, usually used for forming the sides of the concrete sub-base on roads. As with timber shuttering, the Road Forms are laid around the perimeter of the shed base and metal pins are driven through purpose made slots in the forms to stop the concrete pressure pushing them over from inside.
The Forms are levelled in exactly the same way timber is and the top of the Form will act as a great smooth edge for running your tamping bar over.
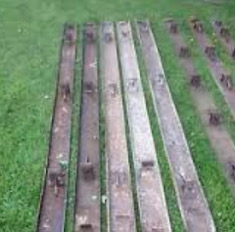
Road forms can be used instead of timber for concreting shed base
Laying Shed Base Concrete
Now it’s time to mix and place the concrete in the frame. For a good mix method and concrete calculator, see our mixing concrete project.

Cement mixer
At this point it’s a good idea to get the help of a friend or a second person. Using a piece of timber laid across the top of the frame and concrete (with one person at either end of the timber), wiggle it about to get the top of the new base level.
Stand the timber upright on its edge and push and pull it backwards and forwards across the frame while dragging it from one end to the other and this will level it roughly. Next, lift the board at both ends about 4 inches above the frame and tap it back down on the frame, moving up and down the frame as you do so. Try and tap together so both ends of the board hit the frame at the same time.
This vibrates the concrete into place and it will find its own level – This is called tamping (See image below for an example).
Lastly, have a wander around the frame tapping gently on the outside all the way round with a clawhammer. This will vibrate out any air bubbles trapped between the frame and the concrete.
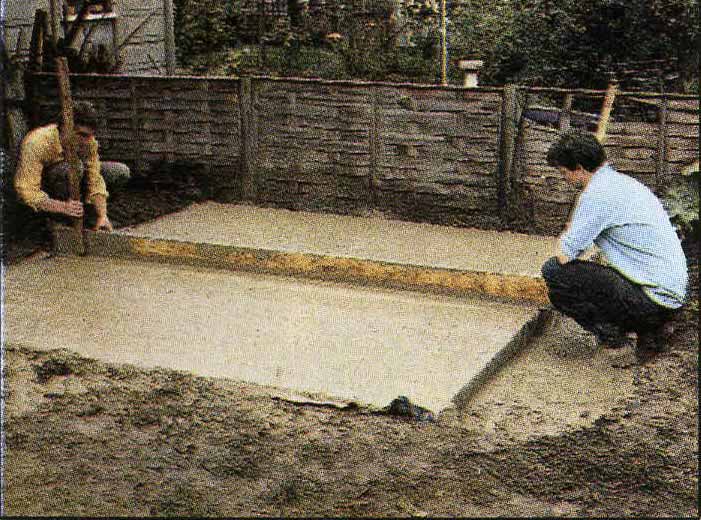
Tamping down the concrete
Building Brick Wall Border
While the concrete is going hard, without disturbing the posts (of which there should be at least 300mm in the ground) dig a small trench all the way around the base, right next to the frame, about 5 inches wide and 2 inches deep. Fill this with concrete also. This will form the foundation for the brick wall which surrounds the base.
This brick wall serves two purposes, it holds the damp proof membrane up so no ground water can seep between the underside of the slab and the membrane and it also gives a much better looking side to the slab.
We are assuming this base is for keeps so you want it to look good as well as being completely functional!
When the concrete is hard after a day or so, pull the timber up and away from the base.
Keeping the polythene held up, lay two courses of bricks around the base (For tips and help on doing this see our laying bricks and blocks project here).
Lay the top course of bricks with any frog (brick indent) facing down so that you have a nice flat top. When these are laid, cut off any surplus polythene just below the top of slab/bricks then push plenty of mortar (soft sand and cement mixed at 4 to 1) into the joint between bricks and slab.
Point up the brickwork (see our pointing and repointing brick and blockwork project for help) and you should have a good looking base for your shed – Good work!!
Positioning Your Shed on the Base
Ideally, when you build your shed it should sit on the concrete base. The bricks are for decoration but if they are well laid it doesn’t matter if the shed sites on them too, going right to the edge, as the decorative part of the brick is its face.
There are no hard and fast rules, so this is really up to you and how you want your finished shed and base to look.