All hedges, whether ornamental or conifer, need annual trimming to stay healthy and well-shaped. Hedges generally respond well to pruning if done at the right time of year, so don’t be afraid to trim boldly.
Before starting, ensure you have the right equipment for your specific hedge type and the task at hand.
Hedge Trimming Equipment
Use hand shears for small hedges, ensuring they are sharp to avoid bruising stems and creating a healthier, more attractive hedge.
For detailed work, topiary shears are ideal. They can be used one-handed for a precise finish.
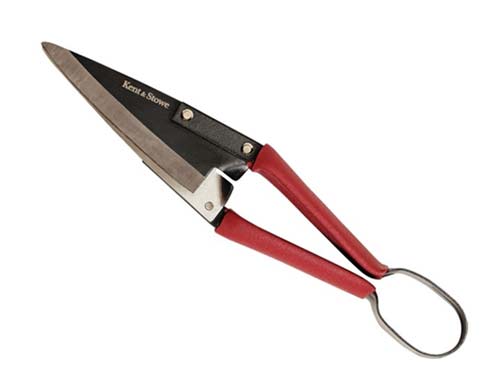
Topiary Shears for shaping a hedge
For general trimming, hand shears with long blades are perfect for creating a flat surface on your hedge.
For taller hedges, consider extendable handle shears for increased reach.
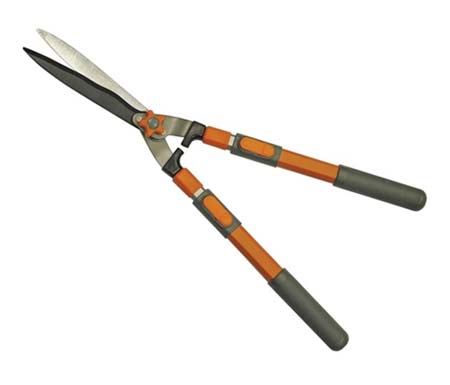
A sturdy pair of hedge shears with extendable handles
For large or multiple hedges, an automatic trimmer is a good investment. Options include:
- Corded electric trimmer: Affordable and light, perfect for small gardens, but be cautious of cutting the cord.
- Battery-powered trimmer: More expensive and heavier, but offers cordless convenience for small gardens.
- Petrol-powered trimmer: The most powerful and versatile, ideal for larger branches, but heavier and pricier.
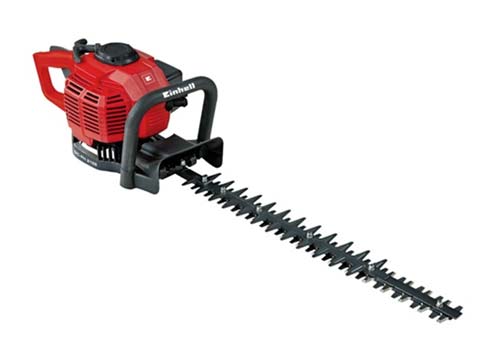
Petrol hedge trimmer
Tip: For cordless trimmers, buy a spare battery to avoid downtime and waiting for recharging.
All trimmers have branch size limits. Petrol trimmers handle thicker branches, but for very thick branches, use loppers or a pruning saw.
Hedge Cutting Safety
Before cutting, check for wires or obstructions in the hedge. Avoid trimming over them to prevent damage to your trimmer and ensure safety.
Use a safety socket with RCD for corded electric trimmers as all times! Test it before starting to avoid electric shocks if you accidentally cut the cord.
Ensure you have enough extension lead to reach all areas. Keep the lead over your shoulder to keep it out of the way and always know its position while cutting.
Keep fingers and anything else away from the blades. If a branch gets trapped, stop the trimmer before freeing it.
Wear protective clothing:
- Safety gloves to protect from the trimmer and hedge thorns
- Goggles
- Ear protection
- Work boots
Do not lift the trimmer above your chest. Use a stepladder or platform if needed, never lean a ladder against the hedge.
Lay a tarpaulin or dustsheet under the hedge to catch clippings for easy cleanup and disposal, reducing tripping hazards.
When done, unplug or remove the battery from the trimmer to prevent accidental starts, especially by children.
When to Cut a Hedge
The best time to cut a hedge depends on its type and age. New hedges need formative pruning in their first few years to shape and encourage dense growth.
For deciduous hedges like hawthorn, beech, forsythia, and fuchsia, prune in winter. For evergreens like box, holly, privet, cypress, and yew, prune in spring.
Maintenance pruning varies by hedge type. Here’s a guide for different plants:
- Box, privet, honeysuckle, Leyland cypress: Prune 2-3 times during the growing season.
- Laurel: Prune twice in the growing season.
- Holly: Prune once in late summer.
- Lawson cypress: Prune twice – in spring and summer.
- Yew and hawthorn: Prune twice, in summer and autumn.
- Western red cedar: Prune in spring and early autumn.
- Hornbeam and beech: Prune once in late summer.
- Barberry, escallonia, lavender, and forsythia: Prune after flowering.
- Firethorn: Prune in late summer.
- Fuchsia and hedge rose: Prune in spring.
How to Use an Electric or Petrol Hedge Trimmer
Use a ladder, solid platform, or telescopic hedge trimmer for high hedges. Ensure you have both hands on the trimmer and keep the lead away from the blade by draping it over your shoulder.
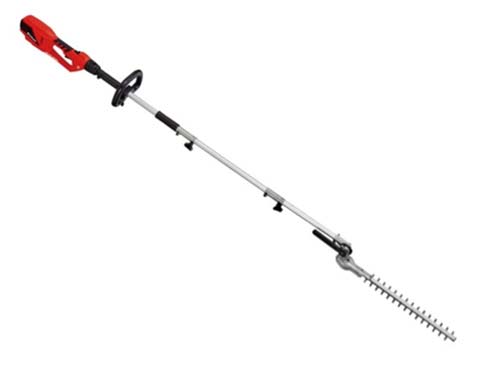
Pole trimmer to cut high hedges
Do not overreach or work above chest height. It’s often easier to trim the sides first to get closer to the top. Trim from the ground up in smooth, upward motions. Make the top thinner than the base for even light distribution.
Keep soil and dirt off the blade to avoid damage. Two passes might be necessary for overgrown hedges. The first pass should be at a 45° angle to remove bulk. Then, make a second pass holding the blade flat for a neat finish.
Collect all trimmings to prevent rot and disease. After cutting, turn off and unplug the trimmer, clean the blade, and oil it to prevent rust. Cover the blade with a sheath before storing.
Cutting Formal Hedges
Use a string line with canes as a guide for a straight, level cut. Start by cutting along the top if the hedge is not too bushy and you can reach easily.
For tall hedges, ensure your ladder or platform is secure, and have a friend hold it steady. Avoid overreaching to prevent accidents.
Keep the shears horizontal for a flat top and remove all trimmed foliage from the top.
When cutting the sides, start at the bottom and work up in a sweeping motion to let cut branches fall away. This prevents foliage from getting stuck in lower branches.
Taper the sides slightly so the base is wider than the top, allowing sunlight to reach the bottom and promote growth.
Be cautious with conifers; avoid cutting into bare wood to prevent holes. Do not cut back more than half an inch from the last green shoot.
Privet and beech are hardy and can handle more aggressive pruning.
Cutting Informal Hedges
Trimming informal hedges is similar to pruning shrubs. They require minimal pruning to maintain their natural shape.
Use secateurs and loppers instead of shears for better results.
Occasionally, remove old stems or cut branches to keep the hedge within its boundaries.
For overgrown hedges, mark the desired size with string or twine. This helps visualise the final shape.
Step back frequently to check your progress.
Trim about 30 cm beyond your target size to allow dense regrowth and maintain the desired height. Lightly trim yearly to keep it in shape.
For severe cuts, trim one side per year to reduce shock and maintain its function as a barrier.
Use loppers and a pruning saw for thicker branches.
Regularly trim new growth to maintain the desired shape and size.
Hedge Trimming and Birds
It’s important to avoid disturbing nesting birds, as it’s illegal and can cause them to abandon their nests.
Watch for birds coming and going to identify nesting areas, and avoid trimming those spots.
Most birds nest in spring and summer, so minimise trimming during these seasons and stay vigilant. Better still do not trim at all during these times, ensure you plan your trimming before any birds start nesting.
Encouraging birds in your garden is beneficial, as they help control pests.
To ensure any hedges stay healthy and flourish it is essential that you keep them neat and tidy and trimmed up, so as much as a chore as hedge cutting is, it’s a necessary job, so follow our instructions above to ensure it’s done correctly and at the right time and frequency.