If you are a keen gardener then composting is an absolute must. Not only does it get rid of unwanted garden waste (and also kitchen waste), once rotted down, this then produces an amazing fertiliser that can then be used to germinate and grow new crops.
In this guide we look at how to make a very simple compost bin that can be installed pretty much anywhere.
Why Should You Compost?
Composting is a fantastic way to turn food scraps and garden waste into nutrient-rich soil that can benefit your garden, plants, and the environment and provide fantastic fuel for growing new crops.
It’s a simple and effective method that anyone can do, whether you have a large backyard or a small balcony. Not only does composting reduce the amount of waste that ends up in landfills, but it also helps to reduce greenhouse gas emissions.
When organic waste breaks down in landfills, it produces methane, a potent greenhouse gas that contributes to climate change. By composting at home, you can help to minimise these harmful emissions.
Another great benefit, aside from those listed above, is that composting is incredibly easy to do. All you need is a compost bin or pile, some organic waste like fruit and vegetable scraps, garden waste such as old crops, leaves and the like, and a little bit of patience.
Simply layer your organic materials in the compost bin, making sure to alternate between green materials (like kitchen scraps and grass clippings) and brown materials (like dry leaves and newspaper).
Give your compost pile a good mix every few weeks to help speed up the decomposition process and before you know it, you’ll have rich, dark compost that you can use to fertilise your garden and nourish your plants.
Composting also helps to improve soil health by adding valuable nutrients and microorganisms back. When you use compost in your garden, it helps to retain moisture, suppress weeds, and improve soil structure. This means healthier, more resilient plants that are better able to resist pests and diseases.
Not only this but composting reduces the need for chemical fertilisers and pesticides, making it a more sustainable and eco-friendly gardening practice. Whether you’re an experienced gardener or just starting out, composting is a simple and effective way to reduce waste, improve soil health, and do your part for the planet and it’s pretty much all for free!

Typical simple compost heap
Types of Compost
When it comes to composting there are two main types of composting materials: green and brown. Understanding the difference between these two types of compost is essential for creating a healthy and balanced compost heap. For a healthy and balanced compost heap, the ratio should be 2-parts green to 1-part brown.
Green Compost Materials
Green materials, also known as nitrogen-rich materials, are typically wet and rich in nitrogen. These materials include things like fruit and vegetable scraps, coffee grounds, grass clippings, and plant trimmings.
Green materials are essential for providing the nitrogen that composting microorganisms need to break down organic matter quickly. Without enough green materials, your compost pile may take longer to decompose, and you may end up with a smelly, slimy mess.
Brown Compost Materials
On the other hand, brown materials, also known as carbon-rich materials, are typically dry and rich in carbon. These materials include things like dried leaves, straw, cardboard, and newspaper.
Brown materials help to provide structure and aeration to the compost pile, as well as absorb excess moisture. They also provide a food source for composting microorganisms and help to balance the high nitrogen content of green materials.
Adding brown materials to your compost pile will help to prevent odours and ensure that your compost breaks down into a crumbly, dark brown substance that smells like earth.
By understanding the difference between green and brown composting materials, you can create a healthy and balanced compost pile that decomposes efficiently and produces high-quality compost.
Remember to layer your green and brown materials in your compost bin or pile, and periodically turn and water your compost to ensure even decomposition. With the right balance of green and brown materials, you’ll be well on your way to creating nutrient-rich compost that will nourish your garden and plants for years to come.
Methods for Making a Simple Compost Bin
There are numerous different types of compost bin that you can make yourself. You can make a really simple version using three pallets secured with stakes driven into the ground and wire to hold them together or four stakes and some chicken wire makes a great bin for leaf-mould – line this with cardboard and you can use it for compost.
Green PVC coated chicken wire is an eye-pleasing alternative to traditional galvanised chicken wire.
When it comes to DIY compost bins, there are plenty of creative and cost-effective options to choose from. Here are some of the main types you can build yourself:
- Pallet Compost Bin: One of the simplest DIY compost bins involves repurposing wooden pallets. You can easily construct a three-bin compost system by standing pallets on their sides and securing them together with screws or wire. This design allows for easy turning and aerating of the compost. Plus, pallets are often free or inexpensive to acquire, making this a budget-friendly option.
- Wire Mesh Compost Bin: Another easy DIY compost bin can be made using wire mesh or hardware cloth. Simply form the wire mesh into a cylinder or square shape and secure the ends together with zip ties or wire. This type of compost bin allows for good airflow, which is essential for proper composting. It’s also lightweight and easy to move around if needed.
- Rubbish Bin Compost Bin: If you have an old garbage can lying around, you can repurpose it into a compost bin. Drill several holes in the sides and bottom of the can to allow for airflow and drainage. You can also remove the bottom of the can and place it directly on the ground to allow worms and other beneficial organisms to access the compost pile.
- Wooden Box Compost Bin: For a more aesthetic compost bin, consider building a wooden box using scrap lumber or cedar planks. You can customise the size and design to fit your space and preferences. Make sure to leave gaps between the boards for airflow and consider adding a hinged lid for easy access to the compost pile.
- Stacked Tire Compost Bin: If you have old tires lying around, you can stack them to create a durable and long-lasting compost bin. Simply stack the tires on top of each other and fill them with compostable materials. The black colour of the tires will absorb heat, speeding up the decomposition process.
These DIY compost bin options are just a few examples of the many creative ways you can build your own composting system. Whether you’re looking for simplicity, affordability, or aesthetics, there’s a DIY compost bin design out there to suit your needs. Plus, building your own compost bin allows you to repurpose materials and reduce waste, making it a win-win for both your garden and the environment.

Well established compost heap
What to Think About When Installing a Compost Bin
If you are thinking of setting up a compost bin there are several things that you will need to consider to ensure its success. Take note of the following points:
- Size: The size of your compost bin depends on the amount of organic waste you generate and the space available in your garden. A general rule of thumb is to aim for a bin that’s at least 3 feet by 3 feet by 3 feet (roughly a metre square). This size allows for proper airflow and heat retention, which are essential for the composting process. If you have a larger garden or produce a significant amount of waste, you may want to consider multiple bins to accommodate for this.
- Position: When it comes to positioning your compost bin, there are a few key factors to consider. First, choose a level area that receives partial sunlight. Avoid placing the bin directly under trees or in areas that are prone to flooding. You’ll also want to position the bin close to your kitchen or garden for easy access. Consider placing it on a surface that allows for drainage, such as gravel or concrete, to prevent water buildup.
- Accessibility: Make sure your compost bin is easily accessible for adding materials and turning the pile. It should be located within reach of a garden hose or water source (water butt) for watering and near a path or walkway for easy accessibility. Additionally, consider placing it in an area where you won’t mind the occasional odour that comes with the composting process.
- Aesthetics: While functionality is key, it’s also important to consider the aesthetic appeal of your compost bin. Choose a location that blends seamlessly with your landscape and doesn’t detract from the overall look of your garden space. You can use screening plants or decorative fencing to camouflage the bin and create a more visually appealing composting area.

Fairly simple dual compost bin
Materials to Build a Compost Bin
When it comes to what materials and the likes that will be required to construct your compost bin, this will very much depend on the size and type that you intent on building.
As this guide is going to focus on building a simple compost bin roughly 750mm x 750mm x 750mm this is what the below list is based on. Obviously if you are going bigger you will need to increase material amounts accordingly.
- 20, 75mm wide x 720mm long x 15mm deep planks (eco-friendly treated preferably)
- 20, 75mm wide x 750mm long x 15mm deep planks (eco-friendly treated preferably)
- 40, 50mm wide x 50mm long x 60mm heigh blocks (eco-friendly treated preferably)
- 240, 36mm long screws or nails
- Tape measure
- Cordless drill/driver
- Pilot drill (if using screws)
- Claw hammer (if using nails and dismantling pallets)
- Saw (to cut planks and blocks to height if needed)
- Jack/crowbar or similar for dismantling pallets (if using pallets)
- Selection of drill bits 4mm for pilot drill
- Pen/pencil
- Suitable material to line base (if using)
How to Build a Simple Compost Bin
As explained above, in this guide we are going to build a very basic stackable compost bin that can be increased or reduced in size depending on the amount of material in it and whether rotted material needs to be accessed.
Basic Compost Bin Design
Creating a compost bin can be straightforward and with the design we are proposing in our example here you simply use wooden frames stacked on top each other. As you add material, you can build up the container and remove layers as the contents decompose. This layering facilitates easy access to finished compost and allows for starting a new heap.
Each layer of the container requires four planks for the sides, four wooden blocks for stability, and screws or nails for assembly. Planks should be approximately 75mm wide and at least 15mm thick, with two pieces at 720mm long and two at 750mm long. Overlapping these ensures a square frame.
Blocks, measuring about 50mm x 50mm and 60mm long, hold the frame together. If using scrap wood, ensure consistency in size for proper assembly. pallets are absolutely ideal for this design, offering suitable timber and blocks, although untreated wood will require eco-friendly treatment to avoid compost contamination.
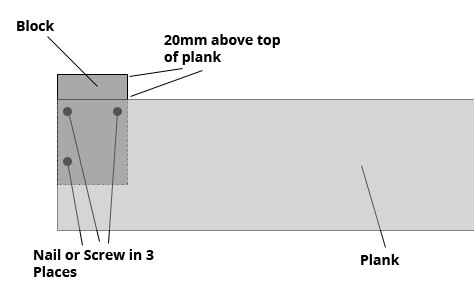
The key to this design is it’s easy stack-ability. As each block sits 20mm above the planks attached to it, each frame section then slots over the top and is held in place by the blocks at each corner.
Compost bin plan
Putting the Compost Bin Container Together
Once you have all your materials it’s then time to start putting everything together:
- Step 1: Fix first block to plank: Begin with a short plank and a block. Lay the plank on the block, ensuring the end aligns with the side of the block while the block extends 20mm above the plank. Drill three holes through the plank into the block and secure it with screws or nails.
- Step 2: Fix second block to plank and repeat: Once one block is fixed to a plank, repeat the process at the other end of the plank. Repeat this for all short planks, resulting in 20 planks with attached blocks.
- Step 3: Fix long plank to block: Take a short plank with blocks attached and one long plank. Position the long plank against the block, covering the end of the shorter plank, and secure it with screws.
- Step 4: Fix second shorter plank: Screw the other end of the long plank to the second short plank-and-blocks piece, creating three sides of the frame.
- Step 5: Fix final long plank to form square: Position the last long plank to form the final side, ensuring corners fit squarely over blocks and ends of short planks. Screw the last piece into place to complete one frame.(see large diagram above).
- Step 6: Repeat for additional frames: Make as many frames as needed. Regular wood treatment will prolong the lifespan of your compost bin, ensuring it lasts for years.
Fix the post to the plank using screws or nails at one end and then repeat for the other end of the plank
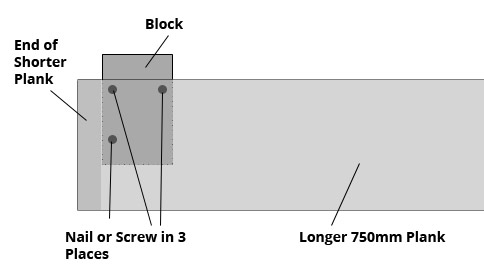
Fix one of the longer planks to the block and overlap the end of the shorter plank already fixed in position
Start Filling and Using Compost Bin
Once you have finished the construction of your compost bin, it’s then time to start using it and producing your own compost which can then be used to nourish and grow your own crops.
As stated in the information above, ensure that you fill it with the correct ratio of green and brown waste and layer it so that everything can interact and break down correctly.
Also ensure that you regularly water the bin down to provide all important moisture for the composting process and also that you turn the contents over every once in a while to ensure everything breaks down at a uniform rate.
Now you’ve made your compost bin there are lots of books available with information on how to make and use the end product. Additionally, more information on best composting practice, materials to use etc. can be found over at the Royal Horticultural Society site.
There are many different types and designs of compost bin and pretty much all can be easily constructed even with little or no DIY knowledge. With so many benefits to making your own compost, it’s ideally something that everyone should be doing, especially when it can be done in such a simple way.