Warning: To complete electrical works you must comply with Electrical Regulations – Click here for more information.
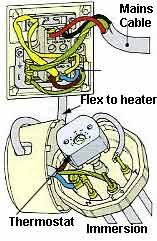
Diagram of immersion heater wiring
Immersion heaters are usually rated at 3KW which, under normal circumstances would qualify them for being wired into a ring main. However, because immersion heaters can be left on indefinitely, taking 3kw from a ring circuit would reduce the circuits capacity immensely so immersion heaters are placed on their own radial circuit.
Cable Sizes for an Immersion Heater
The mains cable for an immersion heater is a two core and earth 2.5mm cable. This cable should run to a 20amp double pole isolator switch (With neon indicator light) from where a heat resistant 16amp cable or flex should run to the heater. Since April 2004 new and replacement immersion heaters must be protected by an overheating safety cut out.
Available Sizes of Immersion Heaters
Immersion heaters are available in the following lengths:
- 27 inches
- 18 inches
- 11 inches
- 7 inches
How to Replace an Immersion Heater Thermostat
Replacing the thermostat is not a difficult operation. The immersion heater operates just like a kettle with the element in the water heating up to the required temperature which, in turn, heats the water.
If the element breaks or malfunctions the fault will usually short circuit the mains box and you will need to change the immersion heater. Any other fault is likely to be the thermostat. See our project on chaning an immersion heater for more information on this.
Please remember to make tight all electrical connections. Loose connections can cause fires.
To replace the thermostat in the immersion heater should your water get scalding hot all of a sudden, make sure the electricity to the immersion is off and the fuse in the isolator switch is out.
Undo the top screw’s of the thermostat cover and you will usually see a cable clamp holding the mains flex in place. You will usually need to undo this cable clamp before the lid can be lifted clear.
The wire going in to the thermostat from the flex, and the wire coming out to the probe can be removed by undoing the small retaining screws and the thermostat rod can be lifted free.
Please remeber to make a note or take a picture showing where each wire goes so that wiring the replacement back in is as easy as possible.
Replacing the thermostat is the operation in reverse.
Many replacement parts for your immersion heater and heating system can be purchased from a variety of sources including online and your local DIY stores.