
Most homes use one of two main electrical circuit types: radial circuits and ring circuits (ring mains). Each system is designed for different uses and load requirements.
This how-to guide explains what a radial circuit is, where it’s commonly used in the home and how it is wired. If you’re looking for step-by-step help on ring circuits instead, see our guide on how to wire a ring main.
Staying Safe With Electricity
Electricity can cause serious injury or fire if handled incorrectly. However, if you understand the risks and follow safe working practices, it is possible to carry out basic electrical work, including installing or modifying radial circuits.
Before starting any electrical job, you must know how to:
- Correctly isolate a circuit
- Test your work for faults and safety
- Use cables and components with the correct rating
- Follow current wiring regulations
Additionally, you should also read the following projects:
To safely isolate a circuit, switch off the correct MCB at the consumer unit or remove the relevant fuse in older fuse boxes. Always confirm the power is off using an approved tester.
Prevent accidental reconnection by placing a clear warning note on the consumer unit while you are working.
If you are unsure about isolating, testing or complying with electrical regulations, do not proceed. Hire a qualified electrician instead.
Electrical safety comes first in any step-by-step how-to guide. Once you are confident you can work safely and competently, you can move on to understanding how radial circuits operate and how they are wired.
What is a Radial Circuit?
A radial circuit is a simple, one-direction electrical circuit used in homes to supply sockets, lighting and dedicated appliances. It starts at the consumer unit (fuse box), runs to each outlet in turn and ends at the final point. Unlike a ring main, it does not loop back to the consumer unit.
In a typical socket radial circuit:
- The cable runs from the consumer unit to the first socket.
- Live (L), Neutral (N) and Earth (E) connect to their matching terminals.
- A second cable leaves that socket and feeds the next one in the line.
- This pattern continues until the last socket, which has only one cable connected.
Because the circuit runs in a straight line, it is often described as a “linear” circuit.
Radial circuits are commonly used for:
- Socket outlets (especially in smaller areas)
- Lighting circuits
- Cookers
- Electric showers
- Immersion heaters
- Boilers and fixed appliances
Appliance circuits such as cookers and showers are higher load radials and must meet stricter wiring regulations. These should only be installed or modified by a qualified electrician.
Fault finding is usually easier on a radial circuit. If one socket stops working, check the last working outlet in the chain, the issue is often between that point and the next. If nothing works, the problem is likely at the consumer unit or power source.
This straightforward layout makes radial circuits one of the most common and easy-to-understand electrical systems.

Diagram of a simple radial circuit
Advantages and Disadvantages of a Radial Circuit?
Radial circuits have a number of advantages and disadvantages, here are a few of each:
Radial Circuit Advantages
- Simple and quick to wire
- Easy to locate and fix faults
- Generally more cost-effective than a ring circuit
- Low maintenance once installed
- Uses less cable, reducing material and labour costs
Radial Circuit Disadvantages
- Not ideal for high-power appliances if many sockets are connected
- Lower current capacity compared to ring circuits
- Voltage drop can occur along the circuit
- Higher risk of overloading if multiple heavy-load devices are used
- Appliances further down the line may receive reduced voltage under heavy loads
How Many Sockets Can I Have on a Radial Circuit?
Short answer: There’s no fixed limit on the number of sockets on a radial circuit, but there are strict safety and load rules you must follow.
For a standard domestic installation (for example, a 16A MCB protecting 2.5mm² cable), you can install multiple sockets on a radial circuit as long as:
- The floor area served does not exceed 50m² (540 sq ft)
- The cable size matches the MCB rating
- The total electrical load does not overload the circuit
Why Load Matters More Than Socket Numbers
What you plug in is far more important than how many sockets you install.
If you connected several high-power appliances, such as multiple tumble dryers, at the same time, the current draw would exceed the MCB rating and the breaker would trip.
However, if the circuit mainly powers low-demand items like a TV, phone chargers, a router, or lighting accessories, a typical radial circuit will operate safely without issue.
Radial Circuit vs Spur – What’s the Difference?
A radial circuit runs directly from the consumer unit and is protected by its own MCB.
A spur is a branch taken from an existing socket or circuit.
Although a spur looks similar to a radial, it is technically an extension of an existing circuit and different rules apply.
Rules for Adding a Spur
- An unfused spur should supply one single or double socket only
- If protected by a Fused Connection Unit (FCU), it can supply multiple sockets
- The FCU fuse must not exceed the rating of the original MCB
- The total area served must still comply with the 50m² rule
For example, a 13A fuse in an FCU connected to a 16A radial circuit is acceptable. A fuse rated higher than the circuit breaker is unsafe and non-compliant.
Key Takeaway
You are not limited by the number of sockets on a radial circuit, however you are limited by:
- Circuit protection rating (MCB or fuse)
- Cable size
- Total electrical demand
- Floor area coverage
When designing or extending a radial circuit, always calculate expected load first. Safe circuit design is about capacity and not socket count!
What Size Cable for a Radial Circuit?
Quick answer: Cable size for a radial circuit depends on the MCB rating and the total load (what you’re powering).
Choosing the correct cable is essential for safety. The cable must safely carry the maximum current allowed by the breaker without overheating.
Common Cable Sizes for Radial Circuits
- Lighting circuits: 1.0mm² or 1.5mm² twin and earth
- Socket circuits (standard domestic use): 2.5mm² twin and earth
- High-load appliances (cookers, showers, etc.): Size must be calculated based on appliance rating
For most domestic socket radial circuits, 2.5mm² twin and earth (also called 2 core and earth) is the standard choice.
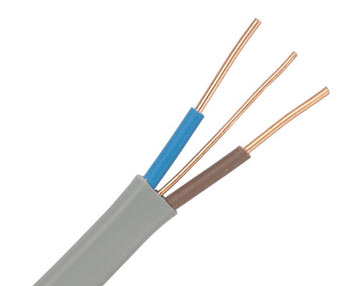
2.5mm twin core and earth cable commonly used for socket radial circuits
What MCB Size for a Socket Radial Circuit?
A typical socket radial circuit uses a 16 amp MCB.
This rating ensures the breaker trips before the cable overheats if the circuit becomes overloaded. A 16A radial is usually sufficient for everyday household appliances such as:
- TVs
- Computers
- Washing machines
- General plug-in devices
If you’re installing a dedicated supply for a high-demand appliance (for example, an electric cooker), you must check the appliance’s power rating and calculate both the correct cable size and breaker rating.
Understanding Cable Types
The most common fixed wiring cable in UK homes is twin and earth (flat grey cable). Flexible cable (flex) is generally used for appliance leads, not fixed circuits.
The cable size must always match:
- The MCB or fuse rating
- The installation method
- The expected electrical load
UK Wiring Colours (Old and New)
UK wiring colours changed in 2004 to align with European standards.
Before March 2004:
- Live = Red
- Neutral = Black
- Earth = Green/Yellow (or bare copper sleeved)
After March 2004 (harmonised colours):
- Live = Brown
- Neutral = Blue
- Earth = Green and Yellow
Always check conductor colours carefully, especially in older properties where both systems may be present.
Key Takeaway
For most domestic socket radial circuits:
- Use 2.5mm² twin and earth
- Protect with a 16A MCB
- Confirm the total load before installation
Correct cable sizing isn’t optional it’s an absolute critical necessity for safety, compliance and long-term reliability.
The Importance of Using Correct Sized Cables and Breakers
Choosing the correct cable size and matching it to the right MCB or fuse is critical for electrical safety.
An electrical circuit is only safe when the cable and breaker are correctly paired. The breaker must trip before the cable overheats. If it doesn’t, the wiring can become dangerously hot and create a fire risk.
Why Cable and Breaker Size Must Match
Cables are designed to carry a maximum amount of current. If too much electricity flows through a cable that is too small, it heats up.
The MCB (Miniature Circuit Breaker) protects the cable by cutting power instantly if:
- There is a fault on the circuit
- The circuit is overloaded
- The current exceeds the cable’s safe capacity
If the breaker rating is too high for the cable size, it may not trip quickly enough. The cable insulation can melt, potentially causing fire or serious damage.
Simple Example
Imagine multiple high-powered appliances running on a 2.5mm² radial circuit at the same time. The combined load could exceed the cable’s safe limit.
If properly protected, the MCB will trip immediately. If not, the cable can overheat to the point where the outer insulation softens, melts, and ignites nearby materials.
Electrical Safety Rule to Remember
- The cable must be rated to carry the load
- The breaker must protect the cable, not the appliance
- The breaker rating must never exceed what the cable can safely handle
Correct cable sizing and breaker selection are not optional extras, they are essential for preventing electric shock, overheating, and fire.
When designing or modifying any circuit, always confirm that the cable size, breaker rating and expected load are fully compatible.
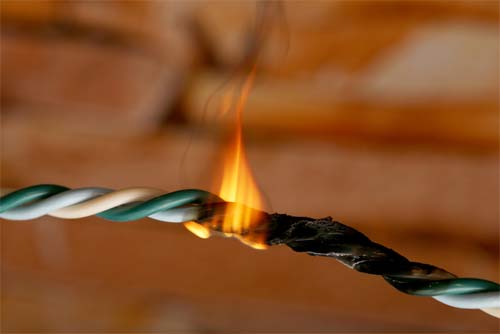
Old electrical wire catching fire – Image courtesy of TED Systems
Can You Have a 32amp Radial Circuit?
Yes, you can install a 32amp radial circuit, but it must be designed correctly. A radial circuit runs from the consumer unit to a single appliance or a set of outlets without looping back. A common example of such a circuit is an electric cooker, which often requires a 32amp breaker because it draws a high level of power.
The key factor is cable size. The breaker rating, cable size and appliance load must always match. For example, a standard radial circuit supplying multiple sockets typically uses 2.5mm² twin and earth cable protected by a 20amp breaker. This setup is suitable because normal socket loads rarely exceed 20 amps.
However, a cooker drawing 30 amps or more cannot safely run on 2.5mm² cable. Doing so would cause the cable to overheat and create a serious fire risk. High-load appliances usually require thicker cable, such as 6mm², to safely handle the current.
Can I Add Sockets to a Radial Circuit?
Yes, you can add sockets to a radial circuit. This is called adding a spur. However, there are clear wiring rules you must follow to keep the installation safe and compliant.
Without extra protection, you can only add one single or one double socket to an existing radial circuit. If you need to add more than one socket, you must install a fused connection unit (FCU) first. The FCU limits the current using the correct fuse (typically 13A), allowing multiple sockets to be supplied safely.
You must also:
- Use the correct cable size for the circuit
- Fit the correct fuse in the FCU
- Ensure the total floor area supplied by the radial circuit does not exceed 50m²
A spur can be taken from either:
- An existing socket outlet, or
- A junction box installed on the radial circuit cable
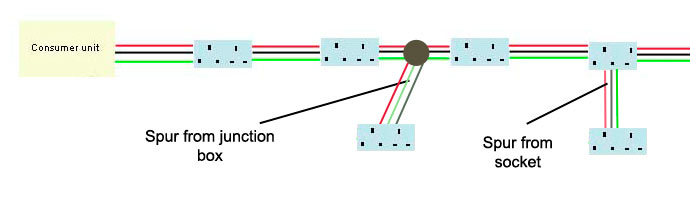
Single spur taken off of an existing radial circuit
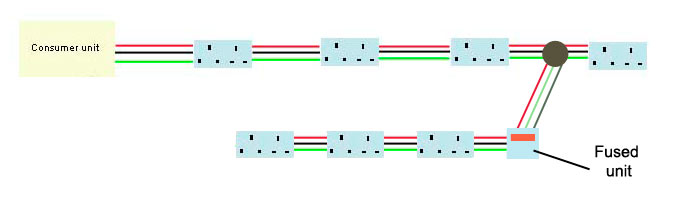
Spur taken off of radial circuit with multiple sockets using a fused unit
How to Wire a Radial Circuit
Now that you know what a radial circuit is, here follows a simple step-by-step guide explaining how to wire one up safely and correctly.
In this example, a 2.5mm² twin and earth cable is run from a dedicated MCB in the consumer unit to supply a small garage conversion used as a home office.
Important: Only a qualified electrician can work inside a consumer unit. While the MCB connection must be completed professionally, understanding the layout beyond the breaker can be used and applied to DIY situations where such circuits can be installed.
Step 1 – Install the MCB
Start by installing a MCB (Miniature Circuit Breaker) of the correct rating in the consumer unit. For a low-power setup, like a garage office with a TV, laptops, and monitors, a 16amp MCB is suitable.
The electrician connects the outgoing live wire to the MCB’s live terminal the neutral and earth wires to their respective terminals in the consumer unit, following the manufacturer’s instructions.
Safety first: Only a qualified electrician should work inside the consumer unit. Before installation, the mains supply should always be switched off and the relevant RCD (if present) isolated, ensuring complete safety.
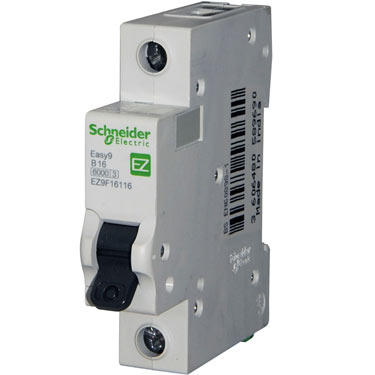
16amp MCB for new radial circuit
Step 2 – Connect Cable to the MCB
With the MCB and consumer unit still switched off, the next step is to connect the cable from the MCB to the sockets.
Run the cable from the MCB to the first socket location. For surface-mounted wiring, route it neatly around corners and leave some slack. At each socket, create a small loop (about 6 inches) before continuing to the next outlet. Repeat this process for all sockets.
For cables running behind walls, drill a small 25mm hole at each socket location. Pull a 6-inch loop of cable through the hole to form the connection point. Cut the loop at the top to create the feed for the socket, then continue to the next one.
Continue this looping method until the final socket. Pull the remaining cable through to complete the circuit.
Tip: Always keep loops neat and avoid sharp bends to ensure a safe and professional installation.
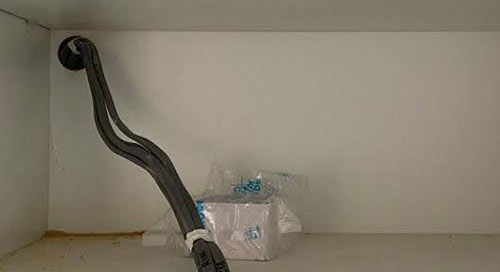
Cables loooped through hole ready for socket
Step 3 – Wire Up the Sockets
Now connect each socket faceplate to the cable at every outlet position.
At the first socket, cut the cable loop to create two separate cables: one from the consumer unit and one feeding the next socket. A radial circuit is wired in sequence, so each socket (except the last) will have two cables connected.
Wiring a socket is similar to wiring a plug:
- Live (brown) > Live terminal (L)
- Neutral (blue) > Neutral terminal (N)
- Earth (green/yellow) > Earth terminal (E)
To prepare the cable:
- Measure and mark how much outer sheath needs removing
- Carefully score and strip back the outer sheath without damaging inner wires
- Strip around 10–12mm from each individual conductor
- Twist stranded ends neatly and fold if required for a secure fit
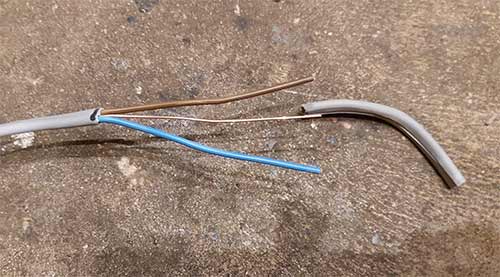
Cable sheath stripped back
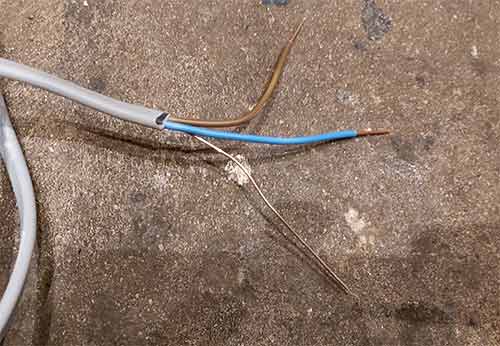
Individual wires stripped back, twisted up and bent over
Finally, insert the matching wires from both cables into their correct terminals and tighten securely. Ensure no bare copper is exposed and all connections are firm.
Tip: The final socket on the radial circuit will only have one cable connected.
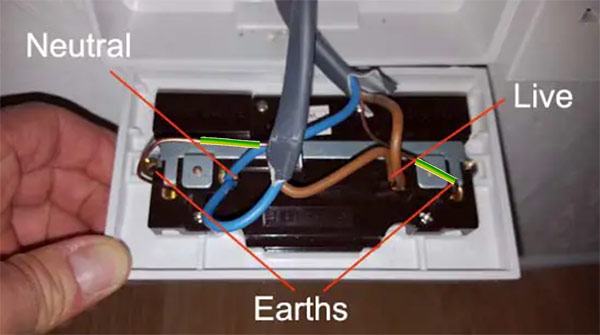
Wires connected to rear of socket face plate
Step 4 – Wire the Remaining Sockets
Once the first socket is connected, repeat the same wiring process for each remaining outlet in the circuit.
At every socket (except the last), you will connect two cables:
- One cable bringing power in
- One cable carrying power to the next socket
Strip the outer sheath, remove around 10–12mm of insulation from each conductor, and connect:
- Live to L
- Neutral to N
- Earth to E
When you reach the final socket on the radial circuit, the wiring method stays the same, but only one cable will be connected, as the circuit ends there.
Check that all terminals are tight, no copper is exposed, and each faceplate is securely fixed before moving on to testing.
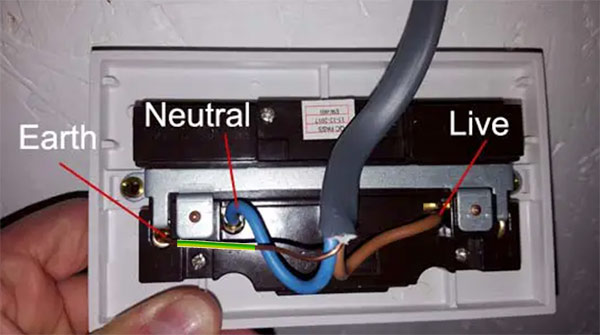
Final socket in radial circuit wired up
Note: Ensure that you add some earth sleeve to any bare earth wires to signify that each is an earth as stated by the regulations.
Step 5 – Test the Circuit
After wiring all sockets, the entire circuit must now be fully tested to confirm it is safe and fault-free.
This testing must be carried out by a competent, registered Part P electrician. They will perform a series of electrical safety checks and issue the correct certification.
The certificate confirms the installation complies with:
- BS 7671 (IET Wiring Regulations)
- Part P of the Building Regulations
If you complete electrical work in your home, you are legally responsible for ensuring it meets current safety standards.
Once testing is complete and certification is issued, your new radial circuit and sockets are safe and ready to use.
Installing a new radial circuit is straightforward if you have the right knowledge and practical electrical skills. If you are unsure at any stage, it is always essential to hire a qualified electrician.
Any work that legally requires a certified professional, especially work inside a consumer unit, must be carried out by a registered electrician. Failing to do so can breach regulations, create safety risks and may invalidate your home insurance.

 DIY Doctor Ltd,
  0845 6342 179


