Why are Joist Hangers Called Jiffy Hangers and who Invented Them?
Joist hangers were first invented in 1903, or at least that’s when the first patent was filed, by August H Eberhabdt of California USA. The patent was for a simple steel construction that has not changed a great deal since.
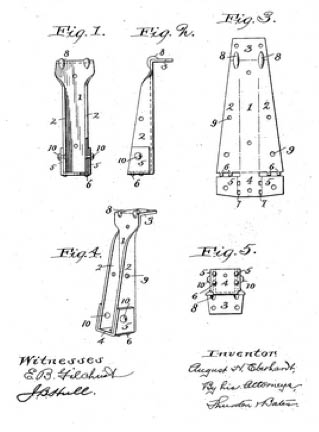
Since 1903 roof and ceiling joists can be erected in a jiffy
In may 1957 however, A James Findleton Roland decided to submit a patent for the improvement of the first hanger. It is not clear why both patents were granted on a design that is very similar and does the same job. The only difference we can see is that Mr Roland came up with the idea of using joist hangers in a saddle fashion.
However, the patent was granted and joist hangers became the go-to product for the simplicity they offered in building. Ceilings, roof, floor joists and even decking could now be laid in a “jiffy” rather than the hours it took to build the end of the joists into the walls, or form the correct joint in adjoining timbers.
Joist hangers (or rafter hangers or joist brackets as they are also known) are usually divided into two categories. Those which are fixed to the face of the wall which is to support the joists, and those which literally hang on the top of the wall that carries the joists. In reality, most joist hangers are a little of both.
They are galvanised to prevent rusting and can be fixed, where fixing is necessary, with either screws or nails. One of the largest suppliers of Joist hangers of all kinds in the UK is a company called Simpson Strong Tie who have adapted their range to now include special galvanised brackets, called Simply Build It, for putting together shelves and workbenches. Thanks to Simpsons Strongtie for many of these images, there is a link to them further down the page if you would like to find out more about them.
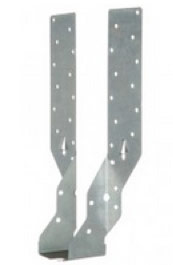
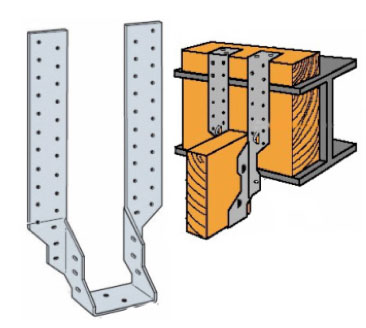
Face fix Jiffy hangers can have long legs to provide plenty of fixing options
Face Fixed Jiffy Hangers
The lighter joist hangers, or Jiffy Hangers, are always provided with fixing holes to allow you to fix them to the face of the wall but usually also have long "legs" which allow the hanger legs to be bent over, or "wrapped over" the wall. This allows fixing from the top also, giving extra support. Many heavy duty joist hangers are also face fixed.
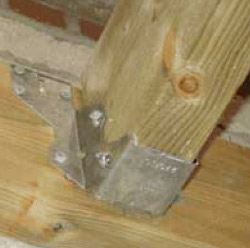
Fixing joists to wall plate with face fix joist hanger
Face fixed and face fixed wrap over hangers can also have the flanges (through which the fixing holes are drilled) either showing either side of the hanger, or concealed where they are bent over to be only visible when there is no joist in the hanger.
Heavy duty hangers, for larger load-bearing timbers do not have wrap over legs, they are, if required, bent over at manufacture to hang on the wall or, in some cases, to be inserted into a chase cut especially into the wall or wall joint. You can read more about this later.

Heavy duty hangers can be face fixed
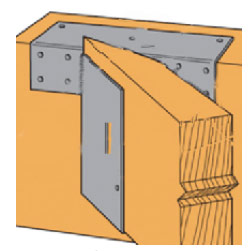
Concealed Flange Joist Hanger
Some face fixed hangers have the fixing holes hidden by the joist when it is inserted. If this hanger is fixed into a slight recess in the wall the visual impact is that of a joist that is actually built into the wall.
There is also an advantage in decoration when using the hidden or concealed hanger in that, if the wals are not to be plastered, thereby hiding the flanges, decoration can be completed right up to the edge of the joist without the steel showing at all.
Concealed flanges in joist hangers allow fixings to be hidden
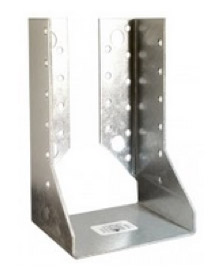
Saddle Joist Hangers
Saddle hangers are designed to hang over both sides of a wall, joist, beam or RSJ (See below) in order to continue a joist line in the same direction. The hanger simply slots over the carrier as can be seen in the image.
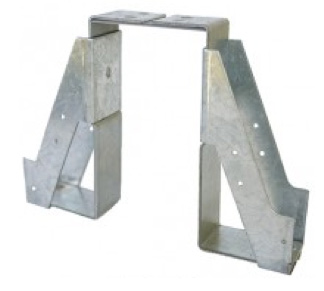
Using saddle hangers, joists can be kept in a straight, continuous line
Open rooms up using RSJ and joist hangers to support joists
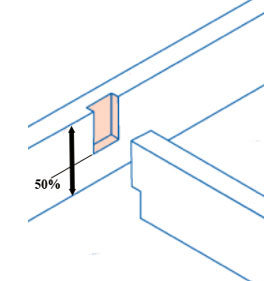
Mini Joist Hangers
Mini joist hangers are used a lot for studs and smaller timbers including timber noggins in between floor joists. Mini hangers should not be used for structural timber and they are generally only used for square timber sections up to 50mm x 50mm.
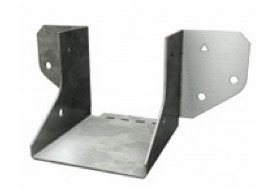
Trimmers and noggins can be secured with mini joist hangers
Skewed Joist Hangers
Skewed hangers are used in areas (usually in the roof) where timbers meet each other at angles other than 90 degress. This includes Jack rafters, valley rafters, hip rafters and traditional (hand built) roofs where pre-formed trusses are not used.
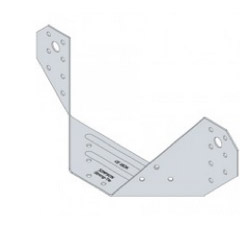
Valley, hip and jack rafters can be secured with skewed joist hangers
Long Leg Joist Hanger
The long legged joist hanger is especially useful when floors are being constructed at different levels to each other. The legs cab be bent over to accommodate different lengths and, in the case shown in the image, underslung joists can be fixed.
This might often be necessary when an RSJ has been installed and the timbers need to be slung underneath it to form an unbroken ceiling line.
Underslung joists can use long legged joist hangers
Custom Made Joist Hangers
When constructing a traditional hand made roof one might find angles between joists and rafters that are not the usual size. Similarly, when refurbishing and joining new building to old, not everything fits easily.
It is possible to get custom made brackets and joist hangers to suit any type of job you are doing and this service is also provided by Simpsons.
Joist hangers can be custom made if required such as this 45° joist hanger
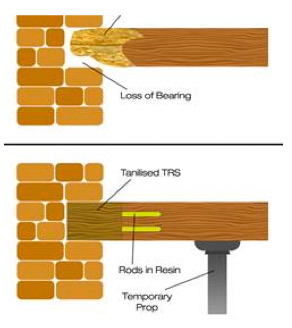
Masonry Joist Hangers
Masonry joist hangers are usually welded in at least one place for strength. They are designed to be placed either on top of a wall and hang directly down to carry the joist or they are built into a joint in the masonry wall.
When they are added retrospectively to a building, to carry a new floor or roof perhaps, a horizontal chase is cut in the wall (usually with a disc cutter) and the masonry joist hanger is pushed in. The joint or chase must then be re-mortared to keep the strength in the wall.
Please be careful only to cut enough of a chase to push one hanger in at a time. If you cut a long chase you are weakening the wall considerably so mark out exactly where you need the hangers and just cut out for each individual hanger.
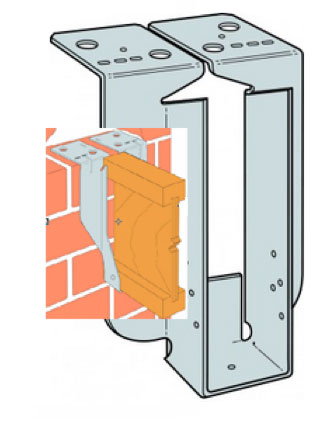
Fixing into or onto masonry with masonry joist hangers
Connecting Joists by Notching Timbers Without Joist Hangers
Joist hangers are an extremely useful product in the building trade and no more so than in some of the DIY jobs we get asked about on this site.
Quite simply, a joist hanger does what it says on the tin. It allows a joist to hang where otherwise it would need considerable time spent trying to fix it, or build it in to something else.
Notching timbers into wall plates or other timbers is a very time consuming business and, by removing parts of timbers it is weakening them to a degree. More about notching joists can be seen in this project.
Timbers and joists can be connected by notching out
Building Joists into Masonry
It can also allow water to soak into the end grain of the timber where it can go undetected before it rots. Please see our projects on repairing timber joists for more information on what to do when you suspect rot has got into your joists.
This problem is more associated with building the unprotected ends of joist into walls than notching timbers together but both can present problems whereas joist hangers are drilled to allow any water to simply run out.
Rotten ends of joists can be cut off and replaced with new sections
Fixing Joists to an RSJ (Rolled Steel Joist)
When a large span has to be covered (usually in a roof space) it is practical to insert an RSJ across two load bearing walls to break the long span into shorter distances. This allows the support from the floor to be minimal leading to greater sized rooms. Fixing joists to RSJ’s however, is not so easy without joist hangers.
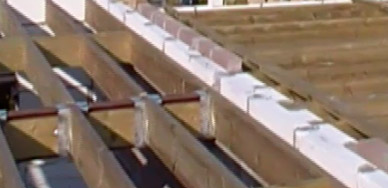
Hanging two joists with one saddle hanger
Usually, builders will operate a belt and braces approach to connecting joists to an RSJ and the first thing they will do is bolt a timber to both sides of the RSJ recess as you can see from the image below.
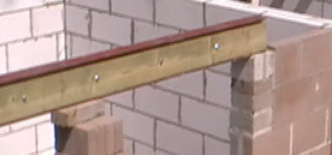
Timbers can be bolted to RSJ’s to hold joists
Once the timbers have been bolted into the RSJ, joist hangers (in this case saddle joist hangers) can be hung over the RSJ and face-fixed to the timbers. This allows the easy installation of the joists as seen below.
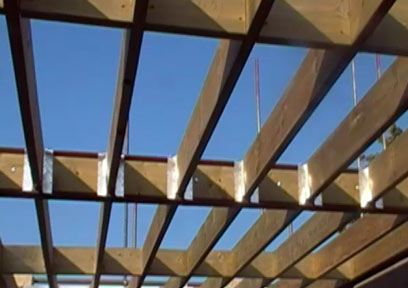
Joists hung on an RSJ with side fixed saddle hangers
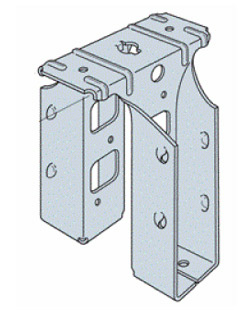
Jiffy Hanger
The hangers above are known as a jiffy hangers. This type of hanger is used only when abutting one timber to another. It comes with plenty of holes through which you can screw or nail the hanger to one timber while you drop another timber in the "shoe".
Joist hangers give roofing carpenters a great deal of flexibility. They are relatively easy to level in, fix very strongly indeed and allow the carpenter (by using temporary fixings) to get all timbers in place, with the correct spacing in between them, before fixing permanently.
Concealed Beam Hanger
One final type of joist or beam hanger is called the Concealed Bean Hanger and it acts a little like a mortise and tennon joint where two beams or joists are to meet at right angles and the fixing is not to be seen.
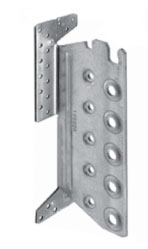
Concealed beam hangers are often used in renovations to hide joints
All that is visible is the ends of a timber or metal dowel either side of the timber.
The back of the concealed beam hanger is fixed to the wall or the adjoining beam. The second, or right angled beam is then notched out to accommodate the tongue of the hanger which is slid into place.
Dowels are then pushed into drilled holes to hold the joists or beams together.
The Concealed Beam Hanger allows two timbers to be joined with no visible fixings making it ideal for the refurbishment of old cottages and period buildings. To all intents and purposes, each concealed beam hanger is a dowelled mortise joint.
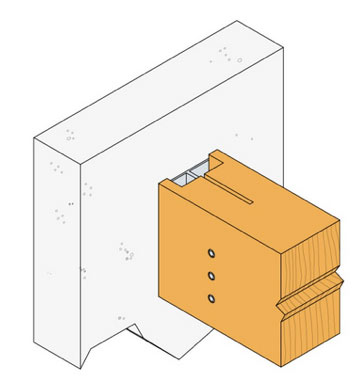
Period renovations are done with concealed beam hangers as they are hidden from view