Floors in older properties are very often out of level. Un-level floors, whether they are concrete or timber are a nightmare to work with. Nothing sits level on them and in turn doesn’t back on to walls and you can’t lay any form of tongue and groove flooring as it simply doesn’t fit together.
Fortunately there is a way to fix this and have a nice level floor once again, read on to find out how.
Why do Floor Joists Sag?
There are several reasons why floors will sag and bow over time, the most common causes are that they’re not strong enough, they’ve rotted or that the bricks or blocks supporting them have crumbled and given way.
Joists not Strong Enough
Many years ago they’re wasn’t the strict rules and regulations governing the construction of houses so in some cases, just making do was the way to go and the materials that were at hand were the ones that were used and occasionally when it came to timbers, these just weren’t sturdy enough to support the weight they were subjected to.
Although in many cases joists such as these don’t break and they do stand the test of time, however due to furniture and foot fall they do sag at their weakest points.
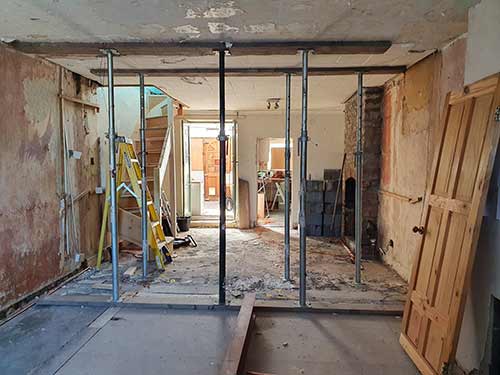
Weak, sagging ceiling propped back up with acro props
Rotted Timbers
One further cause for sagging and un-level joists and floors is the fact that where the end of the timber is fixed into a supporting wall in order to hold it up, over time water and moisture can penetrate through the wall and soak in to the timber.
When this happens and it’s left unnoticed for a long time the end of the timber will rot and eventually lose the ability to support the joist where it will then drop causing it and the floor it’s supporting to sag.
More information on this can be seen in our repairing structural joists project here.
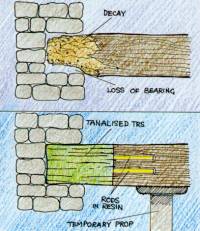
Rotten joist end in wall and subsequent repair
Crumbling Brickwork
Similar to the above, if the brick or block work that supports the end of the joist starts to decay and crumble then this in itself will loose the ability to support the joist and it will drop and sag which will then be reflected in the joist or ceiling.
When it comes to what can cause the supporting brickwork or block work to decay and crumble, these can be various, however the most common cause is again moisture, water and time.

Crumbling brickwork repaired to support joist end
What’s the Problem With Sagging Floor Joists?
The problem of sagging and un-level floors is one mainly reserved for older period properties and when viewing such places, in some ways we almost expect to see them.
However despite their somewhat quirky period charm, they can be an absolute nightmare. The first and most significant point is the fact that there is the potential for collapse, which can lead to thousands in repair costs and also the obvious risk or serious injury.
The second issue is the fact that, when placing items such as cupboards, kitchen units, shower trays and the likes on them, nothing sits square e.g. against walls and also against other surrounding objects.
Additionally, if you try to lay any form of tongue and groove or clip together flooring such as laminate or engineered flooring, it’s almost impossible as it will in no way bend or undulate with the contours of the sagging.
Methods of Leveling Floor Joists
If you are suffering with uneven floors and sagging floor joists, despair no longer as there are certainly ways to fix the issue, however the fix used will ultimately depend on what’s caused it in the first place.
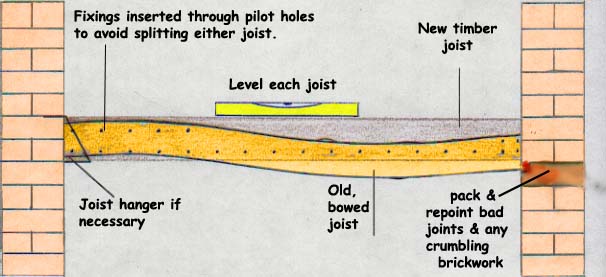
If the floor is sagging due to the fact that a joist or joists are too weak, a repair is as straight forward as simply fixing a new straight joist to the side of it, that effectively reinforces and replaces it.
The new timber should be taken the full length of the old joist even if there is only a slight bow in the middle. Remember the old joist bowed because it is too weak, you must therefore give it as much strength as possible.
However, if the bow, or slope, is due to the joist support itself (brickwork or timber) or the actual end of the timber having crumbled away over time, then this fault must be addressed before a satisfactory repair (normally the above) can be effected.
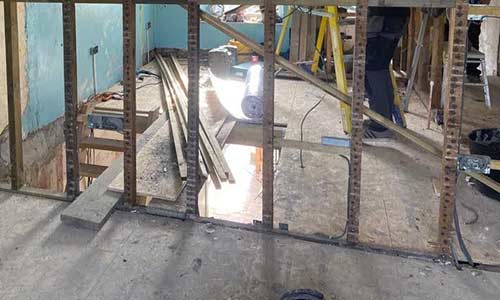
Old, crumbling bricks or rotten compressed timber should be knocked out back to a solid surface and replaced or jointed properly wherever possible to provide a new solid mounting surface.
Where the end of a joist sits on or within a wall, an alternative to this is to re-hang it using a joist hanger instead. This will provide an equally strong support but prevent any future potential rot issues.
These are galvanised metal brackets, into which you slot a joist. They have a strong lip, which is then inserted into a brickwork joint, or fixed on a timber or steel support.
If it is the end of the timber that has crumbled, this will have happened for a reason. Look for signs of damp in the wall, and rot in the timbers. Get to the cause of these defects first and eradicate them before putting any new timbers in place.
In the case that the supporting end of the timber has rotted away, rather than adding a new supporting timber as sometimes this isn’t possible, the end of the timber can be replaced. See the repairing structural joists project we have linked to above for help on how to do this.
One additional point to note is that if you find that the majority of joists in the floor are sagging then the best and most thorough fix is to remove and replace them all, rehanging them to ensure they are level and true.
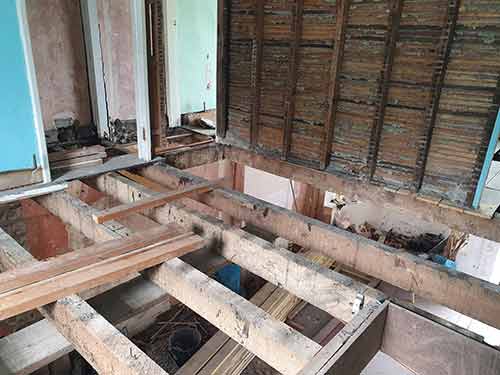
Ceiling pulled down to expose joists
Floors With High Spots
In some rare cases it may not be that the floor has sagged but has in fact bowed upwards causing a high spot.
There are various causes of this that include moisture damage from flooding or long term exposure or another cause is the fact that the timber is slightly too long and due to time, movement, weight and traffic, slowly bows upwards.
When it comes to floor level issues of bowing or sagging, bowing is the easier to rectify. In pretty much all cases the high spots can simply be planed down level to there surroundings, unless the amount of bowing means taking too much away from the timber making it weak, in which case it then needs replacing.
Tools and Products for Leveling Floor Joists
To successfully level one or more floor joists and get a nice flat and even floor, the following tools and products are needed:
- Spirit level, marbles or small balls
- Chalk
- Claw hammer
- Pry bar
- Selection of drills
- Drill/driver
- Suitable screws, should be 8 x 2 1/2 or 3 inch
- Suitable lengths of correct size timber
- Jigsaw and timber cutting blades
- Chisel
- Bricks or blocks (if needed)
- Cement (if needed)
- Clean water (if needed)
- Clamps
It is also possible to repair and replace sections of joists, in situ, without disturbing the entire floor. More on this can be found in our repairing structural joists project linked to above.
If the existing joists offer little in the way of support, there is no point using them to support the new joists.
How to Find Un-level Areas of a Floor
To be able to inspect floor joists and supports for damage (not so much ceiling joists as they are mostly visible) the only real solution is to pull up any floor coverings so that you can access the joists themselves.
Before doing so it’s a good to have an idea of the rough location of the problem joists or supports as you may only need to pull up a section and not the entire floor. Despite this however you will need to remove any coverings such as carpet or the similar as this can prevent a true reading. This can be done in 2 ways:
- Spirit Level: The go-to tool for leveling anything is generally a spirit level. Lay it on the floor and run it over the surface. Where there are any dips a gap will be apparent under the level. You will need to do this over the whole surface to get an idea where all the issues lie. Also be aware of any high spots where the floor has risen
- Marbles/Balls: If you don’t have a spirit level, this is the next best thing. Marbles or other similar small balls, once rolled gently across a floor will, naturally roll to the lowest point, indicating where any low spots are
How to Level Sagging Joists
Rather than attempt to lift the floor by packing out the gap between the underside of the boards and the top of the joist, which is what many attempt to do (the packing invariably works loose as the floor moves with use), it is easier, and more cost effective in the long run, to remove the floor boards and level any sagging joists by fixing new, straight ones, to them.
The below image is of this exact process and this is what we will be working towards in the below explanation.
Step 1 – Clear Floor and Determine Issue
The very first task is to completley clear the floor area of any soft coverings such as carpet or the similar as this will likely hamper any efforts to work out where any sagging is occurring. This is mainly for ground floors as for ceilings, the problem area should be apparent.
Once removed, run your spirit level over the surface of the floor looking for any gaps to indicate dips and sagging. Where any are apparent, mark the area with chalk.
If you don’t have a spirit level, use some marbles or small balls to locate any sagging as we have described above.
Once you have identified the problem areas you will need to remove the floor boards and inspect the damage. This can be tricky to do as most are tongue and groove.
If there is a great deal of sagging and potential damage then it’s best to pull them all up. This is slightly easier as you can start along the edge of a wall and remove one at a time.
If there are screws, remove these first and then simply get a claw hammer or pry bar down the side of the board where the screws/nails are as this indicates where the joist is and gently lever it up. Do this a little at a time along the length of the board as to not damage or break the tongues off. Repeat this for all floor boards.
If the damage and sagging is localised to one area then you can either pull the whole floor up or remove only a section. To remove just a section, remove any screws in the board and then using a hammer and chisel, cut all the way along the tongue, breaking it away.
Although this will damage the board, it’s necessary. Once cut, get your pry bar or claw hammer down under any nails and gently pry the board up. Again work a little at a time up and down the board. Once you have removed one the rest should come up easy.
For any solid floors e.g. ply, OSB etc. to remove everything is pretty much the same process as above, however for just a section you can drill a hole large enough to get a jigsaw blade in and cut a section out.
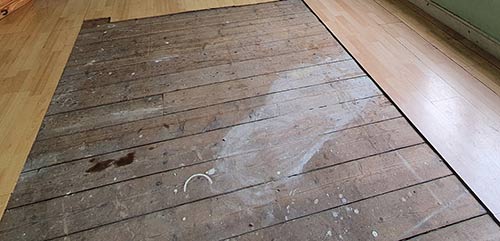
Remove any floor coverings to access floor boards and joists
Step 2 – Purchase Repair Items
Once you have identified the main issues you should now be able to see exactly what needs to be repaired or replaced.
As this example focuses on joists this is what we will be looking at, however you should also check, where and how the timbers mounted e.g. what it’s sitting on.
If the bricks, blocks or timber it’s sat on is decaying this will also need to be repaired/replaced so take note of any bricks, blocks and cement that will also need to be purchased.
When it comes to the timber, this can be bought from your local builders merchant or DIY store. Each new joist should be checked by laying it on a level surface, on its narrow edge, before purchasing. There is little point replacing bowed timbers, with bowed timbers!
Another thing to think about is what size timbers you use as a replacement. As in most cases the joist you’re fixing has sagged due to the fact that it’s too small to carry the weight it’s subjected to, it’s wise to upgrade to larger timbers if possible, such as 4 x 2 or 5 x 2.
However sometimes this isn’t possible so reinforcing with the same size timber will suffice.
Step 3 – Lay New Joists
With everything prepared it’s now time to actually level any damaged floor joists. Measure the total length of the joist that needs repair and then cut a new joist to the same size.
Butt the new joist up to the damaged one and ensure both ends are sitting firmly on their mounting point. If the support isn’t adequate then consider fixing a joist hanger in place. Make sure once fixed the top edge of the new joist is level with those surrounding so that you won’t then have any upward bows.
With the new joist in place, use several clamps to clamp both the old and new joists together.
Once clamped, as in the image below, drill a series of pilot holes along the length of the old joist, top and bottom where you can and where you can’t in a single row. Check the level of the new joist once more and then using suitable screws, screw the old joist to the new one.
Bowed Floor Joist
If it’s all the joists that are faulty, then as commented you will need to replace them all. To do so it’s best to start with the two end joists. Then a string line can be fixed to the top of these two, new joists that span the entire room, giving you the level for all other joists in between.
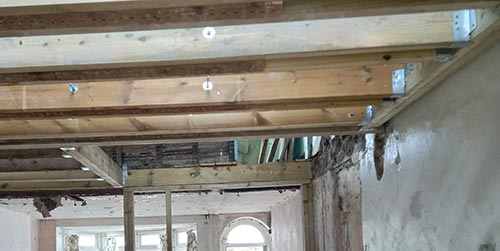
New ceiling joists fixed using joist hangers
Step 4 – Lay Floor Boards
Once you have laid your new joist or joists out you can then lay floor boards or timber sheeting over them.
If you are laying sheet timber then you should use at least 18mm tongue and groove (preferably 22mm if you can) and ideally joints should be glued as well as screwed as this will reduce any creaking.
If laying floor boards, these need to be laid across the joists at 90° top them. Any joints should meet at the centre of the joist. All floor boards should be screwed at least twice per joist. Ensure all screw heads are countersunk below the surface.
You can also use nails in place of screws if you wish.
The above is a very brief run down of how to lay floor boards, for a full and detailed description, see our how to lay floor boards project here.
New floor laid over new floor joists
Step 5 – Check Everything is Level
Once the floor boards are down the only job to do now is just to recheck all levels to ensure that you now have a nice flat and even floor.
To do so, use a spirit level laid on the floor and run it over the surface ensuring that it’s level in all directions.
As soon as this has been confirmed you can then go ahead and re-lay any and all coverings such as carpet, laminate etc.
Leveling floor joists when they have become damaged and sagged is quite an involved job, but ultimately one that needs to be done to ensure you can correctly lay rigid floor coverings and also safely place any furniture. Although quite a large project, it’s certainly something that can be done on a DIY basis.