We get many questions asking "how can I easily tell if a wall I want to knock down is load-bearing or not?"
There is no easy answer. Houses are constructed in many different ways, most conform to building regulations, some don’t. Finding out if a wall is load bearing or not involves investigation, and some of this investigation involves pulling up floorboards throughout the length of the house.
Even builders have been caught out, on many occasions, by commonly held beliefs.
"It’s a timber stud wall covered in plasterboard, therefore it cant be load-bearing"……. WRONG
"The joists are running parallel with the wall so it cant be load-bearing"……. WRONG
"There are no solid walls upstairs so it cant be load-bearing"……..WRONG

Floor or Ceiling layout diagram
The diagram represents a first floor/ceiling. A and B on the diagram represent two rooms divided by the brown, timber stud and plasterboard (in this instance) wall. If, for example Mrs. Street wanted to remove the wall the first question would be "is it load-bearing?".
After taking measurements to the wall from a fixed point downstairs, she does the same upstairs and realises there is (ignoring the dotted lines for a moment) no wall directly above it. Therefore it is not carrying a direct load, which, being plasterboard, one would expect.
While upstairs, she checks the direction that the floor boards are running. Floorboards are almost always laid at 90 degrees to the joists. The wall below must be running parallel with the joists meaning they cannot be sitting on it.
Having made these investigations in above room B, she decides on one last check to make sure, and lifts a floorboard which runs over joists 2 and 3. This final investigation prove that the joists run parallel to the wall and it cannot be load bearing and work begins on a new opening through wall A.
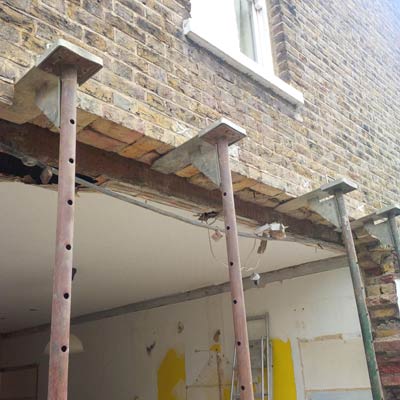
Strongboys added to top of props to support load bearing wall

Load bearing wall supported and propped
Whoops!
Wall A is constructed in plasterboard and timber. This would not be strong enough, under normal construction methods, to hold the floor above. But in the past it had been necessary to install a staircase to these rooms above. This meant cutting a hole in the joists and installing a "trimmer joist" (1 on the diagram).
This trimmer had to be supported on something stronger than the plasterboard wall, so a support was introduced and hidden within the wall. If wall A were built in brick or blocks (solid wall) then joist 1 would have been built into it to support the floor. The wall would still be a supporting wall, albeit in only one place. This one point of support is still carrying a large percentage of the floor load.
This support is by no means just for this example. It is a common way of transferring a load from its old bearing to a new one. When the load of an area, such as the floor in question, is supported in one place, it is called a "point load". This has caused more than enough refurbishment accidents! Point loads are common in new buildings too where stud and plaster walls are being used more and more.
The only way to be absolutely sure whether a wall is load bearing or not is to investigate along its entire length.
In the diagram, if the brown wall was solid, ie brick or block, and it continued into the dotted line area, the wall would be bearing the weight of the load above. If the joists ran the other way and their ends rested on the wall, it would be a load bearing wall.
But what if the joists ran the other way and did not end on the wall. They ran from the end marked "floor boards" to the far end of room B. How then could we tell because it may not be entirely obvious that they are sitting on the wall in question.
The building regulations are compiled with a series of approved documents. Approved document A covers loading, ground movement and disproportionate collapse.
In appendix A there are a series of tables which are used to calculate the size of timbers necessary to give adequate support to floors, ceilings and roofs. Using these tables, it is possible to work out whether your joists are strong enough to support themselves and the load they carry, without the help of any walls underneath.
The timber floor of a property obviously weighs something. This weight consists of the timber joists, the plasterboard ceiling underneath it, the floorboards and even the nails or screws used to fix both of the aforementioned coverings.
All of these are known as "the dead load" and the joists themselves must be able to support this dead load without sagging. For a normal property, with chipboard or timber floors and plasterboard ceilings, this dead load is generally taken by architects and planners to be no more than 0.50 Kilo Newtons per square metre. (kN/sq.m)
The weight we place upon a floor by way of bathroom suites, beds, wardrobes etc, is known as the "imposed load". It is again accepted that, for normal household requirements, the imposed load will not exceed 1.5kN/sq.m.
The building regulations tables A1 and A2, list the size of joist necessary to support this weight, over a maximum span.
Table A2 uses timbers known as "SC4" which are high strength timbers containing very few, if any, knots. These timbers if you have them in your property, will be stamped C24 by the timber yard that supplied them.
They are not common in modern day construction unless specified and we will deal with the more generally used timbers, dealt with in table A1. These timbers are known as SC3 and will have C16 stamped on them.
This table is for a dead load of more than 0.25 but not more than 0.50 and allows for an imposed loading of no more than 1.5 kN/sq.m.
This is an abridged representation of Building regulations Table A1
Spacing (distance apart) of joists or joist spans are stated in mm.
Floor Joist Span Chart – Table A1
| Size of joist | 400mm | 450mm | 600mm | |||
| 38 x 97mm | 1.72m | 1.56m | 1.21m | |||
| 38 x 122mm | 2.37m | 2.22m | 1.76m | |||
| 38 x 140mm | 2.72m | 2.59m | 2.17m | |||
| 38 x 147mm | 2.85m | 2.71m | 2.33m | |||
| 38 x 170mm | 3.28m | 3.1m | 2.69m | |||
| 38 x 184mm | 3.53m | 3.33m | 2.9m | |||
| 38 x 195mm | 3.72m | 3.52m | 3.06m | |||
| 38 x 220mm | 4.16m | 3.93m | 3.42m | |||
| 38 x 235mm | 4.43m | 4.18m | 3.64m | |||
| 47 x 97mm | 1.92m | 1.82m | 1.46m | |||
| 47 x 122mm | 2.55m | 2.45m | 2.09m | |||
| 47 x 147mm | 3.06m | 2.95m | 2.61m | |||
| 47 x 170mm | 3.53m | 3.4m | 2.99m | |||
| 47 x 195mm | 4.04m | 3.89m | 3.39m | |||
| 47 x 220mm | 4.55m | 4.35m | 3.79m | |||
| 50 x 97mm | 1.98m | 1.87m | 1.54m | |||
| 50 x 122mm | 2.6m | 2.5m | 2.19m | |||
| 50 x 147mm | 3.13m | 3.01m | 2.69m | |||
| 50 x 170mm | 3.61m | 3.47m | 3.08m | |||
| 50 x 195mm | 4.13m | 3.97m | 3.5m | |||
| 50 x 220mm | 4.64m | 4.47m | 3.91m | |||
| 63 x 97mm | 2.19m | 2.08m | 1.82m | |||
| 63 x 122mm | 2.81m | 2.7m | 2.45m | |||
| 63 x 147mm | 3.37m | 3.24m | 2.95m | |||
| 63 x 170mm | 3.89m | 3.74m | 3.4m | |||
| 63 x 195mm | 4.44m | 4.28m | 3.9m | |||
| 63 x 220mm | 4.91m | 4.77m | 4.37m | |||
| 75 x 122mm | 2.97m | 2.86m | 2.6m | |||
| 75 x 147mm | 3.56m | 3.43m | 3.13m | |||
| 75 x 170mm | 4.11m | 3.96m | 3.61m | |||
| 75 x 195mm | 4.68m | 4.52m | 4.13m | |||
| 75 x 220mm | 5.11m | 4.97m | 4.64m |
It is now possible to measure the complete span of your floor joists, together with the distance between them and the size of the timbers. This should be compared to the table. If your joists do not meet the requirements set by the table, they are either supported somewhere from underneath or they were installed pre regulations (general use 11 November 1985).
If they meet the requirements then it is safe to remove a wall underneath providing the ends of the joists are well secured at each end.