Filling in, bricking or blocking up old window and doorways seems to be a regular pastime for our users. It is so surprising how a room can be made much larger simply by moving a door from the middle of a wall to the end.
The fact that the door is in the middle means that both sides of the wall around the door have to be kept clear and no furniture can be placed along that wall. Move the doorway to the end of the wall and you have freed up two walls!
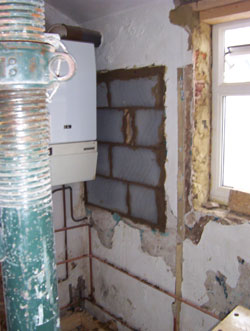
Window blocked in
Filling in a door or window opening is not hard and as long as you have the correct equipment it can be done fairly quickly. See our project on removing window and door frames to first get the old wooden frame out of the way. We have seen many people try and save time and money by leaving the frame in when they try to block up an opening but this never works.
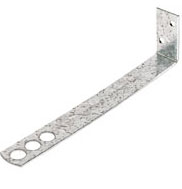
Frame tie
Once the old frame is out of the way you will need to fix some frame ties either side of the opening. Frame ties are made of galvanised metal bent to a right angle. The short side is fixed to the edge of the opening by drilling the masonry and plugging and screwing the frame ties in place. See our project on fixing to masonry to see how to use a wall plug and screw. You will need to scroll down to the second part of the project page.
We recommend you use lightweight block to complete this task. They are easy to cut using an ordinary timber saw (be prepared to throw the saw away afterwards as cutting blocks will blunt the saw for cutting timber) and light enough not to cause a problem when laying.
The frame ties need to be fixed to the walls in the joints of every other course of blocks as shown in the diagram. This will give the wall the strength required to plaster it and allow it to become part of the existing wall.
There are other options available as well as frame ties. Using a sharp pair of tin snips you can cut some lengths of Builders Band or Expanded metal lathing and bend the lengths into shape. These can then be fixed to the wall as you would the frame ties. The image above shows an old window having been blocked up.

Position of frame ties
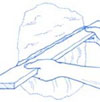
Drag off surplus with plasterers darby
When the frame ties are in place the blockwork can be laid. Most internal walls are 4 inches or 100mm thick with 12mm of plaster stuck on each side.
Obviously when laying the blocks in the opening they should be laid to allow the new plaster to be put on both sides to the same thickness as the existing plaster. This will allow you to get a smooth finish where the new plaster meets the old plaster.
When the blockwork has gone hard it can be plastered. See our various projects on plastering. For the first coat of plaster you will need what is called a base coat or scratch coat and when this is complete it is topped off with skim plaster. The base coat of plaster should be laid so that it finishes level with the existing wall either side of the opening and then any surplus is dragged off using a plasterers darby. All the tools needed for this project can be seen below in the tool box or are dotted about this page. Simply click on any of the tools to find out more.
After plastering the new wall you will of course need to position some new skirting board and if any part of the job you have planned is in an external wall you will need to insert a damp proof course to protect the masonry from rising damp.