Please note that this operation will very often carry a requirement for building regulation approval: Please check with the building control department of your local council.
What is a Load Bearing Wall?
A load-bearing wall is one that supports the structure or structures above it. This can be simply the floor, roof or the top half of the same wall you are working on.
To provide an opening in it, it is necessary to transfer the weight of the load above this new opening to the sections of wall either side by means of a lintel.
The lintel itself takes some of the weight so it important that this should be of a suitable nature for the circumstances and load. For more information, see our load-bearing walls project.
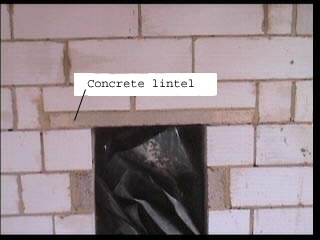
Concrete lintel in place above doorway

Patio opening with cavity lintel
The wall you intend to open up may not just be supporting the weight of the wall above it. There may be floor joists fixed into the wall and in some cases, roofing beams and rafters.
The combined weight of these things will need to be taken into consideration when working out the size of the lintel you need to support it and we strongly advise using the services of an architect to establish the lintel size for you.
Forming Openings in Load Bearing Walls
Insert Steel Needles to Support Weight
The load above must be supported at all times. It is very dangerous to make the hole and hope everything stays put until you get a lintel in. Before you take a single brick out of the wall make sure everything is supported.
Do this by drilling or making holes as close to the ceiling as you can and inserting very strong steels or timbers through them so that these needles stick out either side of the wall by at least 18 inches to give you room to work later on.
These needles should be inserted every 2 feet across the full width of the opening you are to make. For example a 3-foot doorway will need a 4-foot lintel inserted above it to allow 6 inches bearing either side.
It will therefore require 1 needle in a central position, and one at 2 feet either side of that. We prefer to use steel needles, and your local builders merchants may stock reinforcing steel to a 50mm diameter If not, you will need a steel stockist.
Using steel is much easier as the holes for these bars can simply be drilled with a 50mm core drill bit which can be hired, with a strong drill, from your local tool hire centre.
Support the Steel Needles With Timbers Head Trees
When your needles are in, a strong timber (say 3-inch x 3 inch) with no cracks, needs to be placed up to the underside of them at each side of the wall. These are called head trees and are held up by props (Acroprops) from your local tool hire shop, again at 2-foot centres.
It is ok to have one prop at the end of each needle, but for a large opening that means a great many props, and using a head tree allows you to reduce the props by having one prop in the centre of each pair of needles. This is repeated on the other side of the wall.
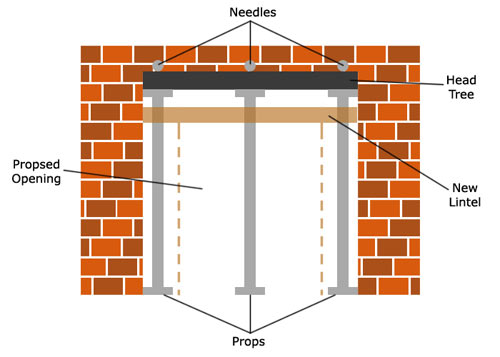
Forming an opening in a wall
Cutting out Masonry and Insert Lintel
When the above support is in place, you can cut out for your lintel. This should be 12 inches wider than the opening, to allow it to sit on at least 6 inches of masonry either side of the opening you are about to make.
Cut a hole for this and insert it, also leave room to insert a cavity tray if you are not installing a proprietary cavity lintel.
Rebuild Masonry Around new Lintel
Rebuild the masonry making sure there are no voids for the brickwork etc to drop into. This may mean forcing in some sand and cement mortar and even banging in some pieces of roofing slate, which has an incredibly high compressive strength.
Damp Proofing for External Walls
If this is an external wall you must insert a cavity tray damp course above the opening. (See our project on lintels and cavity trays).
Any moisture in the cavity will be directed to the external skin of masonry and can run through the weep holes you must leave in it. Proprietary cavity trays can be bought and used in conjunction with concrete lintels, or damp proof material can be used to form this tray.
Cutting Your new Opening
When your lintel and cavity tray are in, and the sand and cement has hardened, you may remove the props and needles and cut your opening, the lintel will take the weight of the load above and spread it to either side of the opening.
Forming Openings in Non Load Bearing Walls
Mark out Your new Opening
By far the quickest way to form an opening through a non load bearing wall, is to mark your opening and cut the width right up to the ceiling, then mark out for your lintel and insert it at the correct height, cutting it into the sides of the wall 6 inches either side for its bearing.
Rebuild Above Your Lintel
Then rebuild the wall above the lintel making sure you tie the new work into the old so you do not have a totally separate panel. These ties may be in the form of frame cramps, which are bought cheaply from the builder’s merchants and are plugged and screwed to the sides of the existing walls and “built in to the joints of the new work.
This infill can also be done using timber "studwork and plasterboard. The upright studs can be plugged and screwed to the sides of the wall above the new frame and horizontal members fixed between them.
This reduces the need for a lintel and the plasterboard can be fixed to the timber above the frame. If the wall is of 4 inch block work for example, with half an inch of plaster on either side, a 4 x 2 inch timber + a sheet of 3/8ths (9.5mm) plasterboard each side, plus skim plaster, will make up the exact thickness of the wall.
This is the same system one would use when blocking off an old doorway after removing the existing frame. The diagram below is as shown from above the opening.
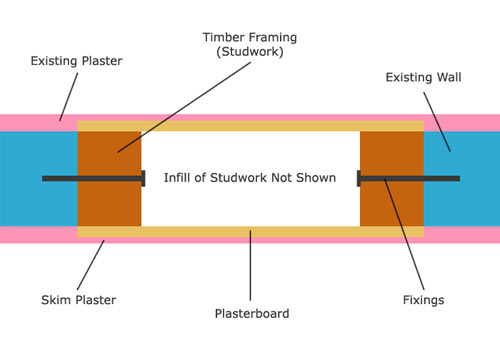
Stud work infill for a non load bearing wall