Condensation in the loft can lead to damp which them can cause mould and then possibly rot. It is such a serious problem that we have a whole section on the website dedicated to damp.
Quite often people see some signs of damp in their loft, or water dripping from the underside of the felt or rafters and automatically assume they have a leak. This is most definitely, not always the case.

Damp causing mould on roof timbers attributed to condensation
In this project we will look at dealing with condensation that is occurring in your loft space. In the worse case scenario this can cause the roof timbers to rot, but typically it will make the loft space smell musty and mould and be unusable for storage, which is very frustrating. We have a project on how to lay loft boards to make storage in your loft here.
Condensation and Ventilation in Loft or Attic Spaces
Essentially there are two elements to dealing with condensation; the first is to understand where comes from, and the second is how it is removed from your home.
There is no stopping moisture in the home. We create it from cooking, boiling the kettle, washing and even breathing out. This moisture is warm and will rise with the warm air in our houses, eventually finding its way into the loft.
Despite featuring extractor fans in kitchens and particularly bathrooms which create the most moisture that disposes of some of this moisture outside, inevitably some will get through the ceiling or rise through the loft hatch if it does not have a good seal and get into the loft.
Most homes will have all the features to reduce moisture getting into the loft, but we have to accept that some will get in there. Then the question becomes how to deal with it. This is where what project focuses on.
It is very important that your loft is ventilated. As we have discussed, poor ventilation leads to condensation forming and this condensation can soon rot roof timbers and cause structural damage.
How to Spot Signs of Condensation and Damp in the Loft?
You will be able to see signs of damp and condensation in one of these way:
- On a cold day there will be condensation on the roof felt – this will be droplets running downs the underside of the roof felt
- Drips or drip marks on the insulation
- Worse, the moisture might come through the ceiling and stain it
- Wet or damp timbers
- Black mould can form where condensation has been heavy, on the felt or the timbers
It can be hard to tell if it’s condensation or the roof is leaking, particularly as it can be astounding how much moisture can condense in the right (or should we say, wrong) conditions.
Typically a leak will usually have an evident external cause and be localised whereas condensation will be across the whole roof space.
Condensation will tend to be on the high parts of the roof, where as a leak might not be, or the evidence of a leak might be lower down. Condensation will be there on cold days because water condenses when the warm moist air touches a cold surface. Leaks will typically show during or after rain.
We are quite used to seeing condensation in the bathroom, firstly in the form of hot steam as we shower or bathe, but then, as the bathroom cools, the steam condenses on the ceiling, cold water pipes, tiles etc. It is not so obvious in the loft.
Normal air gets warm and rises. It filters through the ceiling, getting warmer as it passes through warm rooms and eventually gets into the loft. The loft is usually colder than the house rooms and as soon as the rising warm air hits a colder surface the vapour immediately turns to water.
If you are in any doubt about your own loft, you should seek advice from a builder or roofer. You can find one local to you here.
Cold Roof versus Warm Roof
If you are suffering from condensation in your loft it will be a “cold roof”. This is the most common type of roof with a loft or attic.
We have a full description of the different types of roofs and their insulation in this project, however simply a “cold roof” is one where the insulation in on the loft floor keeps, or is supposed to keep, the warmth in the room below.
A warm roof will have the insulation in between the rafters directly under the roof tiles which means that the loft space will be heated also. They tend to only be used in smaller lofts where the cost of heating a large void space will not be too expensive.
The vast majority of lofts or attics in this the United Kingdom are cold roofs, and this is where condensation will occur. It is not likely to occur in warm roofs and if it does there will be other steps to take.
How to Ventilate a Loft or Attic to Prevent Condensation
If there are no roof windows (opening these is the quickest and easiest way of providing ventilation in a loft) then follow the loft floor along to the point where the roof comes down to meet it.
At this point (called the eaves) there should be a gap between the underside of the roof and the outside wall. This gap should be about 50 – 75mm wide and will usually have a meshed grill within it stopping insects and birds getting in.
This should be clear of insulation (or anything else for that matter) so that air can flow up into the loft space, circulate and then out the other side removing any moisture by cooling warm air down before it hits a cold surface.
The vast majority of condensation issues in lofts can be cured by pulling the insulation back from the eaves. Whether by accident or misunderstanding insulation gets pushed in and stops this vital source of ventilation.
On some occasions this will not be enough to cure the issue so we advise you run through the following steps to gradually improve the ventilation until you have enough to stop the issue. This is our check list of things to work through if you do see signs of condensation in your loft:
- Check that bathroom extractor vents are venting outside of the loft. They sometimes come un-attached from the roof vent allowing the wet bathroom air to be pumped directly into the loft space. This will condense when it touches anything cold, like the underside of the roof. Extractor vent pipes should be insulated to stop water condensing on the inside of them and running back into the extractor fan
- Pull the insulation back from the eaves as we described above. This is the most common issue causing lack of ventilation and condensation
- Add felt lap vents. If there is still not enough ventilation from the eaves then it is possible to spread the overlap of the roof felt under the tiles to encourage more air to move through it. It is particularly effective if you have an old bitumen felt when can stick together when heated in the sun
- Add Vent Tiles or Ridge Vents. This is more involved as you will need access to the roof from outside, and this might need scaffolding, or certainly ladders. One (or possibly more) of the roof tiles is replaced with a vent tile which, as the name suggested has a vent in it to allow air to rise out through it
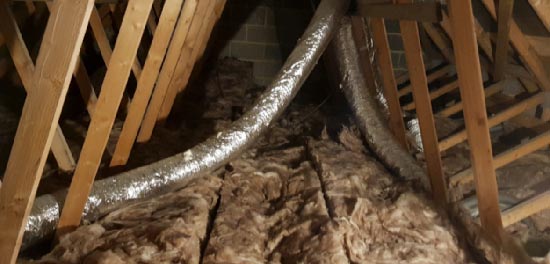
Extractor vents can pump wet air in to a loft space if they become unattached
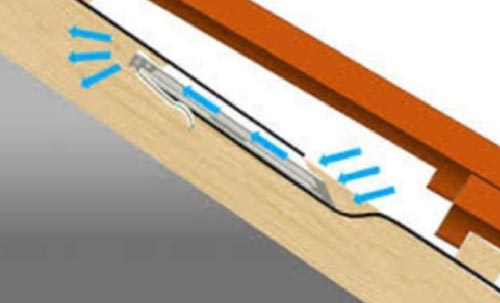
Side view on a felt lap vent separating the roofing felt to increase air flow – Image courtesy of Manthorpe
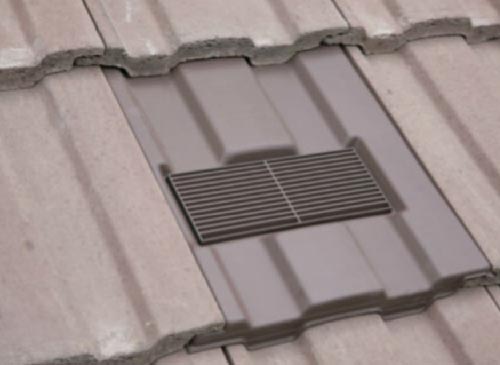
Roof tile vent designed to match standard Marley Ludlow Major Roof tiles
These are the same tiles that provide a terminal for soil vent pipes or mechanical extraction units most commonly bathroom extraction. Most probably you would have checked that the extractor pipe was attached to the underside of one of these in step 1, although they can be vented in other locations also.
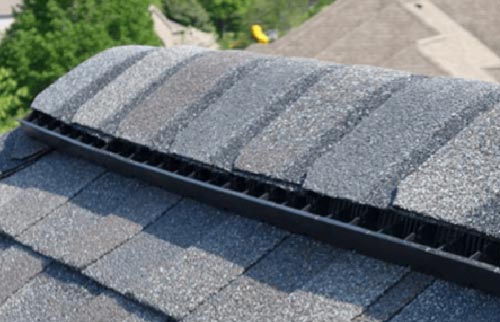
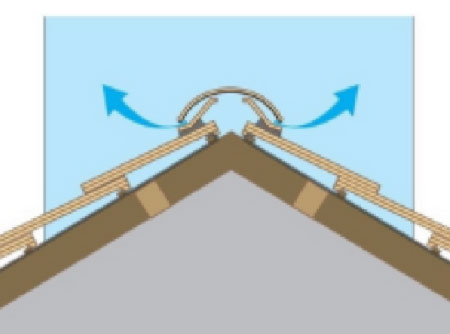
Ridge Vent tile
Ridge tile vents are placed on the ridge, at the very peak of the roof to allow warm air to escape rather than condense in the roof space. The vent ridge replaces a normal ridge tile and the felt below the vent ridge is cut to allow the air out through a sleeve which comes with the ridge tile. Ridge tile vents can, by adding a pipe adapter, also be used to fix an extractor fan hose to.
Ventilation ridge placed on roof with slit cut into felt to allow warm air out. Images courtesy of roofing ventilation.co.uk
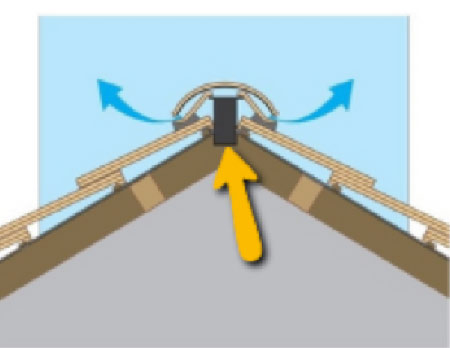
Vent ridge, fitted to roof with felt cut to allow a vent sleeve to drop down below rafter level
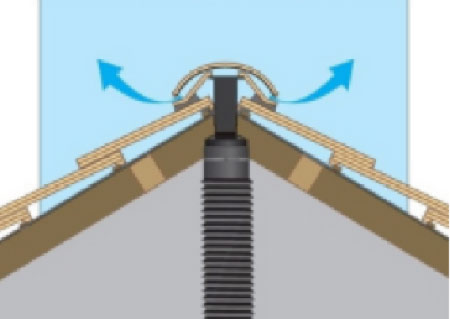
Vent ridge with sleeve fitted together with pipe adapter for extractor fan
How Many Vents are Needed to Ventilate my Loft?
By the time that you have completed all these measures you should have enough ventilation in your loft of attic space to stop condensation forming but it pays to be sure. F you need to go to the expense of getting a roofer to fit vent ridge it pays to make absolutely sure you have enough. That said, too many is not helpful as they are awkward to remove should you need to.
There is a calculation that is use to work out the airflow required but it is based on a given airflow requirement. This is determined by building control or another expert, and typically not available if you are trying to find a solution to the ventilation problem retrospectively.
A rule of thumb is that, for a normal double pitched roof (IE sloping on both sides) of 15 degrees slope or over, you would need (to vent it properly) a continuous 10mm opening all along the ridge. This would give you a “free” air flow per m, of 1m (=1,000mm) multiplied by 10mm = 10,000mm2.
So, for example, if your roof is 8m long, you would need 8m (=8,000mm) multiplied by 10mm =80,000mm2.
A normal sized Marley vent ridge has a ventilation capacity of 12,000mm2.
This then means that your roofs free air flow (80,000mm2) divided by a ridge vents ventilation capacity (12,000mm2) would suggest 6.666 vent tiles, so you would need 7.
Ventilation is critical to ensuring that you do not get damp in your loft or attic space. If you follow our sequence for adding more ventilation into your loft it will increase the airflow and reduce the levels of condensation hugely.