Fitting a loft light in your loft is an essential step if you are looking to use your loft space for any form of storage.
Trying to track down the Christmas decorations or find the suitcases whilst holding a torch in your mouth and balancing on the ceiling joists is just asking for trouble.
One misplaced footing and you can easily put a hole through the ceiling or worse still, end up falling through causing a considerable amount of damage, both to the ceiling and more importantly, to yourself.
With this in mind, if you want to use your loft to store stuff, fitting a loft light is an absolute must as it will easily and safely allow you to locate any item with the minimum of stress and hassle.
Rules and Regulations for Electrical Work
When it comes to electrical work in the home there is actually very little you are able to do yourself and in all honesty rightly so! The consequences of making a mistake or not doing something you should have could be potentially lethal so it is essential you know what you are doing.
When it comes to wiring a loft light, this should only be done by a competent person e.g. someone with the knowledge and ability to the work to regulations standards, test it and then issue a minor works certificate. Essentially, this is only someone that is Part P registered, so wiring a loft light should only be attempted by such a person.
For more information about Part P and what electrical jobs you are allowed to tackle yourself, see our project here.
If you would like to know more about staying safe when working around electrics, see our electrical safety project here.
Where Should I put my new Loft Light and Switch?
In a standard sized loft e.g. somewhere around 7m x 5m, the general rule of thumb is to mount the light at the top of the ridge (the point where the 2 sides of the roof meet) at the centre of it’s length should provide more than enough light to illuminate all the areas of the loft space.
In terms of the switch, the best place to put this is as close to your loft hatch opening as possible so that as soon as you poke your head up into the loft area, you can easily reach it and switch your loft light on.
There are no hard and fast rules particularly in terms of where you should locate a loft light and switch, ultimately it’s up to you and your electrician to decide where best they should go. Unless you have any specific requests, generally, your electrician will go with the above.
What Type of Loft Light and Switch Should I use?
In terms of what light to use in your loft, you really have a few options:
- Fluorescent Strip Light – Traditional fluorescent strip light as found in many kitchens, schools, factories, offices etc. Will provide a decent level of light but can be a little costly to run
- LED Batten Strip Light – Very similar to the above but instead of using a fluorescent tube an LED tube is used instead. Depending on wattage (e.g. more watts the brighter the light) this type of loft light will provide more than enough light and as it uses LED’s it will also be cheap to run
- Standard Pendant Bulb Holder – The most common type of light bulb holder and found on the majority of ceilings in most rooms in the home. Can take a variety of different bulbs including fluorescent and LED and available in both screw (ES) and bayonet fittings (BC). Cost of running will depend on what type of bulb you use
Again, there are no rules on what type of light you can use, go for the option that will fulfill your needs the best. Again, your electrician will generally go with the overall best option which is usually the LED batten strip light.
Tools and Products Needed for Wiring a Loft Light
When wiring up a new loft light, the following tools and products are generally used:
- Chosen style of loft light
- Chosen type of light switch
- Enough 1mm or 1.5mm twin and earth cable to do the job
- Fused connection unit (if power being taken from socket circuit)
- VDE Electrical side cutters
- VDE Wire strippers
- Utility knife
- VDE Small flat blade screwdriver
- VDE Philips screwdriver
- Drill/driver
- 8x 40mm screws
- Standard junction box, Wago box or Quickwire box
- 6amp terminal blocks (if using junction box)
How to Wire a Light and Switch in a Loft
As we have said, wiring in a new loft light should be done by a qualified electrician, unless you are simply changing an existing light unit for a new one e.g. swapping a pendant light for an LED batten light where none of the wiring or earth path needs to be changed.
The below steps work through exactly how a professional electrician would tackle the job.
In this instance, our electrician is using the very handy Quickwire box in place of a standard junction box. The 2 do exactly the same job, it’s just the Quickwire box is a little quicker and easier to use. If you don’t have one of these we also run through the steps of using a standard junction box.
Step 1 – Isolate the Power Supply
The first job is to isolate the circuit that’s being worked on at your consumer unit. This means identifying the circuit that’s being tapping into and making sure the MCB that manages it in the consumer unit is turned off. If it’s a fuse box, the fuse is simply pulled out.
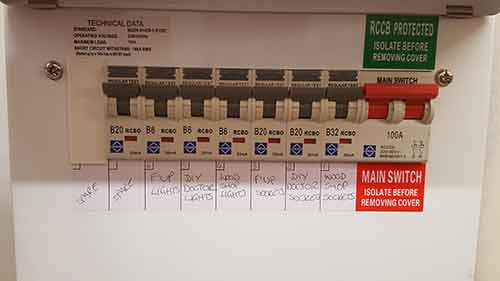
Turn off the correct lighting circuit directly at the consumer unit so that you can work on it safely
This will effectively cut the power to that circuit allowing it to be safely worked on.
For the purposes of this project our electrician will be using the Quickwire splitter box and Switch and Load systems as it’s one of the best solutions for quickly and safely adding lights, such as our new loft light to an existing lighting circuit.
To find out more about the Quickwire splitter box, checkout our full review here.
Alternatively, you can also find out more about the Quickwire wiring system on their website here.
Step 2 – Locate Existing Lighting Circuit Cables in Loft
In this instance, as we are fitting a loft light, we need to tap into an existing lighting circuit to get the power to run the new loft lighting circuit.
Finding the existing lighting circuit that powers the downstairs lights should be fairly straightforward. Simply look in one of the rooms below and make a note of the rough location of the light mounted on the ceiling.
Once up in the loft space, locate the rough area of the lights location on the ceiling below and this should contain any required existing wiring.
The size of the cable itself will either be 1mm or 1.5mm twin and earth. This is the UK standard size cable for lighting circuits.
If the cable looks larger than this, chances are that it will be 2.5mm twin and earth, which is used for socket circuits.
For more information on the different sizes of cable, see our cable sizes project here for more information.
The wires are then simply traced backwards until the rough location for the new loft light is reached.
Loft insulation may need lifting out the way to get a clear view of the existing lighting circuit wiring so it can be easily traced. Once found and traced, replace any insulation that’s been moved.
If the loft is boarded then tracing any existing wiring does become a bit of a job. Some boards will need to be lifted to access and trace the existing wiring below.
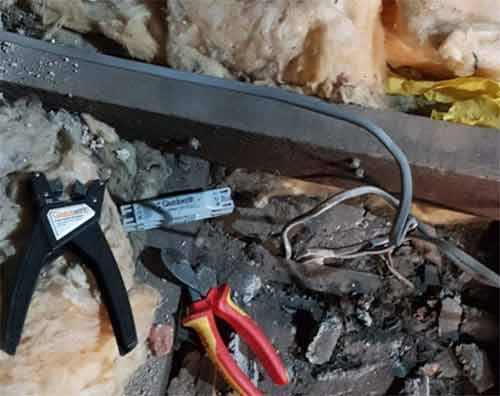
Locate an existing lighting circuit in the loft to tap into
Step 3 – Cut Existing Lighting Cable in Half
With the lighting circuit cable identified, it’s now time to cut into it to get some power for the new loft light.
Firstly, the cable is gently tugged to release some slack. If it doesn’t move then the cable is traced along and some clips removed (remember to replace them later).
Now, with some slack on the cable to play with, the cable is snipped in half in a suitable place with as much room around it as possible to make working on it as easy as possible.

Cut the existing lighting cable in half so that you can get a power source for your new lighting circuit
Step 4 – Strip Cables and Insert into Splitter Box
With the cable cut in half, it’s now time to strip the ends and insert them into the Quickwire splitter box.
To use the Quickwire splitter box correctly there are some fairly strict requirements on how much needs to be stripped off of the outer and inner cable sheathing.
To ensure that this is done correctly, Quickwire supply their very own cable strippers that will strip the cable to the exact requirements needed, these are:
- Strip 22mm off of the grey outer sheath
- 15-17mm off sheath off of each internal cores e.g. live and neutral
If fairly handy with a Stanley knife or pair of wire strippers then by all means it can be done this way, but if not the Quickwire strippers are best used.
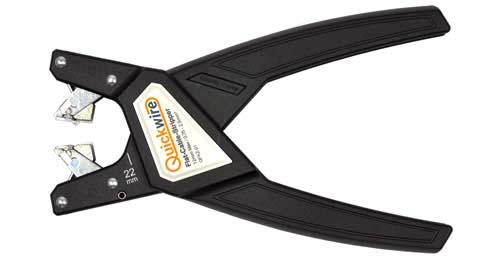
Quickwire cable strippers
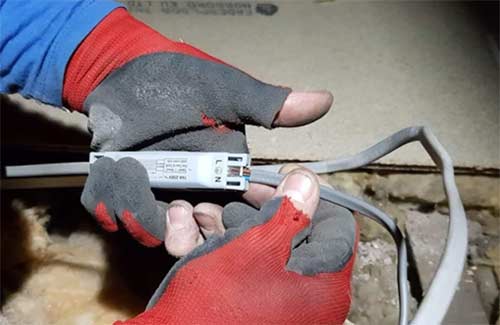
With each end of the existing light circuit cable stripped to the exact requirements stated above, they are then inserted into the splitter box.
Line up cables with the “L” and “N” markings on the splitter box, e.g. live first, earth in the middle and neutral and push into splitter box.
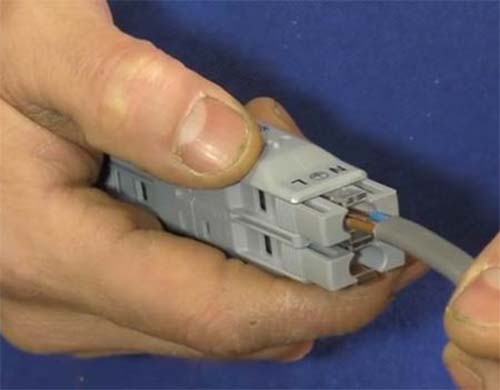
Push stripped wires into the Quickwire cable splitter box
The splitter is fairly forgiving and will locate each wire in the correct slot, as long as they are roughly in the right place.
There is a window on the side of the splitter box to make sure enough cable in the splitter before clamping it down. Ideally, the copper wire should extend down into the box. When the cable is fully in place, the clamp is pushed down to lock it.
The above is repeated for the other end of the existing lighting cable to fully recreate the loop and ensure that the circuit you have interrupted, continues to work when the power is switched back on.
The wires are then gently tugged to make sure they are fully engaged and held firmly.
Finally, a new length of 1.5mm cable is run from the splitter to the rough location of the switch
As with the above, the ends are stripped and then fixed in place in the opposite end of the splitter box to the wires from the existing loop.
A little extra cable is left at the end your new light is going so you have some to play with.
Both ends of power cable inserted into Quickwire junction box and new cable added for the additional light
Both ends of the power cable are pushed into the Quickwire junctionbox and a new cable is added for the additional light.
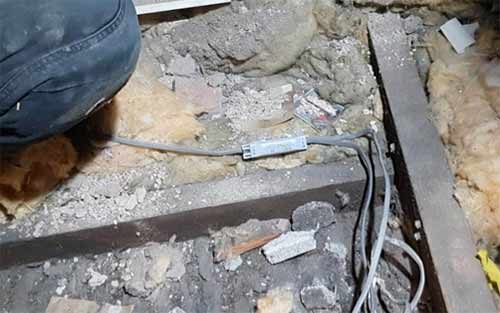
Splitter box complete with existing circuit loop reconnected and new wire run to the location of the new loft light switch
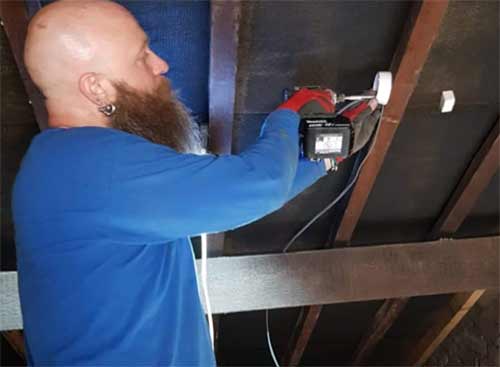
Step 5 – Fix new Light in Place and Wire up
The next job involves fixing the new light up in place.
Whenever our electricians are setting up a lighting circuit in a loft, we always opt for fitting a strip light in the loft, particularly an LED one as we find they provide the best levels of lighting and are also cheap to run.
As you can see from the image below, this again is our lighting weapon of choice in this instance.
To fit a strip light, measure the width of the ridge area and divide by 2, this will give you the centre of the ridge, mark a point here.
The box that the LED strip light came in should also feature a fixing template. The template should feature a centre point mark and then a mark around 30-40mm either side. These depict the fixing points for the strip light.
Next, the top plate of the light is removed from the main body. With this removed the top plate should come off exposing the inside of the main body and the fixings points.
The light is then placed up to the ridge with the centre point on the mark made earlier and then it is screwed place with a screw at each fixing point. It’s not fully screwed up at present, just enough to hold it.
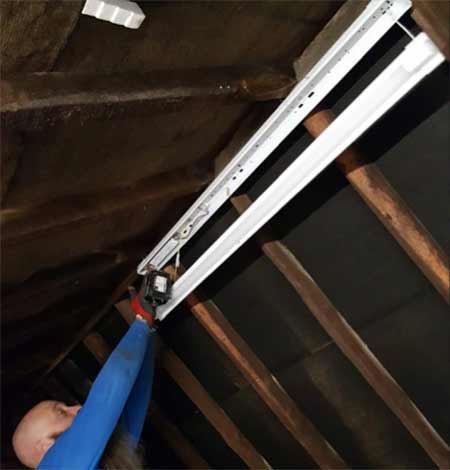
Fix the new loft light up to the rafters ready for wiring up
Now, a length of 1.5mm twin and earth is run from the light over to where the switch will be placed. Again plenty of slack is left to allow for any movement.
The cable ends are then stripped by the correct amount and then connected correctly to each terminal e.g. live to live, neutral to neutral, earth to earth.
More help and information on this can be found in our replacing a light fitting project here.
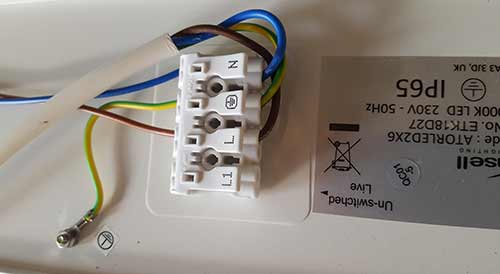
Pic of light wiring connected up – Note: this light was from our own workshop which was wired out using flex instead of normal flat 1.5mm cable
Step 6 – Fix Switch and Wire up
With the new loft light now all wired up and ready, it’s time to get the switch in place and get that wired up also.
As only one light is going to need controlling, only a single 1 way switch needs to be used.
The face plate of the switch is unscrewed and both retaining screws and the face plate are put to one side
A screwdriver is then used to knock out the thin plastic fixing hole covers and also one of the cable access areas so that the cable can be pulled through. The switch back box is then screwed in place.
A length of 1.5mm twin and earth is then run in through the cable slot and enough slack is provided to allow the switch to be wired up. The other end is run over to meet the other cables again giving some slack.
The cable sheath and cores are then stripped and the switch is wired up correctly, connecting the live wire to the “com” terminal and the neutral to the “L1” terminal. The neutral wire will now become our “switched live” wire.
To make sure that anyone that works on this switch in the future knows that this is in fact a switch live, a small piece of brown/red insulation tape is wrapped round the wire just as it comes out of the L1 terminal to signify that it’s the switched live.
Fix switch and run cable switch to junction box
Step 7 – Connect up the Quickwire Switch and Load box
With all of the wiring now in place and the light and switch wired up, before everything will work the ends of all your cables need to be connected into the Quickwire switch and load box.
This very clever little box handles all of the routing required to ensure that the switch has a constant live supply and when it’s switched on the live supply is then routed to the light.
Traditionally this is done using cables and junction boxes and requires a fair bit of knowledge in terms of how it all goes together. Wiring junction boxes can also be quite a fiddly and frustrating job.
The switch and load box does away with all of this and using the same principles as the splitter box, features 4 ports that are clearly labeled in terms of which wire needs to go where.
The ends of the 3 cables are then stripped off and each is then inserted into the switch and load box in the correct port as follows:
- Power – Takes power from the new cable that we’ve run from the splitter box
- Load – Cable running to the new loft light
- Switch – Cable running to switch
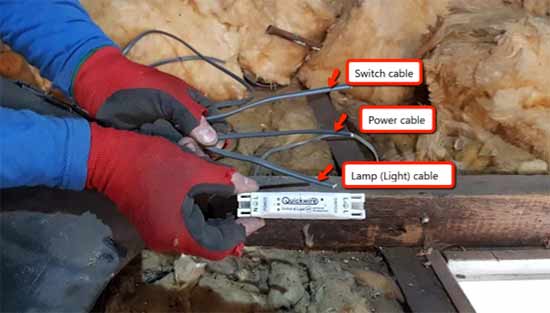
All new wiring connected up to Quickwire switch and load box that will handle all the routing of power, in much the same way as a ceiling rose would
With all wires inserted they are then clamped down giving each a little tug to make sure it’s held securely.
Before the power is switched back on, the electrician will then test the circuit fully to ensure that everything is correct and safe.
Finally, the power is then switched back on to the lighting circuit and the new light switch is flicked on to ensure that the light turns on and off as it should do.
Step 8 – Clip up Cables and Tidy up
Just before everything is packed up and the electrician makes a sharp exit towards the door, everything needs a good tidy up to keep everything nice and neat.
Before this is started the power is turned off again to ensure the working environment is safe.
Using some 1.5mm cable clips, all cables are then clipped up nicely to any available joists, just above any loft insulation that may be present.
In terms of the spacing’s for each cable clip, the regulations state that for 1.5mm twin and earth cable, clips should be added at least every 250mm horizontally and at least every 400mm vertically.
The cables should be clipped in as straight a line as possible to keep everything looking as neat as possible.
Once all your cables are clipped up nicely, everything is now complete!

Clipping up cables so their neat and tidy
Wiring up a Loft Light Using a Standard Junction box
As the Quickwire system is fairly new there are those that may still prefer the traditional method of using a standard junction box. If so then this is done as follows.
- Step 1 – Isolate Power: As with anything to do with electrics, the very first job before we do anything is to turn off the power
- Step 2 – Locate Circuit: With the power isolated, locate an existing lighting circuit in the loft and cut through the wire. Strip back the outer cable sheath and also the sheathing on both the live and neutral wires
- Step 3 – Reconnect Cut Cables: Using a 5amp junction box, you now need to reconnect each end of the existing cable to the terminals inside plus run a new cable out to the rough location our switch will be placed. With the junction box all connected up and a new cable running out to the switch, you can now get the switch wired up
-
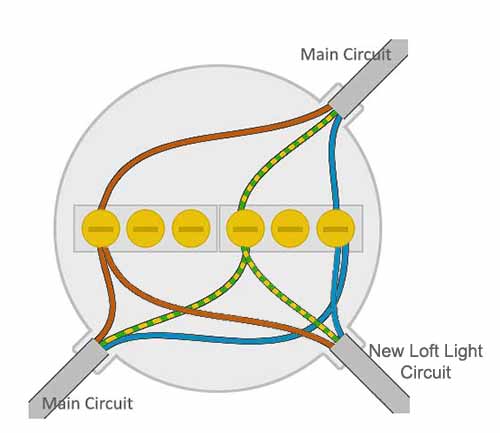
Existing cable cut and then wired to junction box with new cable tapped in
- Step 4 – Connect Com and Run Switch Wire: Strip back the outer sheath of the cable and each of the inner cores and then connect the live wire to the “com” terminal on the rear of the switch face plate. Run a new length of cable from the switch out to where your new loft light is going to be located and strip back the sheathing on both ends of the cable as you did above
- Step 5 – Connect Switch: At the switch end of the cable, connect the live wire of your new cable to the “L1” terminal on the switch. Using 2 6amp terminal blocks, connect together both neutral wires into 1 of the terminal blocks and then connect together both of the earth wires into the other terminal block
- Step 6 – Connect Light: Finally, connect up your light, connecting the live wire of your incoming cable to the live terminal of the light, the neutral to the neutral terminal and the earth to the earth terminal
- Step 7 – Tidy Up: To keep everything neat and tidy, clip all of your cables up using the specifications for spacing stated above and once done, go back to your consumer unit, switch on the power and test out your brand new loft light!
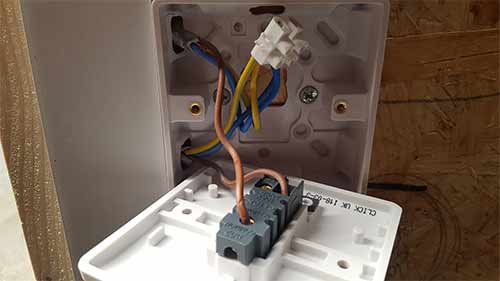
1-way loft light switch wired up with earths and neutrals connected together in 6amp terminal blocks
What if I can’t find an Existing Lighting Circuit to Take Power From?
When trying to locate an existing lighting circuit to tap into for a new loft light, it might be the case that it’s not possible to locate one and the only existing circuits are the socket circuits.
If this is the case then you can tap into one of these. This is totally fine to do, but there are some rules on how it’s done.
To do it, a junction box is inserted as described in “Wiring up a Loft Light Using a Junction box” section above, only this time 2.5mm cable is used to match the existing socket circuit.
This new 2.5mm cable is then run to a 5amp “fused connection unit” (or FCU for short).
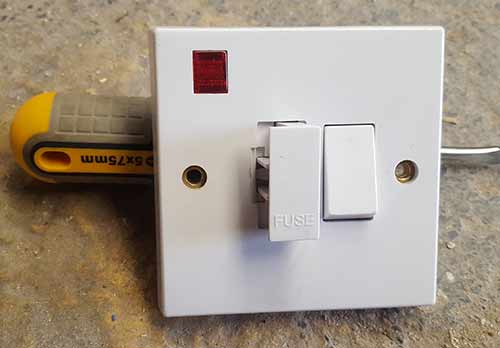
5amp fused connection unit
This unit contains a 5amp fuse that effectively reduces the existing 16amp socket circuit down to the required 5amps for a lighting circuit.
Once connected up with the fused unit using 2.5mm cable from the junction box, 1mm or 1.5mm cable (lighting circuit cable) is used to to complete the rest of the circuit.
Fitting a loft light is a great thing to do, especially if you don’t currently have any form of lighting in your loft. Although this should only be done by a qualified Part P electrician, it’s certainly a job worth paying for.