Installing loft insulation is an excellent DIY project that can significantly reduce your heating bill and enhance comfort, especially during winter. Almost anyone can do it!
Loft Insulation – The Basics
The first step is to select and calculate the type and amount of insulation you need.
The easiest insulation to install is mineral fibre or fibreglass matting, both available in rolls. A minimum of 270mm of loft insulation is recommended, meeting the U-Value of 0.16 as per building regulations (see below for more about U-Values, R-Values, and Building Regulations).
Loft insulation traps warm air between the fibres, preventing it from escaping. Other types of insulation address heat loss through conduction, convection, or radiation, but these are typically not used in a “cold roof” loft.
The installation process is the same for all rolled insulation types, including sheep’s wool and plastic.
Rolling out insulation in the loft
Follow these instructions to make insulating your loft easy.
Preparation for Insulating a Loft
Before you start insulating your loft, follow these steps:
Check Loft Access: Ensure your loft hatch is large enough to fit yourself and the loft insulation through. If not, learn how to enlarge your loft hatch. A minimum hatch size of 50cm by 50cm is needed to fit insulation rolls.
Secure Safe Access: Use a solid ladder or, ideally, a loft ladder. Ensure the hatch can accommodate both the ladder and the insulation rolls without forcing them through.
Measure Insulation Needs: Calculate the amount of insulation required. Follow our tips for accurate measurements below.
Clear the Loft: Remove all belongings from the loft. It’s quicker and safer to work in a clear space. This reduces the risk of accidents, like putting your foot through the ceiling.
Declutter: Remove any junk, old boards, and debris. Don’t worry about dust on the existing insulation unless you’re replacing it; you can cover it with the new insulation layer.
Pro Tip: Use a board (25mm thick and at least 1.3m long) across three joists to stand on. Ceiling joists aren’t designed to bear weight, and the plasterboard gaps won’t support you.
Fix Ceiling Cracks: Fill any cracks or holes in the ceiling before laying insulation.
Once in the loft, perform the necessary checks and preparations before starting the insulation process:
Clear Out All Clutter
Remove all rubbish and clutter from the loft. A completely clear space is essential for efficient work.
Moving boxes and items around will double the time and make the job unnecessarily frustrating.
Should You Remove Old Loft Insulation?
Usually, you don’t need to remove old insulation. Even if it looks tatty and has settled, it still works. Just add new insulation on top to reach the recommended level.
Insulation traps air to act as an insulator. Old insulation still does this, though less effectively due to settling. Topping it up ensures you achieve the necessary thermal performance (U-value 0.16 Km2/W) if you exceed 270mm in total thickness.
Remove old insulation only if you need access to joists for treatments, such as woodworm or mould (learn more about dealing with woodworm and infestations). Also, if you’ve had a vermin problem, it’s best to remove all insulation, seal entry points, and install new insulation.
Removing insulation is messy and space-consuming. Use tough bin bags to contain it. Bagging it in the loft minimises mess when taking it through the house. Note: insulation affected by vermin will be especially smelly and unpleasant.
Ensure Proper Ventilation
Proper ventilation in your loft is crucial. Poor ventilation leads to condensation, which can rot roof timbers and cause structural damage and great expense.
Look for these signs of damp and condensation:
- Condensation on roof felt on a cold day
- Drips or stains on insulation, or ceiling stains
- Wet or damp roof timbers
- Black mould on felt or timbers
If you spot condensation issues, address them before adding insulation to avoid worsening the problem.
For detailed guidance on resolving loft condensation issues, including causes and solutions, check our project on loft ventilation.
Measure Your Loft Area
Accurately measure your loft to determine the amount and type of insulation you need. Our guide on different types of insulation can help.
Calculate the loft area by multiplying the length by the width to get the total square meters. You can reduce this by about 10% to account for joists and trusses, but it’s usually better to have extra insulation on hand.
Here are typical coverage values for various insulation thicknesses. Divide your total area by the coverage area to find the number of rolls needed:
| Insulation Thickness | Area Covered per Roll |
| 100mm Loft Insulation | 8.3m2 |
| 170mm Loft Insulation | 6.47m2 |
| 200mm Loft Insulation | 5.61m2 |
Note: These are typical values; check specific product details for exact coverage. Always buy a little more than needed to ensure proper insulation and avoid increased energy costs.
Insulate properly for the best results!
Check for Water Pipes
Before insulating, check for water pipes and insulate them with pipe lagging if needed. To find out how, see our project on lagging water pipes for more help.
Also, ensure your water tank has a proper jacket if it’s in the loft. Tis will prevent it from freezing in the winter and causing untold issues.
Adequate Lighting
Use lead lamps for adequate lighting while working in the loft. Avoid mains-powered lamps, which can snag and get in the way. Good lighting helps you work quickly and safely and makes ongoing loft use easier.

Rechargeable Worklight with Magnetic Base 10W
Consider installing a permanent light with a switch near the hatch for convenience. For guidance, see our lighting circuit extension guide. Place the switch inside the loft to prevent accidental activation.
If you have a large loft you plan to use frequently, think about installing a roof window for natural light. Roof windows are available at DIY stores and specialist suppliers.
Once you’ve calculated and purchased the insulation and necessary materials, you’re ready to start.
Tools and Equipment You Will Need
In order to successfully insulate your loft you will need the following tools and products
- Enough insulation to complete the job to the required thickness
- Sturdy hardwearing gloves
- Safety goggles
- Good quality FFP3 mask
- Tape measure
- Utility/trimming knives
- Pair of scissors
- Old clothes or even better set of coveralls
- Pipe lagging (if needed)
- Water tank jacket (if needed)
- Filler and filling tools (if you have gaps or cracks to fill)
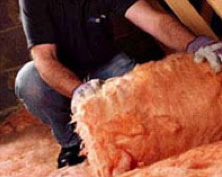
Wear all protective clothing when handling fibre insulation. These small fibres can easily get into your eyes, mouth, and nose.
Mineral insulation can irritate your skin, so gloves are essential. Disposable coveralls, as mentioned, are recommended to prevent fibre spread from your clothes.
How Much Insulation Do You Need?
To calculate the insulation needed, measure your loft floor’s length and width. Insulation rolls specify their coverage area on the packaging. Rolls are designed to fit between ceiling joists, so measure the space between your joists to ensure you buy the correct width.
Learn more about choosing the right type and amount of loft insulation here.
If there’s already insulation, you don’t need to remove it. Lay the new insulation over the existing layer. Over time, insulation may flatten, but this is accounted for in your calculations for additional thickness.
Insulation rolls come in three thicknesses: 100mm, 170mm, and 200mm. The widths typically match common joist spacing in modern homes, which are usually 600mm (24in) or 400mm (16in). Some rolls have perforations for easy cutting to these widths, or are partially scarred so you can easily pull it apart.
Fitting Loft Insulation
Before rolling out your insulation, follow these important steps to ensure safety and efficiency:
- Fill all cracks, gaps, and holes in the ceiling with standard filler or decorator’s caulk.
- Thoroughly clean between the joists, even vacuuming up the dust to prevent it from filling the fibre gaps in the insulation.
- Check for hazards, especially cables, which should be laid on top of the new insulation to avoid overheating. Identify the location of any pipes or other potential hazards to avoid accidentally stepping on them.
Steps for Laying Loft Insulation
- Start from the eaves, leaving a ventilation gap. Work toward the centre of the loft, beginning from the farthest point from the hatch.
- If no insulation is present, lay the base layer (100mm) between the joists. Then, add the top layer (170mm) across the first layer at right angles.
- Elevate electric cables above the insulation and cut around light fittings. All loft wiring must be lifted and placed on top of the insulation to prevent overheating.
- Cut the roll in the centre of the floor from the eaves on both sides once rolled out using your craft knife. Fill any gaps between the insulation and joists. Do not insulate under the water tank to prevent freezing. The tank needs some warm air to rise from below to stop it freezing in the winter
- Lag pipes as you progress to avoid walking over the insulation. Cut around obstacles like pipes or extractor ducts.
- Ensure complete insulation coverage. Lay more insulation at 90-degree angles to improve heat retention until reaching the desired depth.
- Insulate the hatch by attaching insulating material to its top while still ensuring it can close correctly.
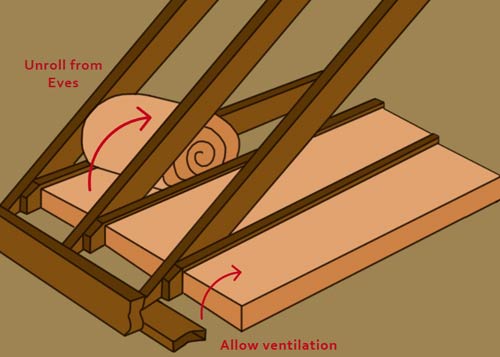
Roll out insulation between joists
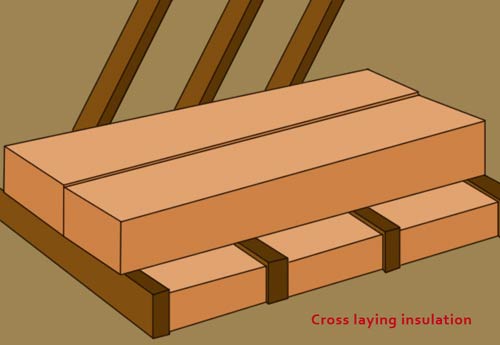
Lay both layers at right angles to each other
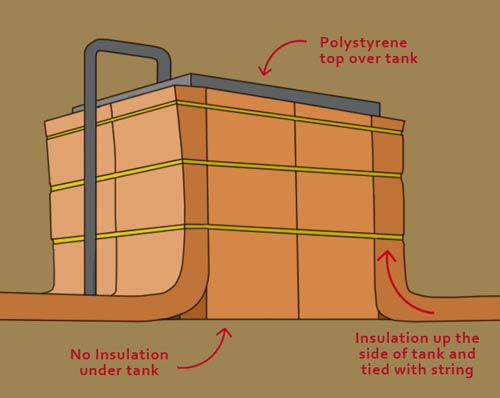
Lag and cover any pipes or water tanks to prevent heat loss
Installing Loose Fill Loft Insulation
Loose fill insulation is available in two types: blown and placed.
The blown type, often installed by specialists, consists of mineral or cellulose fibres, such as rock wool. Rockwool, a manmade fibre, offers soundproofing and insulation benefits.
Typically, rockwool is mechanically placed in the roof space by specialists, sometimes requiring the ceiling joist height to be adjusted for proper thickness.
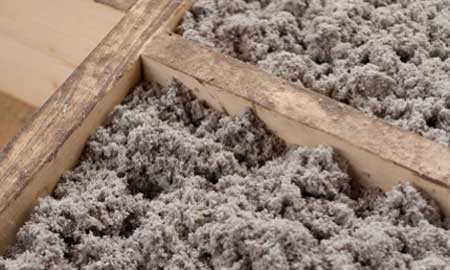
Loose Fill Insulation in situ – Image courtesy of Allied Insulation
Another common loose fill insulation is vermiculite, a natural mineral that expands with heat, known as exfoliation. Vermiculite is fireproof and used in chimney flues and lofts, and as a lightweight aggregate in floor screeds when mixed with sand and cement.
Vermiculite and rockwool don’t contain irritating fibres found in mineral or glass fibre insulation.
Reflective foil insulation, consisting of aluminium foil layers around a wool material, offers good thermal performance despite its thinness. It reflects rather than absorbs heat.
Insulating your loft is a fantastic project with numerous benefits. It keeps your home warmer, reduces heating costs, and is often inexpensive to implement. If you haven’t already, consider insulating your loft today!