Two common plumbing-related questions people ask us are:
“I’m adding a bathroom, but the soil pipe is on the opposite side of the house. How can I solve this?”
“I want to turn my basement into a utility room. How do I drain a washing machine or sink?”
Macerators offer a simple solution for these situations, allowing you to:
- Add a toilet or shower to a loft or basement conversion
- Install utilities like washing machines or dishwashers in basements
Modern macerators (essentially waste pumps) make it easy to add extra toilets, showers, or appliances where traditional plumbing setups are impractical. While the best solution is to connect to the main soil or waste pipe, this isn’t always possible due to layout or cost. In these cases, a macerator is the perfect alternative.
What Are Macerators and How Do They Work?
Macerators are used in homes to help move bathroom or sink waste around when the distance or height to the main waste pipes or soil stack is too great. They’re ideal for situations like installing a bathroom in a cellar or loft conversion.
For example, while it’s easy to pump wastewater from a sink in a basement up to the ground floor, a toilet presents more challenges due to the solid nature of the waste. This is where a macerator comes in.
A macerator grinds solids into a slurry, making it much easier to pump waste vertically through small pipes, usually around 22mm in diameter.
In larger homes, macerators can also pump waste horizontally, avoiding the need for large, unsightly 100mm pipes across multiple rooms. Macerators are typically installed behind the toilet and must be connected to an electrical supply by a qualified Part P electrician, if there is no existing socket to connect to.
Aside from the electrical connection, there are no specific building regulations for macerator installation.
Macerators for home use generally cost between £200 and £600, with installation costs around £200 to £400. However, if the distance to the soil pipe is long, installation costs may increase. Most installations can be completed in one to two days.
What Macerators Are Available?
There are many different types of macerators on the market today, with Saniflo being one of the most well-known brands, but as with all things, some are certainly better than others and their quality if often reflected in their cost.
These systems allow waste removal from any part of a building, making them highly versatile.
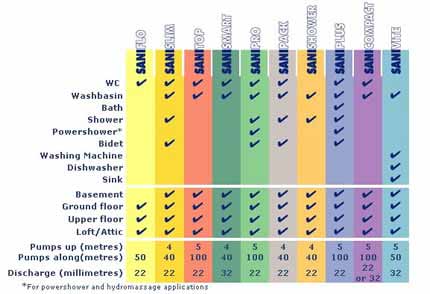
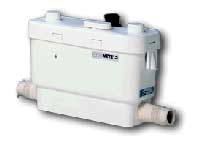
Sani Flow Specification Chart
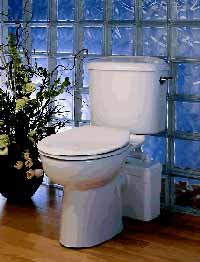
B98500 SANIFLO Small Bore Sanitary System positioned behind toilet
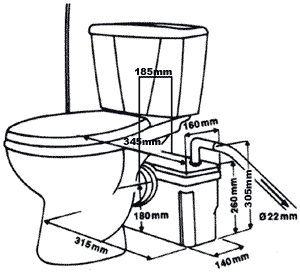
Toilet measurement and dimensions diagram
Some macerators are built into the toilet itself, while others are hidden separately for a more discreet installation.
B98505 SANICHASSE system is built into the toilet
B98506 SANIPACK Extra Slim Small Bore Sanitary System
Adding a Kitchen or Utility Room
The Sanivite (Ref No 1004 – 6004) is designed to handle hot, soapy waste from dishwashers or washing machines, making it easy to install a kitchen or utility room even if it’s far from a drain or below ground level.
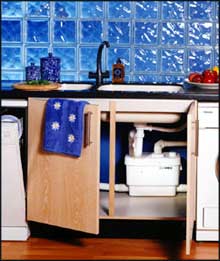
Sanivite system in a kitchen cupboard
- Sanivite features four inlets to connect sinks or appliances.
- It pumps waste through 32mm pipework, up to 5 meters vertically or 50 meters horizontally.
- Compact and easily hidden in a kitchen unit or behind a removable panel for easy access.
Despite their slight temperamental nature, we have generally found the Sanivite to be one of the better macerators on the market today.
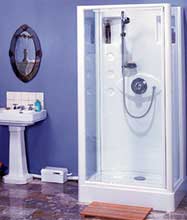
Installing an Extra Shower
The Sanishower is a compact, powerful pump designed to handle hot wastewater from showers and washbasins, ideal for draining to a distant or hard-to-reach drain.
B98507 SANISHOWER Mini Shower Waste Pumping System
This pump is perfect for installations where gravity drainage is difficult, like in basements or on internal walls. Sanishower fits next to or under a shower tray, pumping waste through 22mm pipes, either up to 4 meters vertically or 50 meters horizontally, or a combination of both.
Again, when it comes to shifting shower waste, we have found the Sanishower to be one of the better solutions on the market today.
Tools and Materials fo Installing a Macerator
If you want to install a macerator in your home, you will need the following tools and products:
- Chosen macerator unit
- Selection of screwdrivers
- Pipe slice/cutter or hacksaw
- Tape measure
- Adjustable spanner or selection of spanners
- PVC pipe of correct size and connectors
- Jubilee clips or pipe clamps
- Silicone sealant
- PTFE tape
- Strap on boss
- Drill/driver
- Set of hole-saws
- Solvent weld glue
How to Install a Macerator
If you are looking at installing a toilet, appliance waste etc. in an area where the necessary waste plumbing isn’t possible to install then a macerator is a great solution. Here follows the basic steps to install one.
Note: Although you do not need planning permission to install a macerator, they are still subject to Building Regulations, so if any electrical work is required then this will need to be done by a Part P registered electrician.
Step 1 – Survey Install Location
Your chosen install location will vary but once you have identified the area, inspect it closely for any obvious obstacles that may hinder the installation of the unit and also any pipework.
The macerator unit itself should be installed directly behind the toilet or near the appliance it will be servicing (e.g., a sink, shower).
Ensure the location provides easy access to both the waste outlet and also an electrical supply, as macerators need power to operate.
Note: One point to be aware of is that in the event of a power cut, you won’t be able to use the toilet as there will be no power to power the grinder and pump!
You should also ensure there’s enough space for maintenance or repairs in the future. If you’re installing in a bathroom, you may want to choose a location behind or beside the toilet, depending on space and design considerations.
Step 2 – Install Macerator Unit
The next step is to get the macerator unit correctly installed:
- Attach the Macerator to the Toilet: Position the macerator behind the toilet. Most models are designed to be directly connected to the toilet outlet using a rubber connector. Secure this connection using the hose clamps provided and ensure it’s tight to avoid leaks.:
- Connect the Waste Pipes: The next step is to connect the macerator to the waste pipe system. Depending on the distance to your main sewer pipe, you’ll need to use PVC piping. Cut the pipe to the required length and connect it to the macerator’s discharge outlet using your chosen pipe and connections (compression or glue fittings are best, avoid using pushfit). Run the pipework all the way over to your main drain/soil stack. Also ensure that you get the correct “fall” (slope) on the pipework as sated by the manufacturer to aid pumping.
Step 3 – Add Other Appliances
If your macerator supports additional connections for other items such as a sink or shower, now is the time to connect them.
Again, use suitable pipework and fittings to ensure no leaks and ensure that every fitting is either glued or tightened fully.
Each appliance should have its own inlet on the macerator, and these inlets are usually clearly marked on the unit.
Step 4 – Connect to Electrical Supply
As macerators need an electrical connection to power the pump, the unit now needs connecting to the mains.
If you have a nearby socket then it can be plugged in here, however if not, then you will need to get a Part P registered electrician to install a socket and connect the unit up.
If you’re working in a bathroom or other similar special location, the type of connection used will need to be of the correct rating to keep water and moisture at bay, but the electrician will know this and what to use.
Step 5 – Test the Macerator
Once everything is connected, it’s time to test the system fully. The macerator should activate automatically when the toilet flushes, grinding the waste and pumping it into the new drainage point:
- Turn on the power and flush the toilet.
- Look at the system closely as it runs, listening for any unusual sounds and again checking for leaks.
- Repeat the process a few times to ensure everything works properly.
Other Points to Consider
When connecting into a main drain or soil stack, the best item to use is a strap on boss, This is essentially a collar that sits over and seals a hole that is drilled in a drainage pipe.
Once positioned, glue is added around underside of the mating face of the collar to glue it to the pipe and then the strap is clamped up tightly around the pipe to hold everything in place.
Any new pipework is then inserted into the collar through a rubber bung that seals everything up and prevents any leaks from the new pipework.
Finally, to ensure the correct operation of the macerator using, you should only ever flush human waste and toilet paper and nothing else! If other items are flushed other than these they can easily cause blockages and cause the system to fail totally.
If you are looking to install a new toilet or appliance such as a basin or shower in an area where you can’t access a main drain, then a macerator provides and ideal solution to this issue, however they can be a little temperamental so need regular maintenance and checking to ensure their correct operation.