Basement conversions are increasingly popular. The key to success in this field is to make absolutely sure everything is waterproof.
All this means that once neglected, mouldy and dank basements can be transformed into wonderful cosy living areas.
What is a Basement or Cellar Conversion?
A basement or cellar conversion transforms an often under-utilised or storage-only underground space into a functional and useful living area.
Whether you want to create a home office, gym, extra bedroom, man cave, or even a self-contained apartment, converting your basement can significantly increase your home’s usable space and also add a fair amount of value at the same time.
Although not that common place in many UK homes, other than those with purpose-built cellars or basements or larger period and stately homes, a basement or cellar is effectively an underground room or space beneath a property.
Due to their location, being below the ground, this brings a selection of fairly unique issues such as lighting and often damp control that need to be overcome when turning what’s often a forgotten, disused space into useful, lovable area.
Main Issues When Converting Basements and Cellars
Converting a basement or cellar into a liveable space can add significant value to your home, not to mention that additional space that it also gives you, but it comes with its own set of unique challenges.
From structural and footing concerns to often the most significant issue, damp-proofing, careful and thorough planning is essential to ensure a safe, dry, and comfortable environment.
Here follows some of the most prevalent points to think about:
Waterproofing and Damp Control
One of the biggest challenges in basement conversions and anything underground is water ingress.
Underground spaces are naturally prone to damp due to their position below ground level and the natural presence of water and moisture.
Proper tanking systems (applying a waterproof membrane) or cavity drainage systems (which channel water away) are essential to keep the space dry.
Poor damp-proofing can lead to mould, condensation, and structural damage.
Ceiling Height and Excavation
Many older UK cellars have low ceilings, making them unsuitable for living spaces without additional underpinning or even further excavation.
Lowering the floor level can provide more headroom but requires specialist structural work, which often comes at substantial expense.
Excavation must be done carefully to avoid compromising the stability of the existing foundations, for you own home and also any surrounding properties or structures.
Ventilation and Airflow
Basements often suffer from very poor airflow and ventilation, leading to musty and stale air and potential moisture problems.
Installing mechanical ventilation systems, air bricks, or light wells can improve air circulation and maintain a fresh, healthy environment.
Natural Light and Windows
Basements can feel dark and enclosed without adequate lighting, making them feel small and claustrophobic.
Solutions to get around this can include installing light wells (Method of adding windows below ground), sun tunnels, or glazed doors that connect to an outdoor space.
Maximising natural light improves comfort and makes the space feel much more inviting and less like a cave!
Structural Integrity and Load-Bearing Walls
Before any type of conversion takes place a structural engineer will need to assess the basement’s load-bearing capacity, especially if you plan to remove walls, excavate or make other significant alterations.
Any alterations to any part of the area must comply with building regulations to ensure safety and stability. For full advice on what you need to do, always consult with your local authority building control office.
Access and Fire Safety
Due to its location beneath the ground and its obvious access difficulties, a converted basement needs a safe escape route in case of fire.
This may require a secondary exit, larger egress windows, or a fire-rated staircase to ensure it enables any and all inhabitants to get out if in an emergency.
Smoke detectors, fire-resistant doors, and emergency lighting are also crucial for compliance with UK building regulations.
Planning Permission and Building Regulations
Most basement conversions can fall under permitted development, but significant alterations, such as major excavations or creating a self-contained unit, may require planning permission.
Additionally, all conversions, regardless of whether they need full-blown planning permission, must meet UK Building Regulations covering ventilation, fire safety, insulation, and structural stability.
What’s the Difference Between a Basement and a Cellar?
In the UK, a cellar is typically a smaller, partially underground space, often found in older homes and originally used for storage.
A basement, on the other hand, tends to be larger, fully underground, and sometimes already habitable.
Both can be converted, but the level of work required depends on factors like head height, structural integrity, and damp-proofing.
Do you Need Planning Permission?
Although converting a basement can add valuable living space and brick and mortar value to your home, whether you need planning permission depends on the scale of the work involved.
If just a straight renovation with no structural work, a basement conversion can fall fall under permitted development rights (PD), meaning you don’t need formal approval.
However, major structural changes or **creating a separate dwelling** may require permission from your local authority.
When Planning Permission Is Required
You’ll likely need planning permission if your basement conversion involves:
- Significant excavation or structural changes, such as underpinning or lowering the floor level.
- Altering the external appearance of your home, including adding light wells, external staircases, or new entrances.
- Changing the use of the basement, such as converting it into a separate self-contained flat.
- Listed buildings or conservation areas, where stricter rules apply to protect the property’s character.
- Increasing the number of storeys, such as adding a new basement where none previously existed.
When Permitted Development Applies
If your basement already exists and the work is **internal with no major structural changes**, planning permission is generally **not required**. This includes:
- Converting an existing basement into living space without altering its footprint.
- Adding insulation, waterproofing, or ventilation without external changes.
- Using the basement for non-residential purposes, such as a storage area, gym, or home office.
Building Regulations Considerations
Regardless of whether you need planning approval or not, when converting a basement you will always need to follow and abide by the building regulations, as by law, it must meet UK building regulations to ensure safety, energy efficiency, and structural stability.
Here follows the key building regulations you need to consider:
Structural Integrity
- The basement must be strong enough to support the weight of the building above.
- If underpinning (strengthening foundations) or major excavation is needed, a structural engineer must assess the site.
- Retaining walls and load-bearing elements must meet Part A of the Building Regulations.
Damp Proofing and Waterproofing
- Effective waterproofing is essential to prevent damp and flooding.
- Systems include tanking (applying a waterproof membrane) or cavity drainage (channelling water away from the structure).
- Materials and methods must comply with Part C (Site Preparation & Moisture Resistance).
Fire Safety and Escape Routes
- All habitable basements need a safe escape route in case of fire.
- If there’s only one staircase leading to the upper floors, an egress window may be required.
- Fire doors, smoke alarms, and fire-resistant materials must meet Part B (Fire Safety) regulations.
Ventilation and Airflow
- Proper airflow prevents condensation, damp, and poor air quality.
- Passive vents, mechanical ventilation, or heat recovery systems can help.
- All ventilation must comply with Part F (Ventilation).
Insulation and Energy Efficiency
- The basement must be well-insulated to prevent heat loss and comply with Part L (Conservation of Fuel & Power).
- Floor, wall, and ceiling insulation should meet minimum U-values for energy efficiency.
Electrical and Plumbing Compliance
- Electrical work must meet Part P (Electrical Safety), ensuring circuits are properly installed.
- If adding a bathroom or kitchen, plumbing must comply with Part H (Drainage & Waste Disposal).
Getting Building Regulations Approval
Before starting work, submit a Building Regulations application to your local authority or an approved inspector.
This ensures your project meets safety and legal standards, avoiding costly modifications later. A completion certificate will be issued once the basement passes inspections.
Methods of Waterproof a Cellar or Basement for Conversion?
As we have discussed, waterproofing is one of the most critical aspects of converting a cellar or basement into a habitable space so this needs to be done correctly.
Without proper protection, damp and water ingress can lead to severe structural damage, mould growth, poor air quality and also damage to your health.
In terms of how this is done, there are three main waterproofing methods used in the UK, with each being suited to different property types and the potential water and moisture issues likely to be encountered.
Tanking (Liquid/Slurry Coatings)
Tanking involves applying a waterproof coating or slurry directly onto the walls and floor, creating a watertight barrier that prevents moisture from entering the space.
- Best for: Older properties with low water pressure from surrounding soil.
- Common materials: Cementitious slurry, bitumen-based coatings, and liquid membranes.
- Pros: Cost-effective, relatively easy to apply, and suitable for smaller cellars.
- Cons: Can be vulnerable to cracks, requiring ongoing maintenance if water pressure increases.
Cavity Drainage Membrane (CDM) Systems
A cavity drainage membrane system uses dimpled plastic sheeting installed on walls and floors, allowing water to flow into a network of drainage channels that direct moisture to a sump pump where it is then plumped away.
- Best for: Properties with high water tables or persistent damp issues.
- Common materials: High-density polyethylene (HDPE) or polypropylene membranes.
- Pros: More reliable than tanking, allows moisture to be managed rather than blocked, and doesn’t interfere with structural integrity.
- Cons: Requires professional installation and a sump pump system to remove water.
External Waterproofing (Bentonite and Bitumen Coatings)
For new builds or properties undergoing major structural work, external waterproofing involves applying waterproof coatings or membranes to the outside of the basement walls, stopping water before it reaches the structure.
- Best for: Homes undergoing excavation or new basement extensions.
- Common materials: Bentonite clay sheets, bitumen-based coatings, or liquid waterproofing membranes.
- Pros: Highly effective in keeping moisture out, protecting the entire structure.
- Cons: Expensive, labour-intensive, and often not possible for existing basements without major excavation.
Basement before

Basement after
Ventilation and Insulation in Basement Conversions
Proper ventilation and insulation are absolutely key when converting a basement or cellar into a warm, dry, and comfortable living space.
Without them, damp, condensation, and poor air quality can become serious issues. Understanding the best ventilation and insulation methods will ensure your basement is energy-efficient and meets UK Building Regulations.
Basement Ventilation: Preventing Damp and Improving Airflow
Basements naturally have limited airflow, making ventilation crucial to remove moisture and stale air while preventing damp and mould growth. There are several ways to improve basement ventilation:
- Mechanical Ventilation (MVHR) – A Mechanical Ventilation with Heat Recovery (MVHR) system extracts stale air while bringing in fresh, filtered air. It also recycles heat, improving energy efficiency.
- Passive Ventilation – Air bricks, trickle vents, or wall vents allow natural airflow, helping to reduce condensation in mildly damp basements.
- Extractor Fans – Installing humidity-controlled extractor fans in areas like bathrooms or kitchens within a basement conversion prevents excess moisture build up.
- Dehumidifiers – While not a long-term solution, a dehumidifier can help remove excess moisture, particularly in newly converted basements as they dry out.
Basement Insulation: Retaining Heat and Boosting Energy Efficiency
Basements can lose heat quickly, so high-quality insulation is needed to maintain a comfortable temperature and reduce heating costs.
Insulating correctly also helps meet UK Building Regulations for thermal efficiency.
Wall Insulation:
- Internal Wall Insulation (IWI) – Rigid insulation boards or insulated stud walls are added inside the basement, providing a thermal barrier while keeping the space warm.
- External Wall Insulation (EWI) – If possible, insulating external basement walls before waterproofing adds extra protection against heat loss.
Floor Insulation:
- Rigid foam insulation boards are typically installed beneath flooring materials such as concrete, laminate, or carpet, preventing heat loss into the ground.
Ceiling Insulation:
- Insulating between the basement ceiling joists helps regulate temperature differences between the basement and the rooms above, reducing energy costs.
Solutions for Lighting and Natural Light
As with damp and moisture control, lighting is another big challenge in basement conversions due to the lack of natural daylight.
Without proper lighting, basements can feel dark and unwelcoming and a bit like a cave.
The key to a bright and inviting basement is a combination of natural light solutions and artificial lighting techniques that enhance the sense of space and warmth.
Maximising Natural Light in a Basement Conversion
Bringing natural daylight into a basement not only improves the atmosphere but also reduces the need for artificial lighting during the day. Here are some of the best ways to increase natural light in a basement:
- Light Wells and Sunken Courtyards – Excavating a light well at ground level allows sunlight to reach basement windows and doors, dramatically improving brightness. Adding a sunken courtyard also creates an outdoor seating area while increasing ventilation.
- Larger Windows and Doors – Where possible, widening existing basement windows or installing patio doors at the rear can flood the space with daylight. Using floor-to-ceiling glass panels maximises light entry.
- Glass Floors and Skylights – Installing walk-on glass panels in the floor above allows daylight to filter down into the basement. Roof skylights and sun tunnels also help brighten deeper areas.
- Light Reflective Surfaces – Using light-coloured walls, glossy finishes, and mirrors helps bounce existing daylight around the room, making it feel more open.
Best Artificial Lighting for Basement Conversions
Even with natural light enhancements, artificial lighting is essential to create a well-lit, comfortable space. A layered lighting approach works best:
- Recessed LED Spotlights – Ceiling-mounted LED downlights provide bright, energy-efficient lighting without taking up space.
- Wall Washers and Up lighting – Indirect lighting, such as wall washers or floor up lights, reduces shadows and creates a softer, more natural glow.
- Feature and Task Lighting – Pendant lights, under-cabinet LED strips, and table lamps add warmth and functionality, helping to define different areas.
- Smart Lighting and Dimmers – Installing dimmable LED lights or smart lighting systems lets you adjust brightness and colour temperature to suit different moods and activities.
How to Convert a Basement or Cellar
Now that we have looked at all the different aspects of converting basements and cellars it’s now time to take a look at how it’s actually done.
As this is quite a complicated process, in most cases you are going to want a specialist basement conversion company or competent builder to do the work, so for the purposes of this guide we are going to run through all the steps involved for each of the main two methods.
Converting a Basement Using Waterproof Membranes
First up on the list is converting a basement using a waterproof membrane system. Depending on who’s installing it, the steps may vary slightly as some have their own techniques, however, most should be something like the following:
Step 1: Assessing the Basement and Preparing the Space
Before installing a waterproof membrane, a full basement survey will be conducted to assess existing damp issues, drainage conditions, and the overall structural integrity of the property.
Any cracks or structural defects in the walls or floor should be repaired to create a stable surface for the membrane application.
Step 2: Installing a Cavity Drain Membrane System
A cavity drain membrane (CDM) is the most effective way to waterproof a basement. Unlike traditional tanking, which blocks water, a CDM allows moisture to flow into a managed drainage system. The installation process includes:
- Fixing the Membrane to Walls and Floors – A dimpled polyethylene waterproof membrane is applied to all basement walls and floors using specialised fixing plugs. This creates an air gap, allowing water to drain behind the membrane.
- Installing Perimeter Drainage Channels – A drainage channel is laid around the edges of the basement floor to collect and direct water towards a sump pump.
- Fitting a Sump Pump System – A sump and pump unit is installed to remove any collected water from the basement, preventing flooding or water build up.
- Sealing and Vapour Control – Joints and overlaps in the membrane are carefully sealed to ensure a fully watertight system, preventing any residual moisture from affecting the basement interior.
Step 3: Floor and Wall Finishing
Once the waterproof membrane system is in place, the basement can be finished with:
- Floating Floors – A new insulated floor layer is laid over the membrane, providing thermal efficiency and preventing condensation.
- Wall Linings and Plasterboard – Internal stud walls or direct plasterboard fixings are installed over the membrane to create a dry, warm, and habitable space.
- Ventilation and Insulation – To prevent condensation, adequate ventilation (such as air vents or mechanical ventilation) should be included, along with high-performance insulation for energy efficiency.
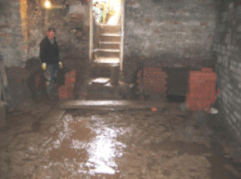
Basement Project Before
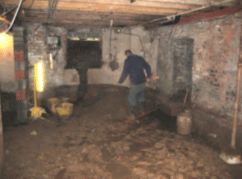
Basement Project Before Work Starting
Before Basement Conversion
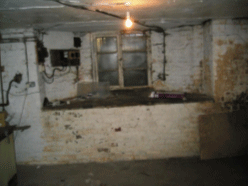
Before Basement Conversion

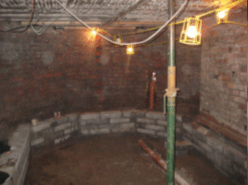
Basement Under Conversion
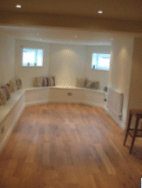
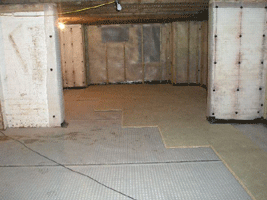
After Project Completion
Fully converted and completed

After Project Completion
Converting a Basement Using Tanking and Cementitious Slurry
Tanking a basement with cementitious slurry is a popular waterproofing method that creates a watertight barrier, stopping moisture from penetrating walls and floors.
This approach is widely used in older properties or where a cavity drain system isn’t suitable or possible.
Here follows a step-by-step guide to successfully converting a basement using tanking slurry.
Step 1: Preparing the Basement Walls and Floor
For tanking slurry to bond effectively, surfaces must be properly prepared:
- Remove Existing Coatings – Any paint, plaster, or loose materials must be stripped to expose the bare brick or concrete.
- Clean the Surface – Walls and floors should be brushed and washed to remove dust, dirt, and salts that can affect adhesion.
- Repair Cracks and Gaps – Any holes or structural cracks should be filled with a suitable waterproof mortar to create a solid surface.
- Dampen the Surface – Before applying the slurry, dampening the walls with clean water helps improve adhesion and prevents premature drying.
Step 2: Applying Cementitious Tanking Slurry
Tanking slurry is a cement-based waterproof coating that is applied directly to basement or cellar walls and floors to prevent water ingress.
- First Coat Application – The first layer of tanking slurry is applied using a stiff brush, ensuring deep penetration into the surface. This coat should cover every part of the basement to prevent weak points.
- Curing Time – Allow the first coat to dry partially but remain damp before applying the second coat. This helps create a strong bond.
- Second Coat Application – A second layer is applied in the opposite direction to the first, ensuring full coverage and a reinforced waterproof barrier.
- Final Curing – Once both coats are applied, the slurry must cure for several days. During this time, avoid rapid drying by lightly misting the surface if needed.
Step 3: Finishing and Internal Protection
After the tanking slurry has fully cured, the basement can be finished and insulated:
- Applying a Protective Coating – To prevent damage, a breathable protective layer or waterproof render may be applied before decoration.
- Installing Insulation and Ventilation – Good ventilation is crucial to prevent condensation build up. Insulated stud walls or breathable insulation boards help improve energy efficiency.
- Floor Coverings – For added protection, use a floating floor system rather than fixing materials directly onto the tanked surface.
Like an extension or loft conversion, a cellar or basement conversion, if you have one, can be a great way of adding both additional living space and value to your home, however, to avoid any costly issues down the line it must be done correctly and in line with Building Control.