Measuring for vinyl tiles, ceramic tiles, quarry tiles, softwood flooring, hardwood flooring, chipboard flooring, laminate flooring, carpets and other floor coverings.
Measuring Floor Area for Carpet, Tiles, Vinyl etc.
Measuring for a floor covering can be very tricky in some rooms where awkward shapes and alcoves can cause some confusion. We have shown below the simplest method of measuring in these circumstances. As you can see the floor has been divided into rectangles.
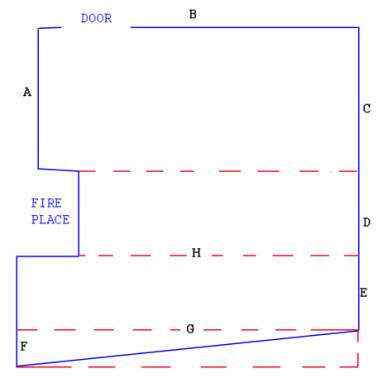
Downstairs floor area example showing the space divided into rectangles for easy measurement calculation
String can be laid on the floor to show these rectangles when measuring, masking tape can be stuck to carpets and pencil lines can be drawn on floors to be permanently covered by tiles etc. You can also use a chalk line to mark any floors which are to be covered and this is a very handy tool to have in your tool box.
There is a laser line generator which, when turned on, shines a laser (harmless!) light across the surface allowing quick and easy measurement.
There is a diagonal wall in this room, which can make it very tricky to measure until you remember that a triangle with a right angle in it is half of a rectangle. Therefore by drawing the line G and multiplying it by the line F, then dividing it by 2, you have the area of the triangle section of the room.
The area of the room above is:
- A X B
- H X D
- E X G
- ½ of F X G
Add all of these together and you will know how much material you need.
Measuring Floor Area for Floorboards
The area method described above is OK when ordering materials such as tiles, carpet and others that are sold by the square yard or meter. For floorboards there are some additional calculations that need to be made.
We have now added floorboards, and some dimensions to the plan. This is not drawn to scale and the number of floorboards represented is not the amount needed for a room of this size. We will say for the purpose of this demonstration that the face of the floorboard, which will be seen when the boards are laid, is 150mm.
Each board may be wider than this if it is a tongue and grooved board, as the tongue will stick out a little. You must check with your supplier, before measuring and buying, the width of the board that will be left showing. This is called the finished width.
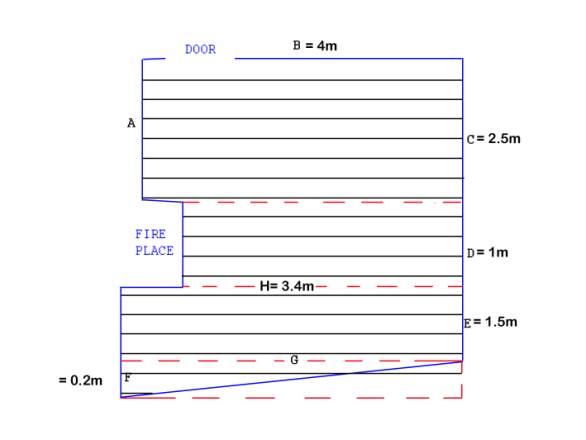
Downstairs floor area example showing the space divided into rectangles for measurement and also showing floorboards laid over floor space
To work out how many boards we need, and the lengths they need to be, we now must produce what is called a cutting list. We want as few joints as possible so if we can order the correct lengths of board it will make life a lot easier. Its no good telling a supplier we want a total of 100m of floorboard as they may well send it to you in very short lengths which have been left over from other orders. You will then have a great deal of extra cutting to do as each join must be placed on a joist. See our replacing a timber floor project.
Rectangle 1 – A, B, C
- We know length B is 4 m and by dividing length C by the width of each board (150mm) we can see how many boards we need in the first of our rectangles
- C = 2.5m divided by 150mm (or 0.15m) = 16.66 (always round number up to avoid being short)
- So area C x A needs 17 boards of 4m or longer.
Rectangle 2 – D, H
- For the next retangle, measurement D = 1.00m divided by 150mm = 6.66 (say 7)
- So area D x H needs 7 boards of 3.4m or longer.
Rectangle G, E
- For the next rectangle measurement E = 1.5m divided by 150mm = 10
- So area G X E needs 10 boards of 4m or longer.
Triangle G, F
- Finally measurement F = 0.20m divided by 150mm = 1.33 (say 2) which in theory can be divided by 2 because it is a triangle. BUT…..Because of the cut you will need to make to go up against the angled wall, it is very, very unlikely you will be able to use the remainder of the first board top complete the space left. It’s always advisable to have a little spare anyway, so in this instance we would order,
- Area G X F needs 2 boards of 4m or longer.
We can then take these totals to our supplier and give him our cutting list which for the example above would be:
- 29 boards of 4m or longer
- 7 boards of 3.4m or longer
Measuring Floor Area for Chipboard
For floor coverings such as Chipboard, which, for ordinary flooring can be bought in tongued and grooved panels measuring 2.4m x 1.20m with smaller panels available for lofts, the total area of your floor can be divided by the area of each board to give you the number of boards required. So for our plan above we have:
- B X C = 10 square m
- H X D =3.4 square m
- E X G = 6 square m
- G X F divided by 2 = 0.40 square m
- Total area = 19.80 square m.
The area of each board is 2.40m x 1.20m = 2.88 square m
Total area (19.8) divided by a board (2.88) = 6.875 boards (say 7)
The calculation above relies on every bit of every board being used, however when you come to lay them out on your floor joists you will probably need to cut some off the length and even the width to be able to fit the boards to the joists and edges of the room.
Obviously this means more boards so be prepared to add to the number you need depending on the layout of your joists and the shape of the room. These calculations however will give you a very good idea of the amount of timber and the cost involved.
When ordering quarry, vinyl and carpet tiles, each box of tiles will say how many square meters its contents will cover. Armed with your total area you can easily work out how many boxes you need. Bags and drums of tile adhesive will have the same information available.
For laying carpets you will also need to work out the complete perimeter of the room to order gripper rods for holding the carpet down.