Engineered wood flooring is a great choice for pretty much any room in the house. It looks smart and elegant, is easy to install, has a decent lifespan if installed correctly and is easy to keep clean and tidy.
Before laying engineered wood flooring it should be left for at least 48 hours, ideally a week, in the space it’s going to be installed in so that it can acclimatize to temperature and moisture levels in that environment.
Engineered wood flooring is generally installed in one of three ways – it’s either glued down, floated over the existing flooring or secured with hidden nails.
Gluing or nailing wooden flooring to the existing floor is generally carried out in bathrooms and kitchens as it creates a solid stable surface for the heavy objects such as kitchen appliances, baths and toilets etc that are normally present in these areas.
Although fixing engineered flooring to an existing floor (whether it’s a concrete floor or timber floor) has its benefits it does prevent the natural movement and expansion of the floor which can lead to damage and a reduced lifespan.
For the best and longest lasting finish, we would always suggest floating engineered wood flooring as this method works for any existing type of subflooring and is also fairly quick and easy to do.
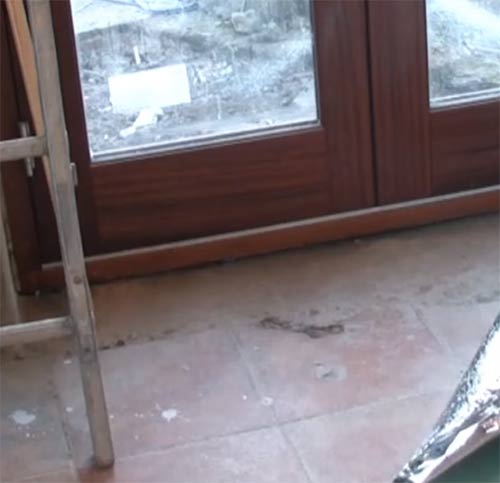
Existing tiled sub floor ready to install engineered wood flooring on
What is Engineered Wood Flooring?
Engineered wood flooring is flooring that can be laid over a variety of different sub floors. It is constructed in several layers, with a solid wood top and then a plywood base made of several layers, with the grain of each running at 90° to each other. This makes it much more stable and resistant to humidity then other types of flooring.
It comes in a variety of different thicknesses that range from 3mm all the way up to 18mm.
When it comes to buying engineered wood flooring, the cost generally reflects the quality with the thicker boards tending to be higher quality and more expensive, although shopping around can surface some great deals.
For the purposes of this guide we have used premium offcuts. When top quality premium engineered flooring is made, it’s formed using a single length top layer. If there are imperfections or damage these areas are cut out to leave shorter lengths of flooring.
This is a great way to buy engineered flooring as you get great quality for a lot less money, but the downside is you don’t get uniform single lengths and have to work with a lot of different sized boards which takes a fair bit of planning to ensure as uniform a finish as possible.
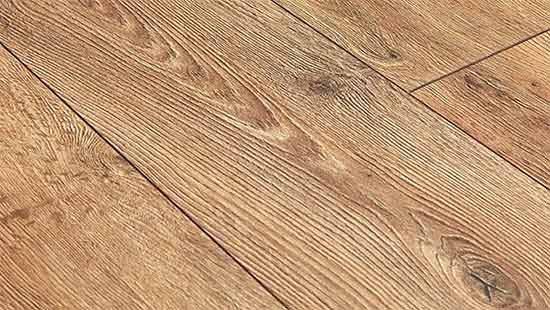
Section of oak engineered flooring
Things to Think About Before Installing Engineered Wood
Before even attempting to lay any flooring down there are a few things that you should check first:
- Check all floor surfaces are flat level. If not, see our project here on levelling concrete floors or our project here on levelling floating timber floors
- Check that there is no damp or moisture present. Damp membrane will need to be installed if so
- If laying over an existing timber floor, make sure any raised nail or screw heads are knocked down or screwed down below the surface
- Move any objects that can be moved out of the room you are laying the flooring in
- Ensure you are using the correct type of underlay for the type of floor you are laying your flooring on
- Vacuum the entire floor area over to remove any and all traces of dust and debris
- If possible, remove any existing skirting boards and also architrave around doorways
- Remove any doors that will be in the way if you are laying into and around doorways and thresholds

Raised nail heads in existing floor need to be knocked down below the surface
What Tools do you Need for Laying Engineered Wood Flooring?
Laying engineered flooring is a fairly straightforward job so you don’t need a great deal of expensive tools to do it. Here follows a list of tools that are required:
- floor tensioners
- wood glue
- cork strip
- Tape measure
- Engineered hardwood laminate floor – better than solid hardwood floor as more stable and prevents cupping and twisting
- Hammer
- Offcut of flooring to use as a drift
- Crowbar
- Circular saw or jigsaw
- Vacuum cleaner
- Pencil
- Timber quadrant of similar style to flooring (if laying up to a doorway)
How to Lay Engineered Wood Flooring
Now that you know exactly what preparation work needs to be done and what tools are required it’s time to start laying some flooring.
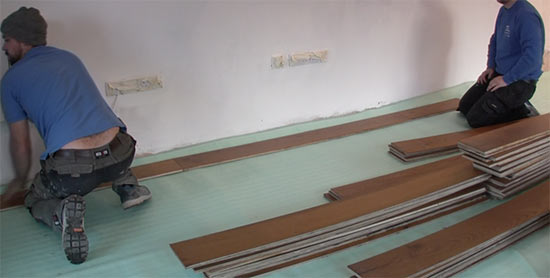
Step 1 – Unpack all Flooring and Sort Sizes and Shades
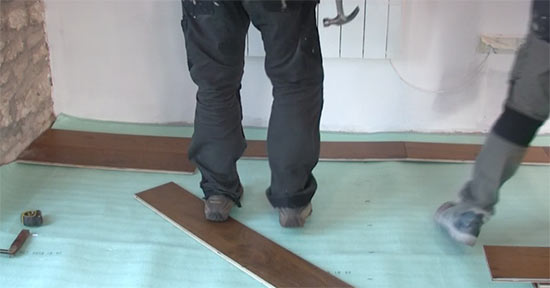
The first job is to unpack all of your flooring and sort through it all. Organize all of your flooring boards into different sizes (if there are any different sizes) and pile them up.
Also carefully inspect all flooring boards for any damage or defects (especially to the tongues or grooves) and also any boards that are of a slightly different colour or shade. These can be used for cuts later on.
As we have stated above, before laying engineered flooring it needs to acclimatize to the space it’s being laid in so once unpacked, leave it for at least 48 hours (ideally a week) to do so.
Unpack and layout all flooring and sort into piles of different sizes if different sizes are present
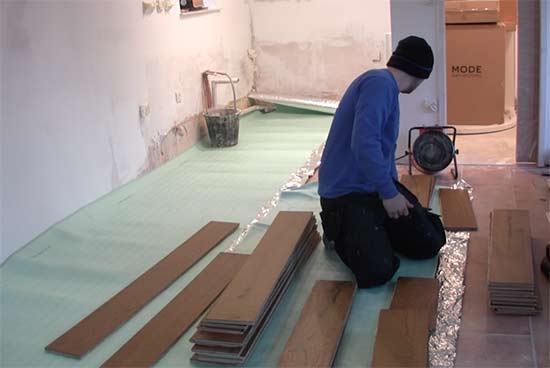
Step 2 – Lay Down Engineered Flooring Underlay
Once fully acclimatized, the next job is to then lay out your underlay over the surface of the floor you’re working on.
Ensure you have the correct type of underlay for the existing surface you’re working with, there are several different types (more on this below). The company that supplied your engineered hardwood flooring should be able to advise on what you need.
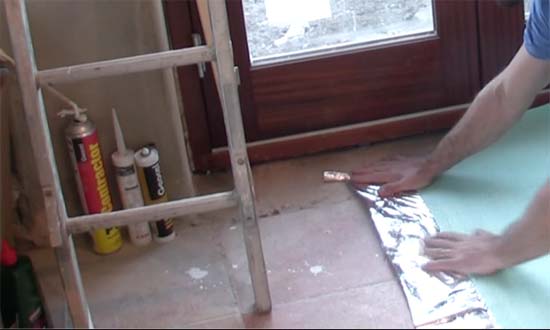
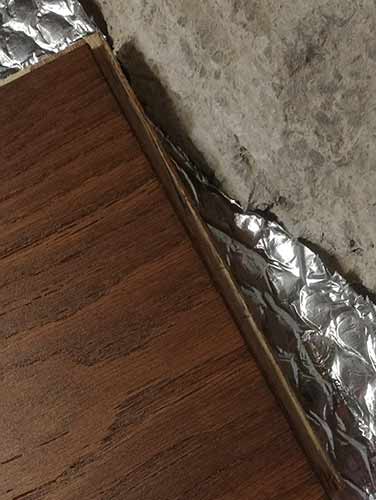
In this case, we were installing onto an existing tiled surface so we used a standard foam underlay that also featured a foil backing as we generally find this the best underlay for solid wood flooring on solid surfaces and concrete as the foil backing helps retain heat, prevent moisture from damaging the underside of the floorboards and the foam provides some cushioning and evens out any small imperfections.
Lay out all your engineered wood flooring underlay over the surface of the room you’re working in
Step 3 – Mark out Board Widths on Underlay
Before you start laying out your floorboards, it’s a good idea to first consider where the boards are going to lay in relation to the shape of the room so measure the width of a board and mark the board widths on the underlay across the room.
You will need to do this in 2 locations with the first set of marks towards the front of the room and the second towards the rear.
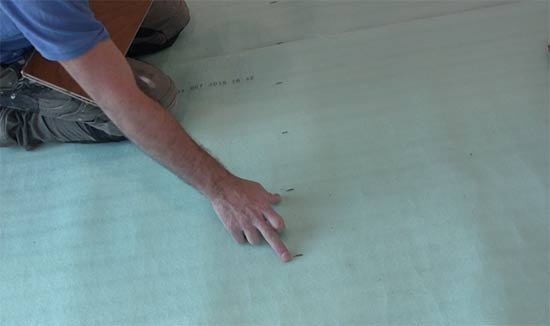
Mark out floor board widths across the underlay all the way across the room
The aim of this is to ensure when you get to the wall you’re working towards you’re not left with a tiny gap to cut into that will disappear under the skirting or look odd. Ultimately, you want an equal gap at either wall.
If you do end up with a very small cut, adjust the board width at the starting wall and move everything over so that the gap against each wall is the same.
You will also need to leave a 10mm expansion gap all the way around the perimeter of the floor, between it and the wall. This allows the floor to naturally expand and contract.
When laying engineered floorboards, the best method is to start laying along the longest wall first and work across to the opposing side of the room.
If laying engineered flooring in a hallway or long room, lay the boards with the length of the room as this helps give the illusion of size and space, making the room feel a little bigger.
Once you have worked out the correct spacing’s and marked them on the underlay, repeat your markings at the other end of the room. All being well, both sets of markings should be square and inline.
Ping a chalk line between the first markings nearest the wall you’re working away from and this will give you a square line to start laying your first run of boards.
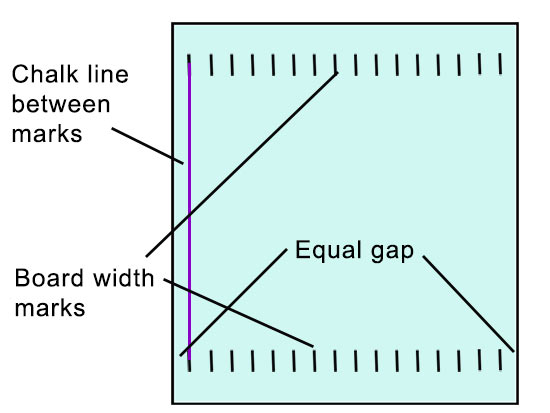
Mark board gaps across the floor at front and back of room and then join first row with a chalk line to set a straight edge to work from
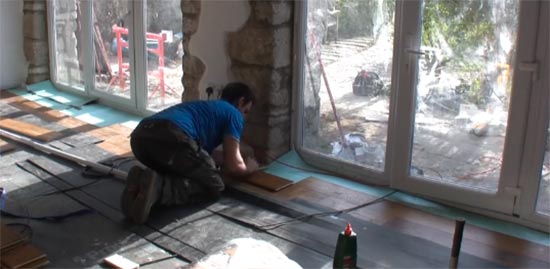
Step 4 – Start Laying Your Engineered Floorboards
When laying engineered hardwood flooring the main goal is to lay a totally square floor within the space you’re working in, with all the joints equally staggered for strength and a uniform appearance and a nice equal gap (including your expansion gap) around the perimeter for your cuts.
Starting in the corner of your longest wall, lay a full length floor board down, making sure you stay level with your chalk line.
A common question that gets asked is; Should I start laying tongue and groove floorboards with the tongue or groove section facing the wall I’m working from? The answer is it really doesn’t matter, so start whichever way you want to.
Starting in the corner of the longest wall, lay your engineered flooring down
With the first floorboard in place, add some more full length boards to the end and continue adding boards up to the point that you reach the wall and can’t add any more.
As you add each floorboard, spread a thin bead of good quality wood glue on to either the tongue or groove of the board you’re adding. Add to either the bottom of the groove or underside of the tongue so that when you push the boards together the glue doesn’t squeeze out and go everywhere.

Spread bead of glue onto tongue or groove before pushing boards together
Ensure each joint is fully engaged and there are no gaps. If the boards are good quality they should slot together fairly easily, but if they need a little help, use a small offcut fo flooring as a drift and gently hit the offcut section with a hammer to knock the rest of the joints together.
If you need to knock boards together use a drift so you don’t damage the board
Don’t hit too hard and cause damage or move anything out of position. To help stop floorboards moving too much, get someone to stand or kneel on the board you’re knocking into. This will minimize any movement.
With one run complete, move back to the beginning and start adding your second run of floorboards. For the second run you need to start staggering the joints, so this time start with half a board.
Once first row laid, start laying the second row of your flooring
If starting a new run with a cut board you will need to use the section that has the tongue or groove remaining so any further boards have an edge to fix into.
The remaining section of board can then be used for cuts or to finish the run at the other end. This will also help to minimize any wastage.
Again, add glue to the base of the groove or underside of the tongue of the board you’re joining and that the joint is fully engaged with no gaps. Continue adding boards along your second run until you reach the wall at the other end.
Step 5 – Get Your First Runs of Floorboards Square
Now that your first two runs of engineered floorboards are down you need to make sure they remain totally square whilst laying the remaining boards and for this you now need to add in any cuts and fill the expansion gap with some cork strips.
In an ideal world all the walls in the room you’re working in will be nice and square and level, but in reality this is often not the case. For this particular job, we were laying a floor in a barn conversion so all the walls were extremely uneven.
In this situation any cuts that need to be fitted will need to be scribed in using a pair of compasses to transfer and mark the shape of the wall onto the floorboard. Once marked it can then be cut to fit exactly.
To do this, firstly place the floorboard to be scribed and cut in on top of the board that’s already been laid in the second run and adjust it so that it sits absolutely square and level to that board.
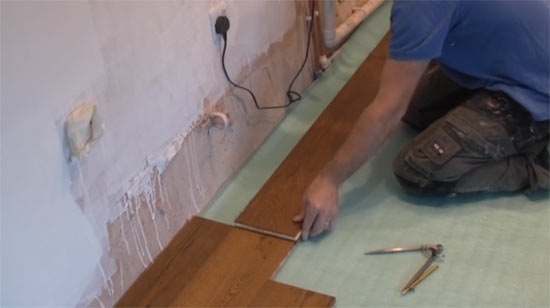
Place board to be scribed directly over board in second run
Next, using a pair of compasses, set them to the exact width of your floorboard plus 10mm (expansion gap) and then position the pencil/marking arm over your floorboard and the needle point touching the walls surface.
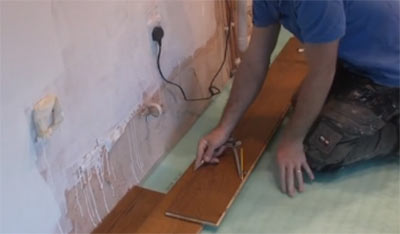
Set the width or your compasses to the correct width for scribing
Steadily move the compasses along the wall making sure that the needle point is touching the wall at all times and the pencil is also touching the surface of the floorboard. When you reach the end you should be left with a perfectly scribed line that matches the shape of the wall exactly.
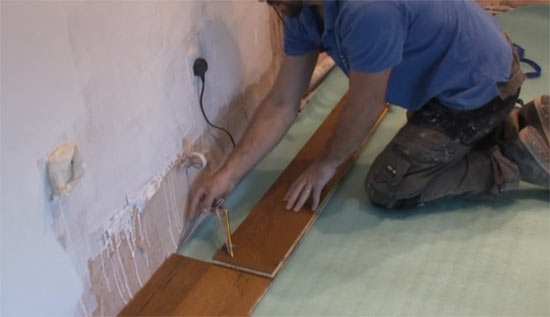
Scribe your cutting line along the board using the wall as a reference
To find out more about scribing timber and other surfaces, see our project here.
Once your line is scribed you will then need to cut it using a jigsaw or circular saw and then fit it in place.
Due to limited space for knocking boards together with a hammer and drift, to close up any gaps fully use a floor tensioner to squeeze the boards together.
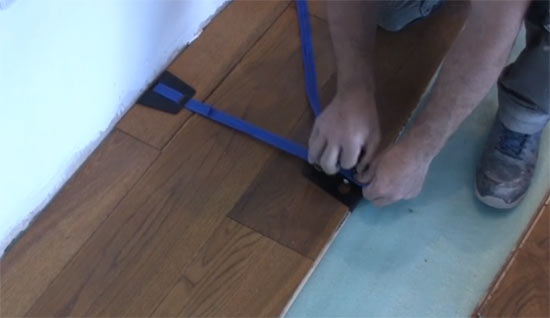
Using a floor tensioner to close up gaps in engineered wooden floor
Once all of your cut-in sections have been fitted in place you will then need to push the cork strips down into the expansion gap to fully fill it.
Once this is done you will then have a solid square and level base to install the rest of your floorboards off of that should remain square and not move.
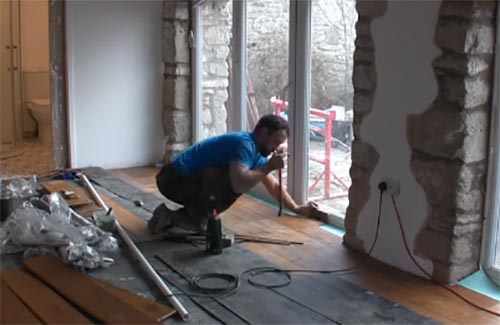
Step 6 – Cutting a Floorboard in at the end of a run
With your first few runs of engineered flooring down, the next task is to cut in the ends of the first two runs so they are totally finished and scribed up to the wall with your 10mm expansion gap.
In the scribing process that we have run through above it just so happened that the edge that needed cutting in was a full floorboard width which meant that we could just set our compasses at the width of the board, however this very rarely happens.
With most of the other cuts that are going to need doing the gaps are going to vary so when this is the case, place a board directly over the board you have already laid and push it up to meet the wall, keeping it square to the existing board.
Place the board to scribe directly on top of board that’s alread laid
Look along the edge that’s touching the wall and identify the deepest gap and measure from the wall to the edge of the board, this will be the width that you need to set your compasses at, minus 10mm for the expansion gap (you need to deduct the 10mm of the expansion gap this time).
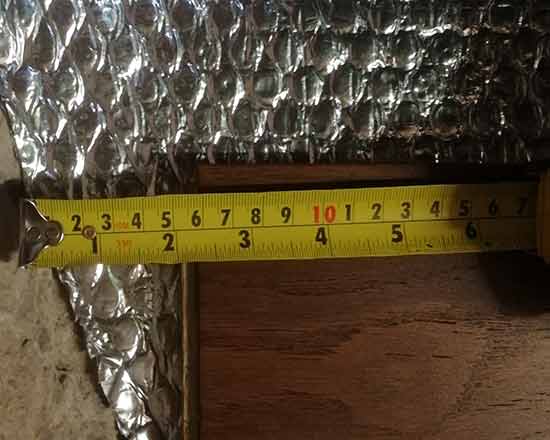
Measure the depth of the gap to set your compass width
Before marking anything you will now need to cut your board to the correct length. With the board to be cut still in situ, mark on the board at the point where it meets the board that’s already been laid and then measure and mark down from this the measurement that you set your compasses to.
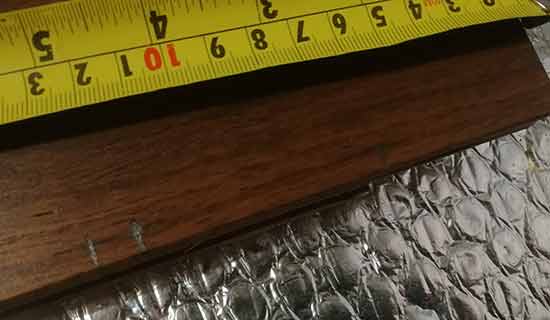
Mark the length to cut the board to
Now measure this full distance and this will be the length that you need to cut your floorboard to, just remember to cut up from the bottom edge of your floorboard so that you keep the tongue or groove edge.
Once the board has been cut, put it back in place and then mark on your scribe line and then get it cut ready for fitting.
Repeat this for the additional run so that you have then completed both runs in full.
Step 7 – Lay Remaining Engineered Floorboards Across Room
Once the first two runs of flooring have been laid totally square and the cuts and cork expansion gap filler are in place and forming a solid base to work off of you can now get cracking and lay the remaining flooring.

Continue laying the remaining floorboards across the floor over to the opposite side of the room
Work your way across the floor laying your floorboards down one row at a time, making sure that you complete each row including the cut in at the end. Remember to add a thin bead of glue to each tongue or groove section.
Ensure all the joints are fully pushed together for each row your add. Use your floor tensioners to pull the boards together or a drift and hammer to knock them into place.
Lay floorboards until you reach the opposite side of the room area
Once you finally reach the other side of the room, use the techniques mentioned above to measure and scribe any boards that need cutting in.
If any of the floorboards need compressing together to fully engage the joints, at this point you won’t be able to use floor tensioners or knock them together as there won’t be any space to do this.
Instead, use any offcuts you have lying around to pack out the gap up to the wall and then use a crow bar to lever off of the wall to push the joints together. Once all joints fully squeezed up, fill the expansion gap with cork strips.
In tight spaces you can use a crow bar to squeeze teh joinst together
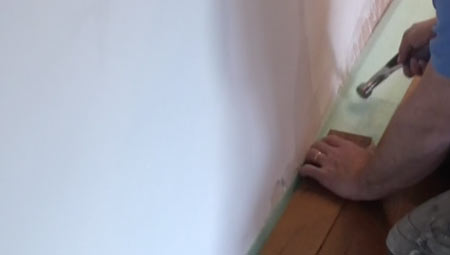
Step 8 – Fit Skirting and Quadrant
With your engineered flooring now all fully laid and in place and all expansion gaps filled with cork strips the final job is to now fit any skirting boards.
Simply cut the skirting to the desired length and mitre each corner joint where it meets the next run of skirting. For more information on how to measure, mark and cut accurate angles see our project here.
Where your flooring butts up to a door threshold you won’t be able to fit any skirting as there just isn’t the space to do so. Instead you will need to use some flooring quadrant to cover the expansion gap.

Where skirting is too deep to use, timber quadrant can be used in its place
As with the skirting, this is simply cut to length and scribed at either end to fit if needed. When fixing flooring quadrant in place, ensure you fix it to the door frame or surface behind it and not the floor so that the floor can expand and contract below it without leaving a gap as it does so.
With any and all skirting or quadrant fitted you have now completed laying your engineered wood flooring, now stand back and admire your handy work, good job!
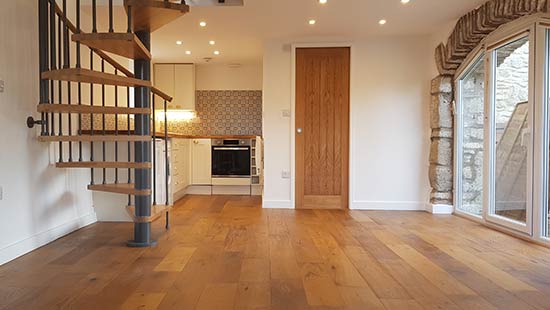
Engineered wood floor laying completed and job finished!
How Durable is Engineered Wood Flooring?
Engineered wood flooring is fairly durable, but the laminated “real wood” top layer can sometimes detach itself from its plywood base or chip, crack and scratch if put under increased stresses. However, solid wood flooring is more resistant to these issues but isn’t as resistant to water and moisture as engineered wood flooring.
This does bring us on to another common question that gets asked; Is engineered hardwood flooring waterproof? Although it’s not totally waterproof, as mentioned, it does have fairly decent water resistant and heat resistant properties due to its layered plywood construction.