Ground Floor – Hollow or Timber Floor
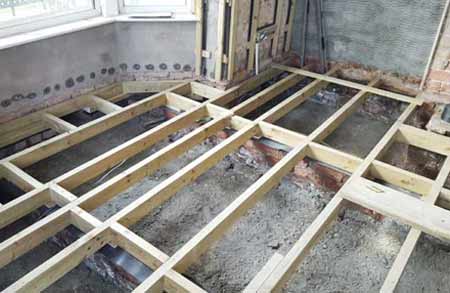
Hollow floors, also known as suspended or timber floors, are simply timber joists suspended across and supported by load bearing walls under the floor. The ends of these timber joists are built into, or suspended by joist hangers from the external walls of the property.
There are suspended concrete floors but we do not cover these here as they are more typically used in new build projects as they tend not to be economical under around 50m2. Here we are going to focus on floating timber floors (all these terms are interchangeable).
The internal load bearing walls are called sleeper walls and are very often built with gaps in between the bricks to allow a free flow of air under the floor. This stops any build up of condensation and is assisted by building in airbricks through the external walls. More can be seen about air bricks and under-floor ventilation in this project here.
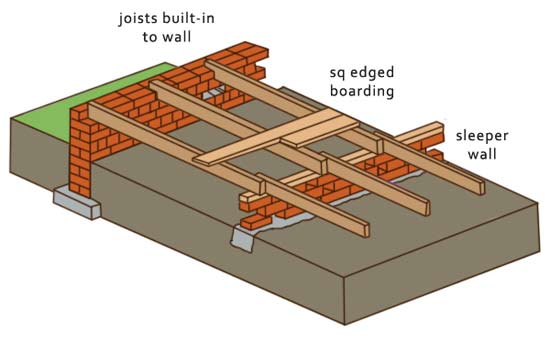
A suspended timber floor on sleeper walls – Image courtesy of retrofitproject.co.uk
Sleeper walls are built on small foundations and hold up the joists at regular intervals; the distance between them is referred to as the span. The width of these spans depends on the size of the timber used for the floor joists and more can be seen about joist spans in our loadbearing walls project.
How to Construct a Suspended Timber Floor
As we described above the construction is relatively simple to understand, which is why this type of floor construction is so popular.
How a Suspended Timber Floor is Constructed
There are three key things that need to be considered when constructing or renovating a timber floor:
- The span: It is possible to create a suspended floor of any size using sleeper walls to bridge the span. The span that can be achieved is determined by the size of the timber joist used. There are published tables that tell you how far a particular timber size can span – See our project with the table from the Building Regulations here.
- Laying the Joists: Using timber joists means that they are going to be susceptible to damp and rot if not laid properly. The joist ends for new flooring joists should be laid on galvanised joist hangers, rather than embedded in walls. We explain how to use joist hangers properly here. Where the joist rests on a wall, such as a sleeper wall, there must be a damp proof course between the wall and the timber.
- Ventilation: Ventilation beneath a hollow timber floor is really important as if any moisture that collects cannot be ventilated away can cause rot. Airbricks need to be fitted on external walls and ventilation through the sleeper walls is required, whether using airbricks or half brick gaps in the wall construction.
We cover the building regulations for timber floors below in greater detail.
It is important that weeds are not allowed to grow under the floor. To stop this happening the regulations stipulate that there should be a layer of concrete poured over the ground.
Sleeper Walls for Suspended Timber Floors
The purpose of the sleeper wall is to allow the use of smaller (thinner) timbers for the joists and to ensure that the joists for the suspended floor can span the required distance without the risk of failure. If it is not possible to use a sleeper wall, then the joists need to be suspended from the outside walls of the room.
The sleeper wall should be built on small strip foundations to transfer the load effectively to the ground. For more details on building strip foundations see our project here.
If the gap below the joists is less that 150mm (6 inches) then sleeper walls should not be used as they will reduce ventilation. If the gap is over 1 1/2 feet or 450mm then it is not recommended to use a sleeper wall either.
The wall must have air bricks to allow ventilation, or should have air gaps such as created by using a honeycomb bond.
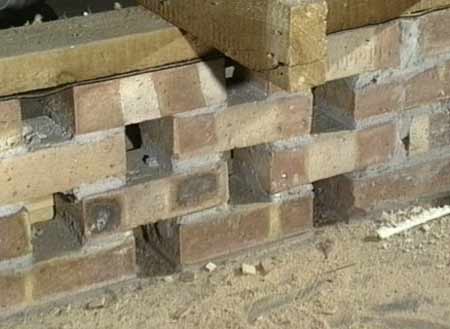
Honeycomb bond used for a sleeper wall – Image courtesy of Northumbria University
As we have mentioned, ventilation is very important, however in older properties the required air bricks are sometimes not present so these will need to be fitted retrospectively.
Building Regs for Suspended Timber Floors
The following is a summary of the regulations that apply to suspended floors. You should read the full regulations which you can find here. If you are in any doubt your local Building Control department will be able to advise you.
- Weed prevention under the floor – concrete must be poured on the ground below a suspended floor
- Ventilation – air bricks are required to provide ventilation from outside to under the hollow floor. Air gaps are required between sleeper walls. If the space under a floor joists is below 150mm then sleeper walls must not be used
- Span – The timber specific to the spacing and span that the joist needs to cover is determined in this floor joist spans table. Note that specific calculations are likely to be required for openings through the floor, such as staircases, although in practice this is often a doubling up of joists
- Damp proofing – Where the timber meets the walls a damp proof course must be used. Joist hangers should be used where the joist meets the wall, rather than embed the joist into the wall
- Insulation – a minimum U value of 0.11W/m2K for new build and 0.25W/m2K for refurbishments should be use under a suspended floor
In some areas, a gas membrane might be required to stop gases, such as radon, entering the living space and ventilation required to stop it colleting.
For more information on the building regulations for floors please see the planning portal or speak to your local building control officer.
Pros and Cons for Choosing Suspended Timber Floors
The big benefit for choosing a suspended floor (whether concrete or timber) is that the construction is simple. The materials can be more expensive than other flooring options, but there is very little needed in the way of ground preparation which makes the overall cost lower on the whole, particularly for the labour involved.
Suspended floors are the norm for first floors (and above), but are also excellent for creating a level ground floor over uneven ground.
Alongside being cheap and easy to construct, timber floors benefit from being able to be adapted on site if need. Being timber they are also relatively sustainable (if you ensure you’re using sustainably grown timber).
There are many problems associated with hollow or timber floors, not least that they can be very drafty with air sometimes whistling up through the gaps between floor boards.
This can be overcome these days by installing draught excluders between the floorboards. Have a look at our project on filling gaps in floorboards.
This problem is very much alleviated by using tongue and grooved floorboards.
Since 1990, when a modern timber floor is constructed, insulation is required by the Building Regulations. This insulation is placed between the floor joists.
If the insulation is soft insulation it can be suspended on netting fixed between the joists whereas rigid insulation can be sat on battens nailed to the side of the joists.
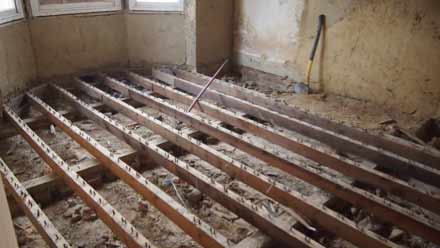
A suspended timber floor with the flooring lifted to expose the sleeper walls – Image courtesy of myretrofit.blogspot.com
Suspended, hollow or timber floors also have a tendency to creak as the nails work loose over time. The answer to this problem can also be found in our project about stopping creaking floors and stairs.
Creak is also caused by the joists twisting and warping over time. This further loosens the nails and disrupts the floor boards, however this can be reduced with the use of struts, such as the herringbone joist struts seen below:
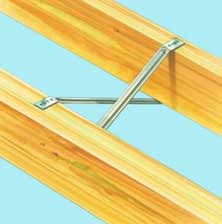
Herringbone Joist Struts to reduce the twisting of timber floor joists
Finally, timber joists can become weakened by excessive or ill-advised notching. We have a joist notch calculator here to make calculating where you can notch easier.
Enhanced Options for Suspended Timber Floors
One of the problems that timber joists have is that they have a limited span and can be prone to twisting and warping (causing the creaking described above). And technology has come to the rescue!
There are a number of enhanced options to replace simple timber floor joists.
I-Joists
These are engineered wooden joists which have been designed to be much stronger for their size and weight so that they can span greater distances. They use the concept of an iron girder or RSJ but in timber, with two flange parts connected by a web part to create an “I” in cross section, hence the name.
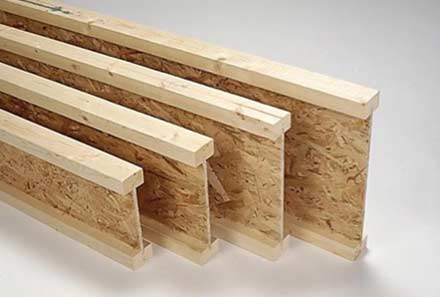
I-Joist are stronger than conventional timber joists
They can be trickier to fit that a conventional joist, but are much lighter (for the added strength) which actually means that they tend to be quicker to fit. They are less affected by shrinking, twisting and warping, however they are more expensive (about double), and are not nearly as resistant to fire as standard timber joists.
Open Metal Web Joists
Rather than having an engineered chipboard web between the two flanges, this type of joist have lightweight metal struts.
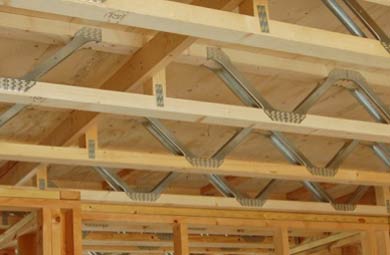
Open metal web joists
Open Metal Web Joists are even stronger, lighter and therefore a little more expensive than I-joists. They can span further and are much easier to handle, although generally need to be measured to fit. The big spaces in the web means that it is very easy to run the services through – no more notching!
Hopefully this project will have given you the confidence to go and build your own suspended timber floor, within the Building Regulations. Knowing the pros and cons of this approach to timber flooring helps and with an understanding of the options that technology has made available so you can choose and build the right hollow floor for your home.